
NeQter Labs User Manual
Table of Contents
Vulnerability Scanner
The Vulnerability Scanner is where you are able to find vulnerabilities in your network as well as set up the parameters to define what vulnerabilities are and are not as well as define which vulnerabilities are minor or severe. The Vulnerability Scanner is represented by a icon that looks like a page under a magnifying glass on the left navigation bar.
Before you can begin using the Vulnerability Scanners you will need to make sure that feed.neqterlabs.com is allowed to get feed syncs so that the scanner can stay up to date on the latest vulnerabilities. To do this make sure port 873 is open for the NeQter Unit and any associated Firewalls, Routers, etc.
NOTE: Please wait 30 minutes after adding the above whitelist before performing a vulnerability scan.
Dashboards
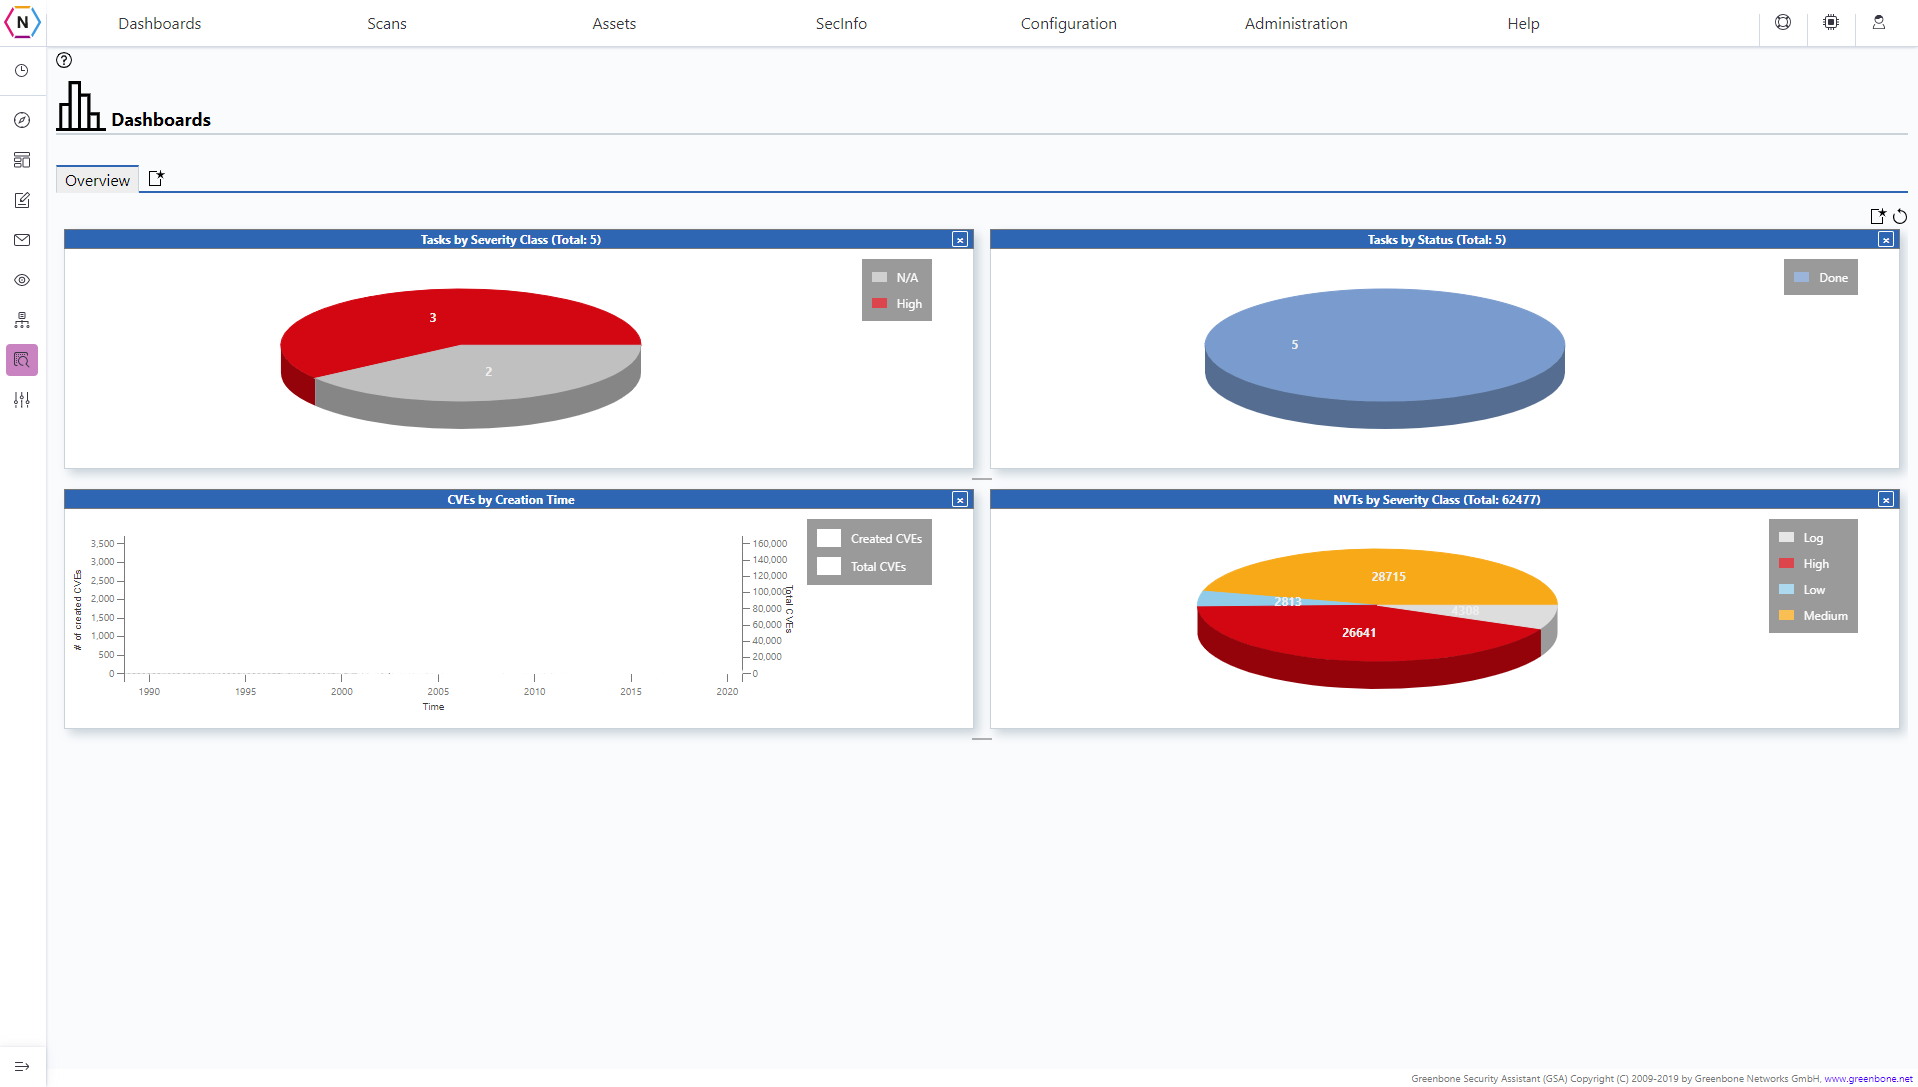
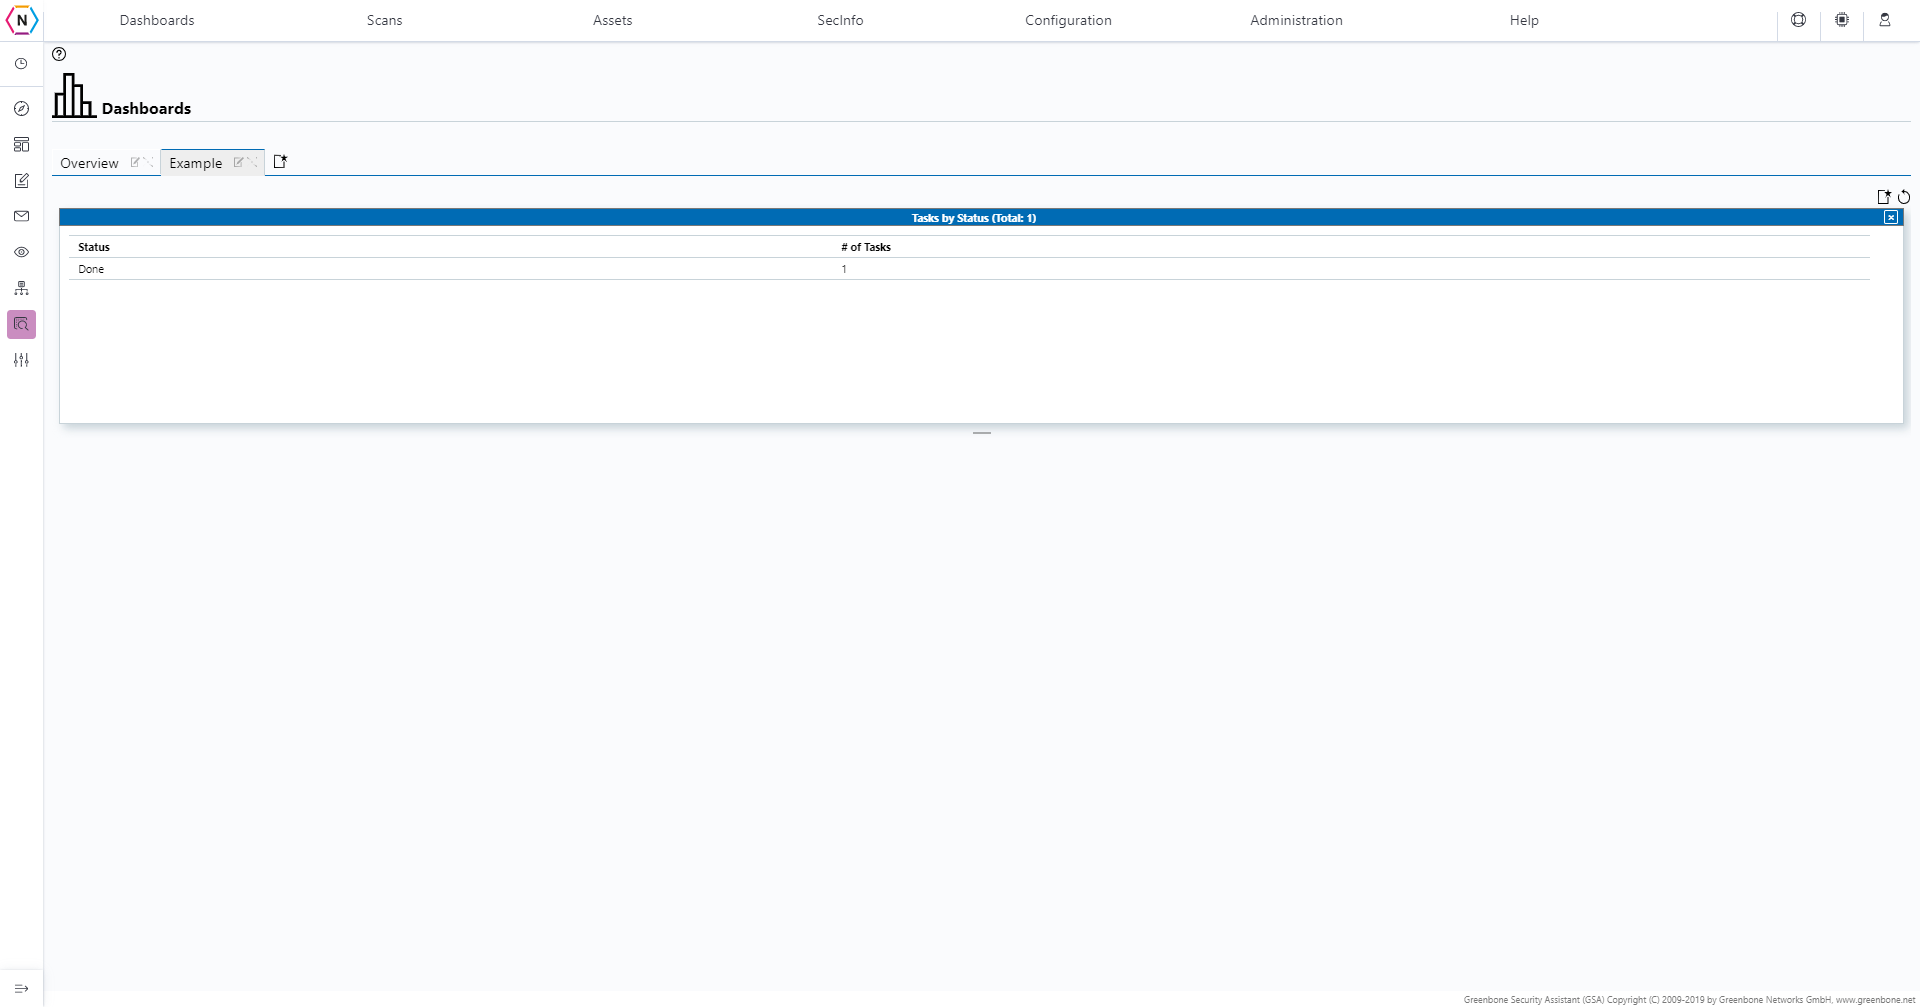
Dashboards is where you can see quick visualizations of all your scans, secinfo, assets, and other information collected by the Vulnerability Scanner. By default there will be a Overview section with the only dashboards on display being Tasks by Severity, Tasks by Status, CVEs by Creation and NVTs by Severity.
You are able to create your own dashboards and displays on this page as well instead of just using the default one made available. To create a customized dashboard you can click on the Page Icon on the top left of the dashboards page. From there you’ll be brought to a screen like this:
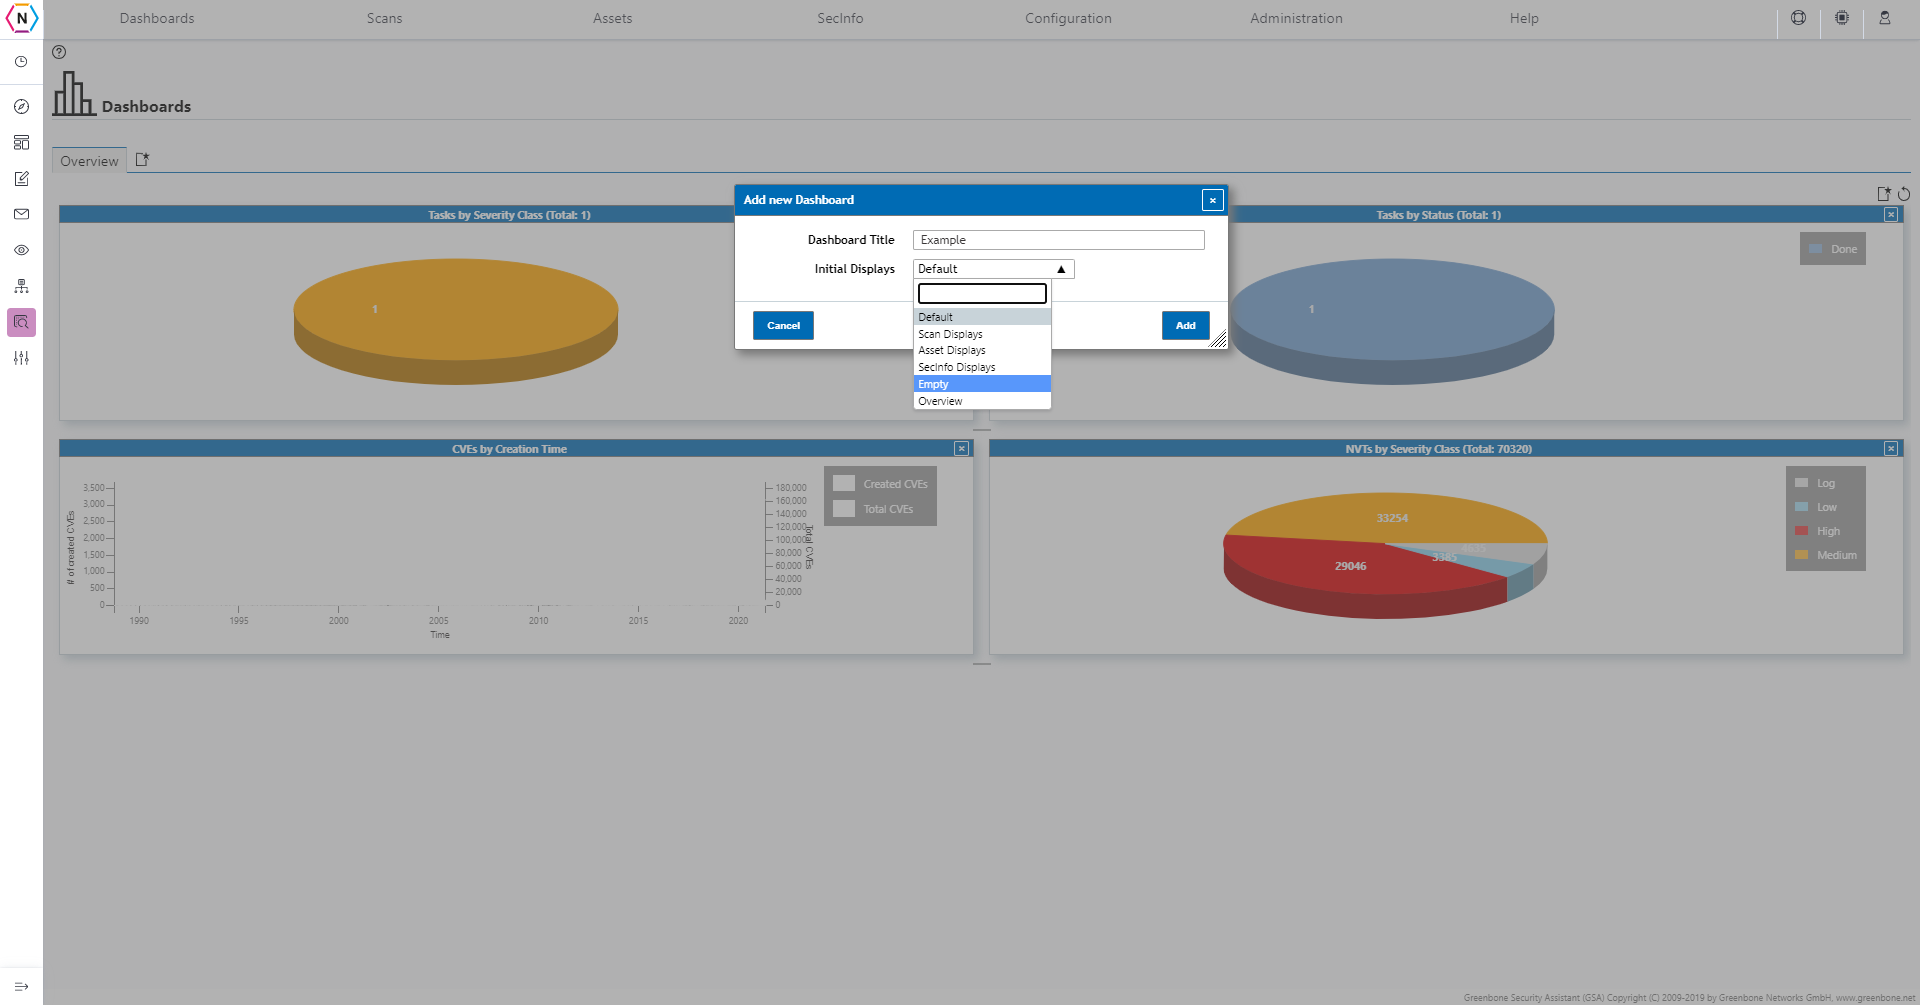
Here you are able to give your new dashboard a name as well as Initial Displays to use. The Initial Displays are simply a foundation to build off of and if you wish to start with a blank dashboard you can click empty in the initial display drop down. Once you have everything set you can click add to create your new dashboard!
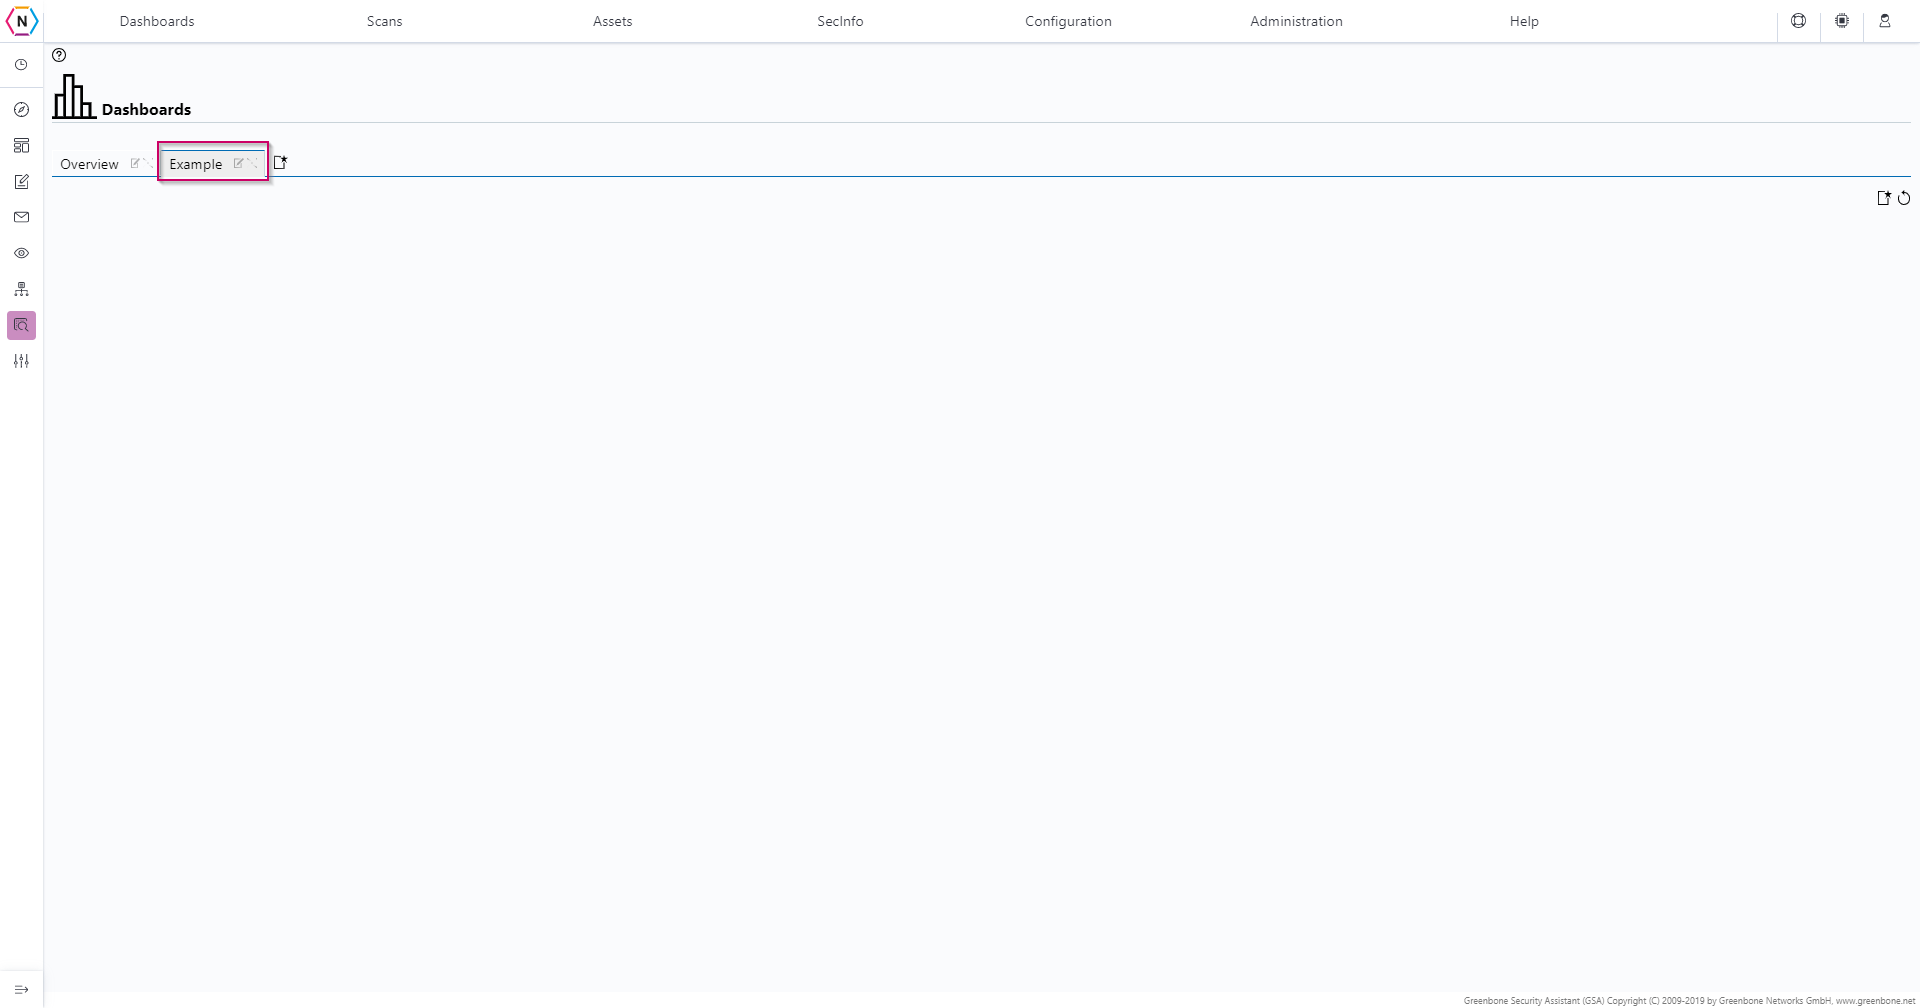
You can delete or change the names of dashboards created by clicking the edit (page with pencil icon) or delete (big ol’ X icon) buttons respectively.
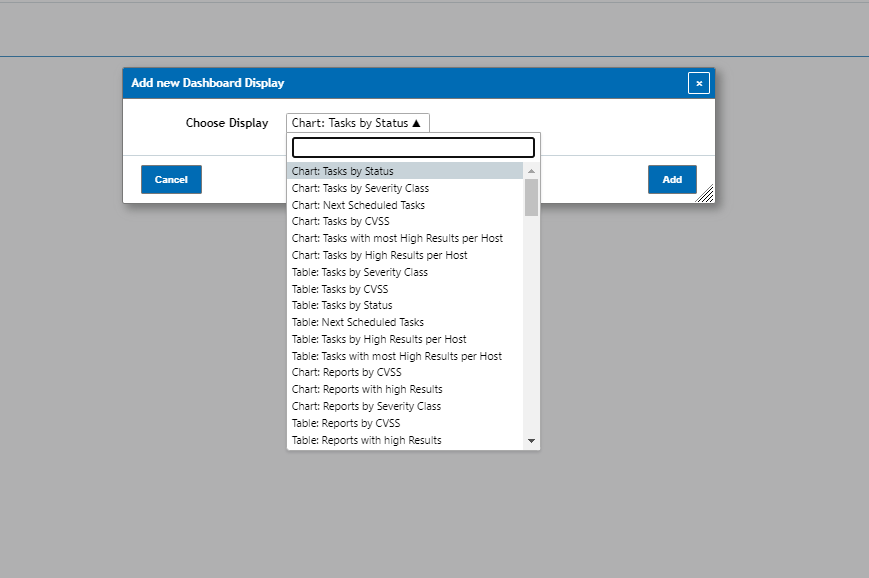
Next to add visualizations to your dashboards page you can do so by clicking on the page icon found on the top right instead. When you click on the page you’ll be asked to choose a display to use from a drop down menu:
To remove an visualization from the dashboard simply click the [x] icon on the top right of the dashboard’s window.
SecInfo
The SecInfo section is where our indices of vulnerabilities listed by curated sites can be found and is actively used for our vulnerability scanner to compare against when scanning for vulnerabilities. This section can be a helpful reference / resource to help improve security of your network against the latest security threats!
NVTs
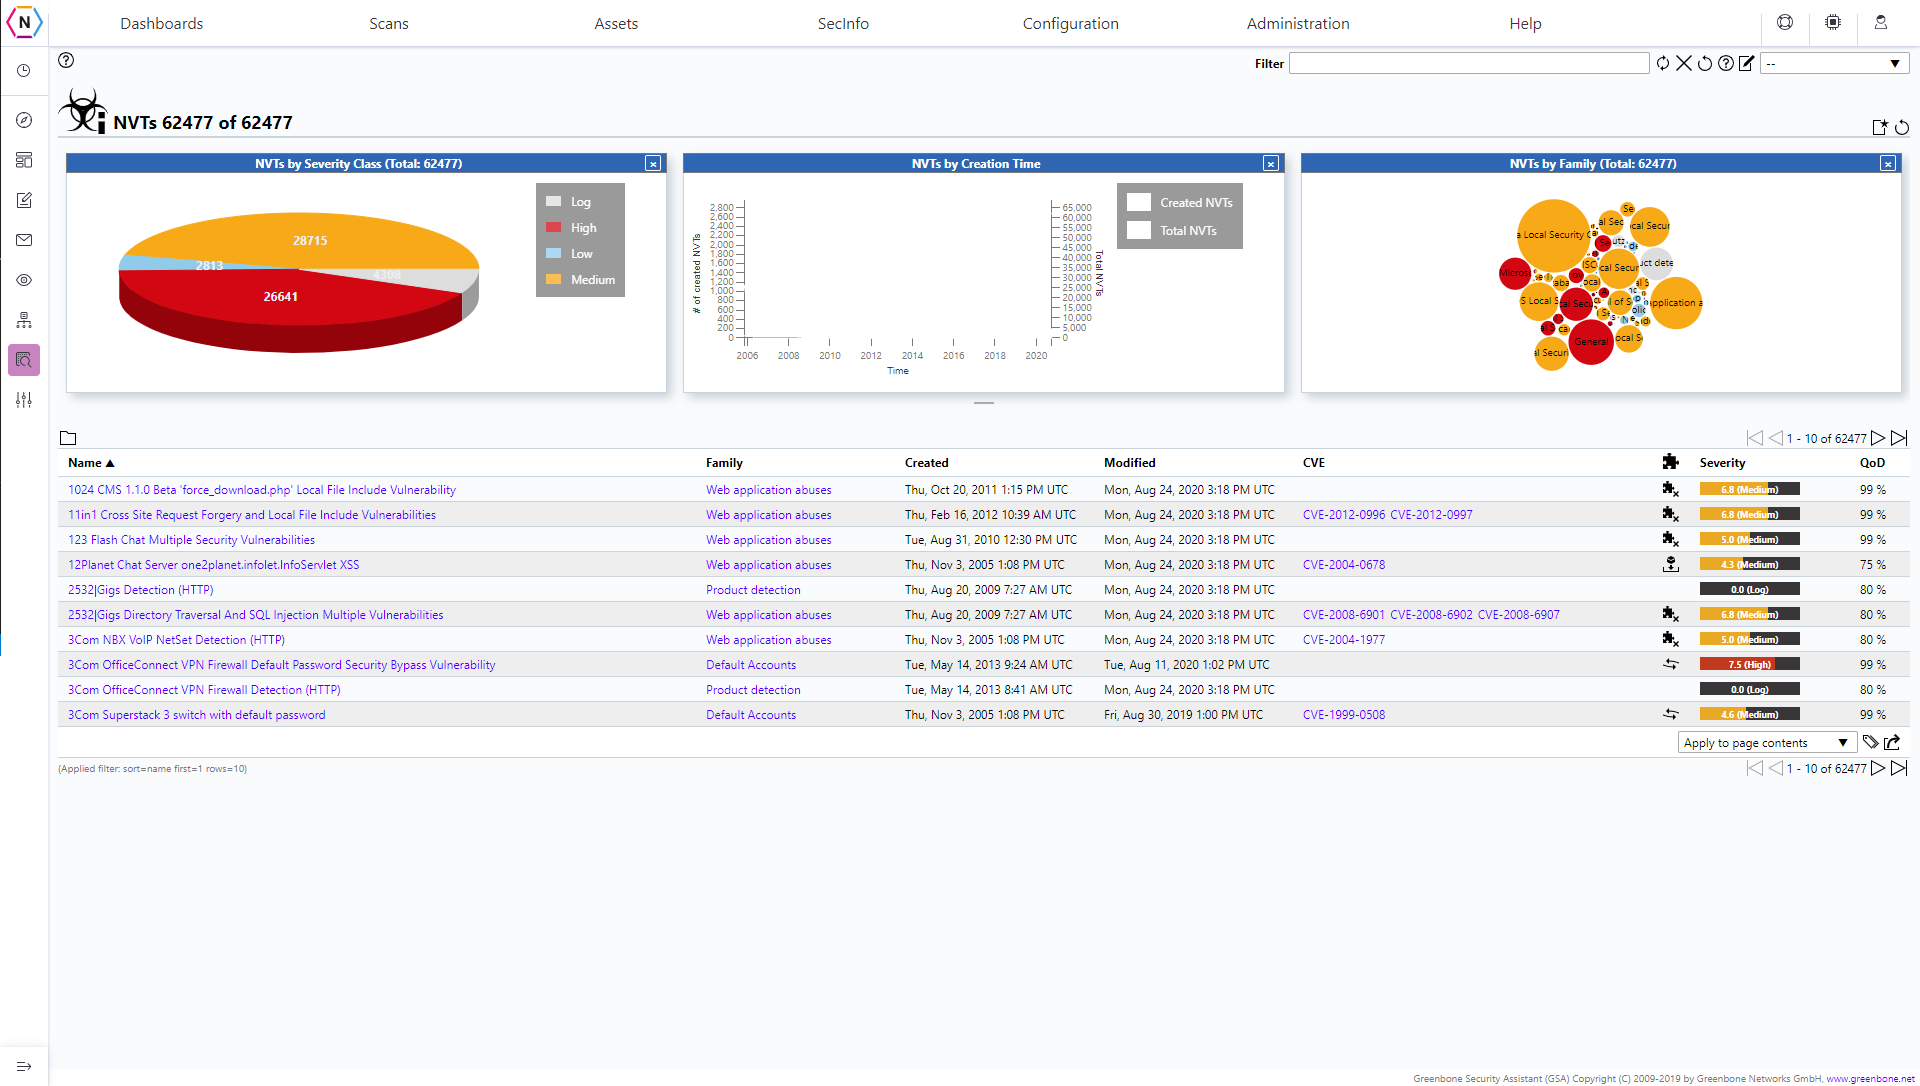
The Network Vulnerability Test (NVT) Page is an overview of Vulnerability Tests that are available for use by our Vulnerability Scanner. There are multiple different visualizations that help you sort through information as well as a list with even more information such as the Vulnerability Name, Family, when it was created, last modified and the version number, the CVE, Severity and QoD (Quality of Detection)
CVEs
The Common Vulnerabilities and Exposures (CVE) page is an overview of publicly known security vulnerabilities and exposures related to them. There are multiple different charts and graphs to help give a better picture as well as an index of CVEs with information such as their name, vector, complexity, authentication, Impact on Confidentiality & Integrity & Availability, when it was published and its Severity Score.
CPEs
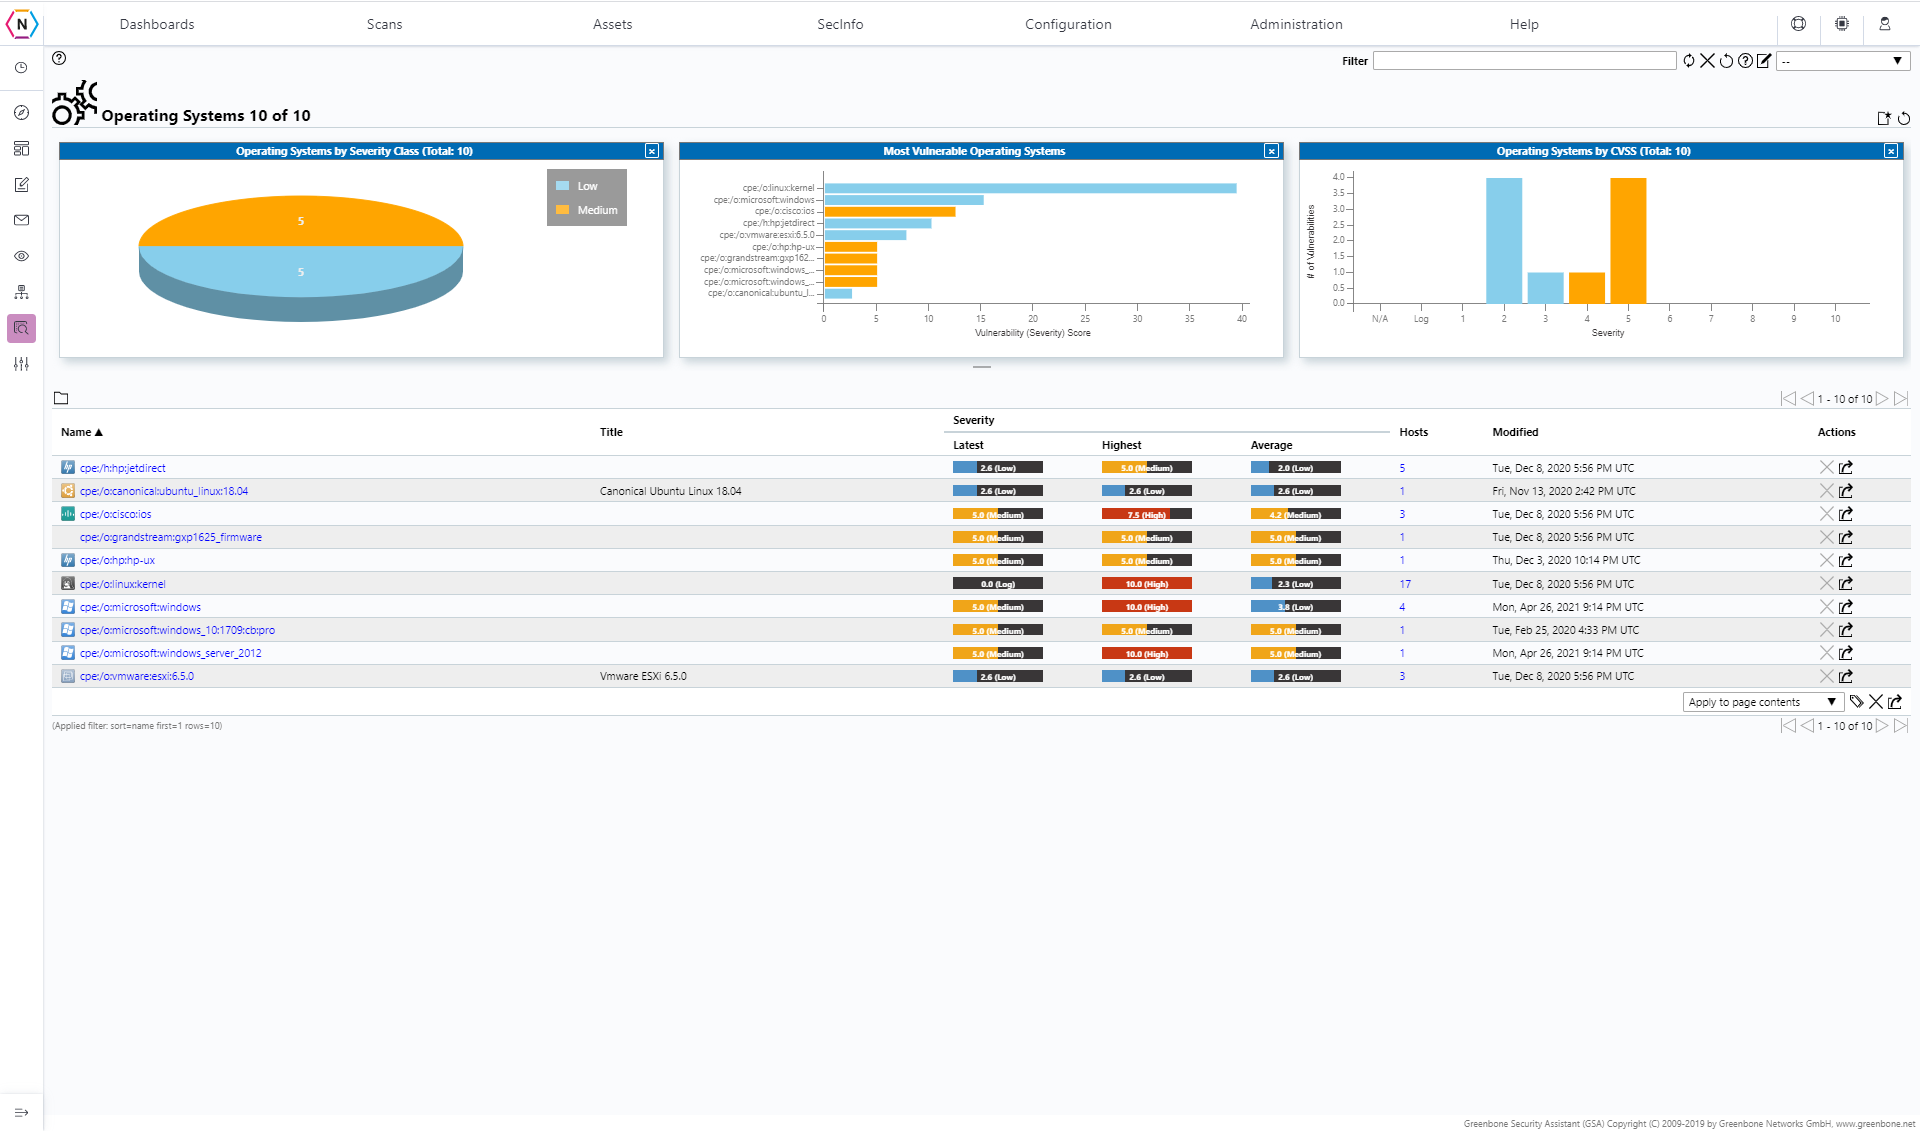
The Common Platform Enumeration (CPE) Tab is a general overview of CPEs that can be used for reference. Similar to CVEs and NVTs it has charts, graphs and finally an index to help you. You can find information about each CPE’s Name, Title, Last time it was Modified, Number of CVEs under each CPE and its Severity.
Oval Definitions
The Open Vulnerability Definition Page is an overview of OVALs. Information on OVALs include their name, version #, Status, Class, date of creation and last modification date, CVEs and Severity Class.
CERT-Bund & DFN-CERT Advisories
The CERT-BUND and DFN-CERT Advisories pages is an compilation of vulnerabilities and recommendations created by CERT-Bund and DFN-CERT respectively. From here you can see a general overview of CERT-Bund and DFN-CERT Advisories with an index of all the advisories on the bottom of the page.
All SecInfo
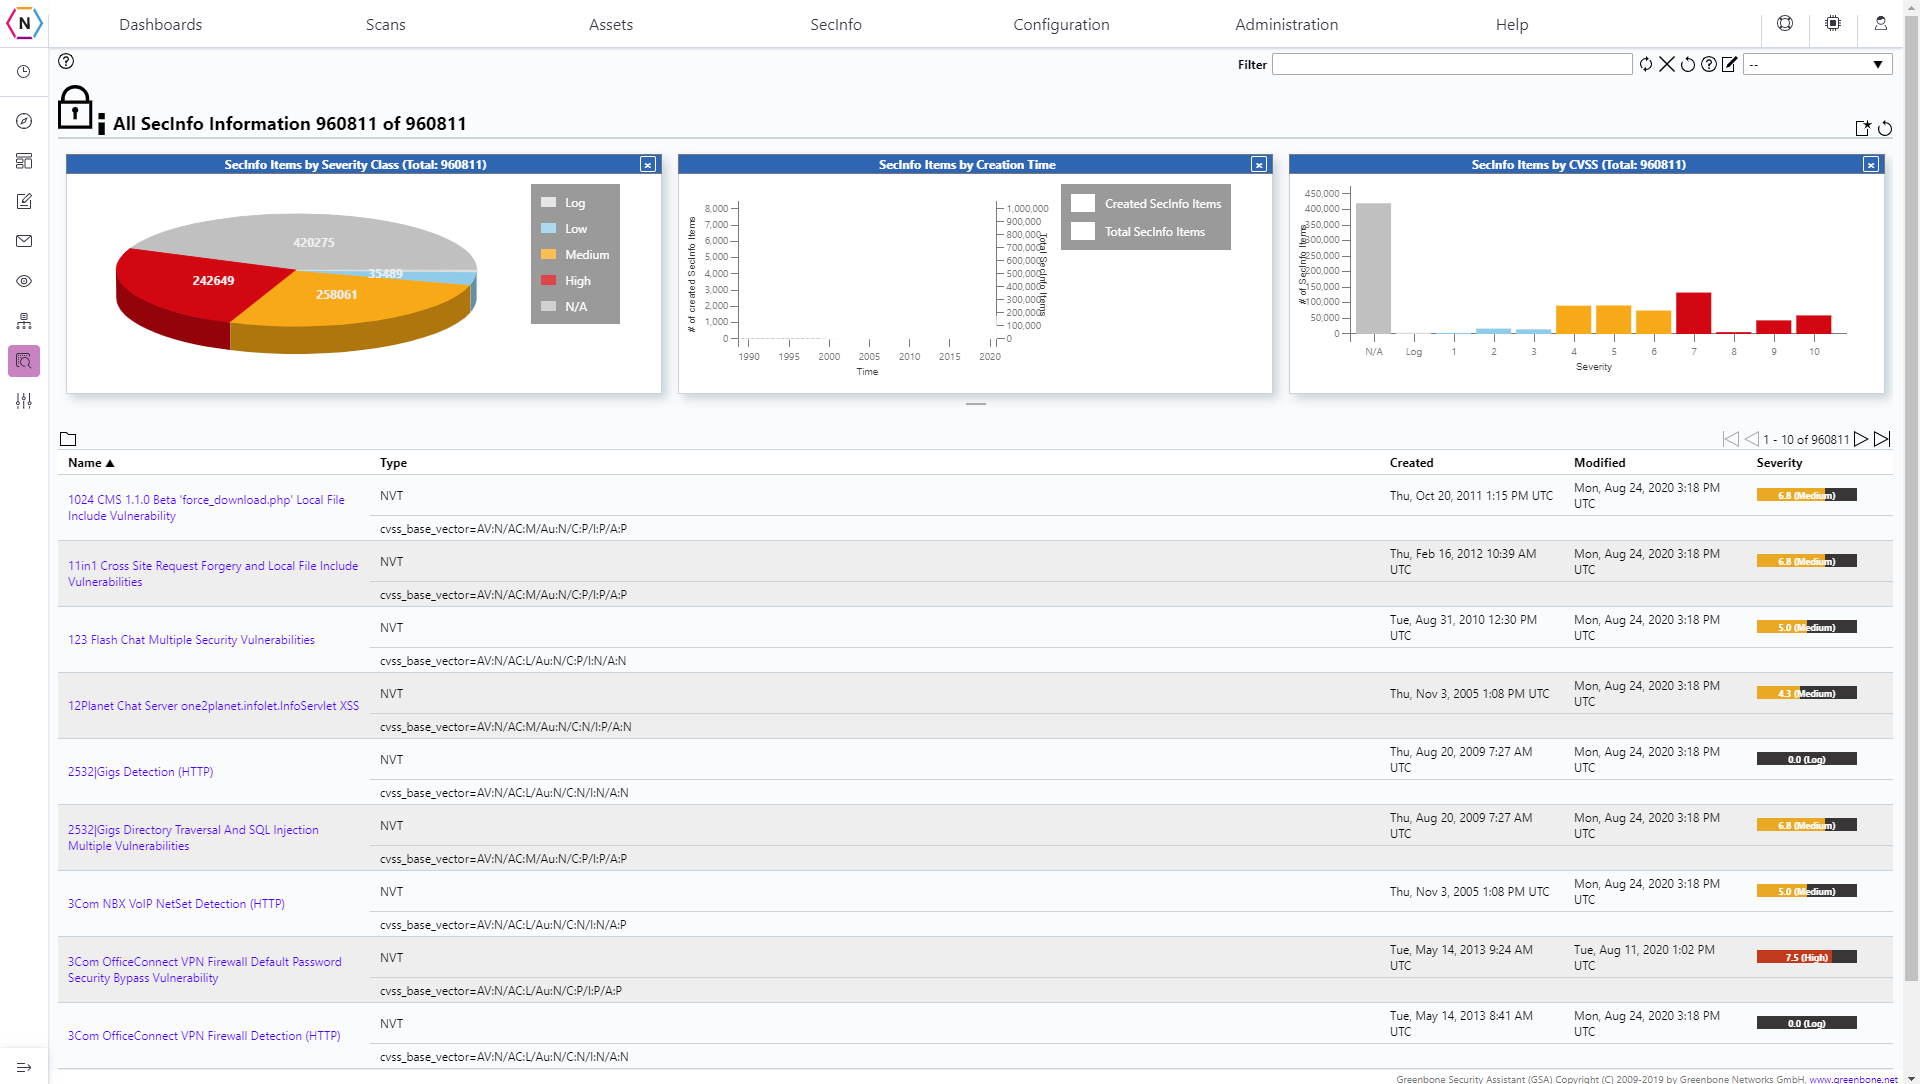
The All SecInfo tab provides an overview of all the information of the previous SecInfo Pages and attempts to summarize the essentials aspects of each one for better digestion.
Targets, Ports & Credentials
Before creating a vulnerability Scan Task you’ll need to make sure your Targets, the ports you’d like to have your discovery scan check and if applicable the credentials you’d like your scan to utilize.
Targets
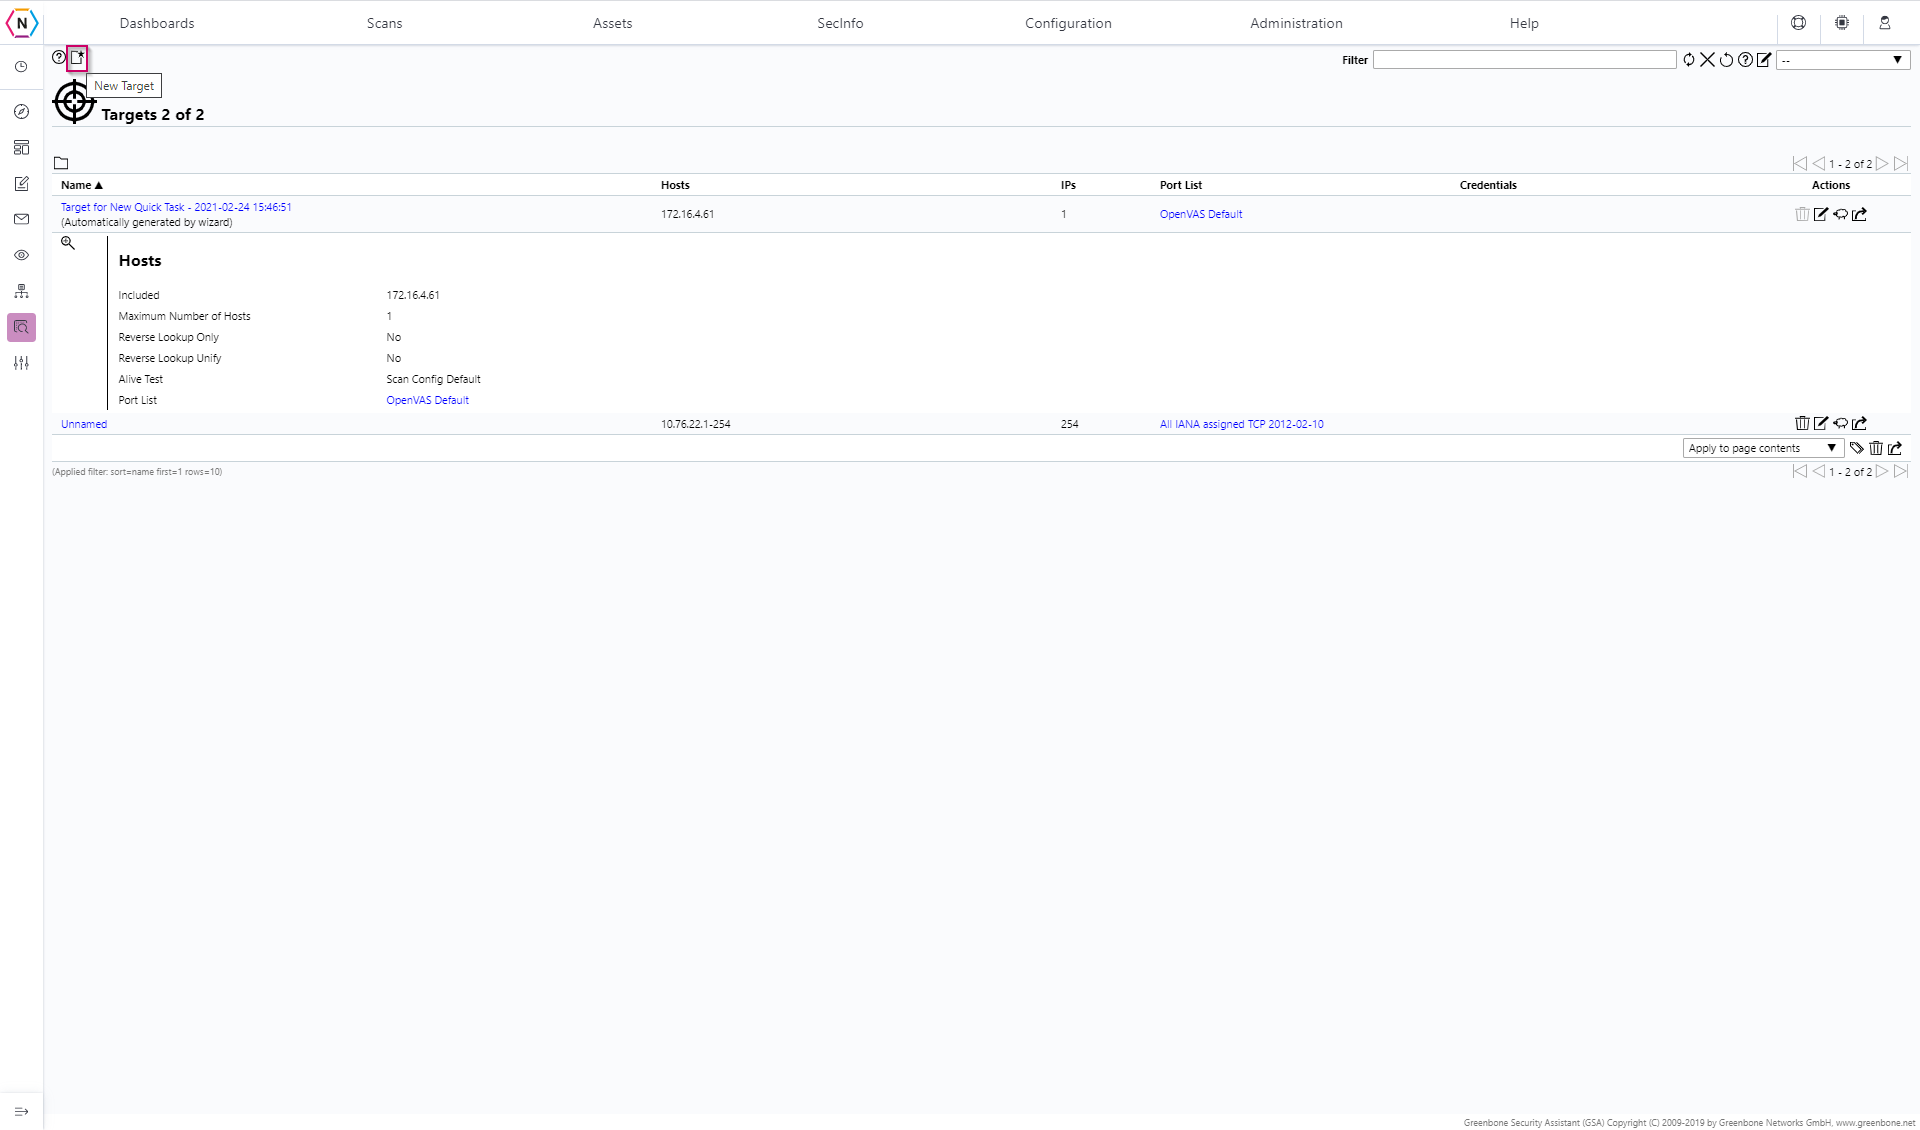
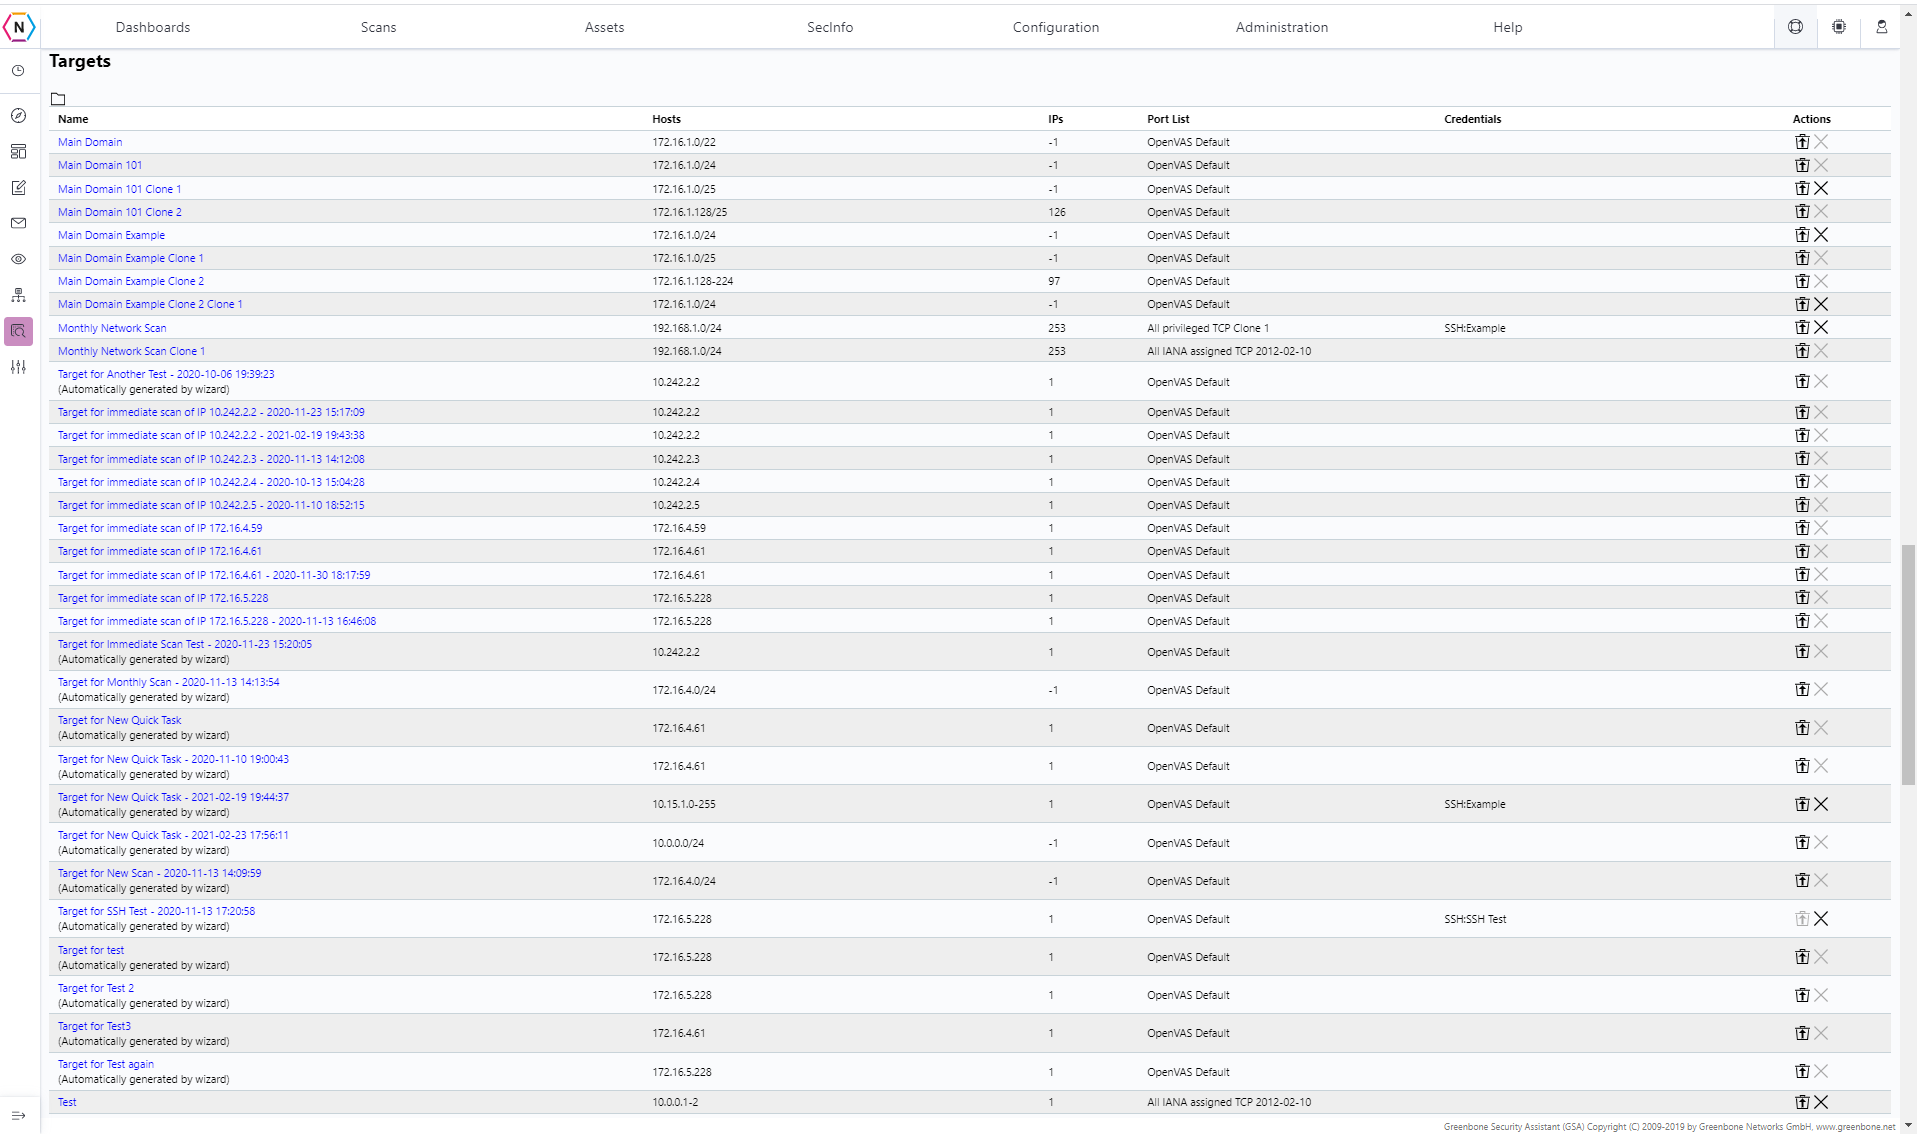
The Targets page found under the Configuration drop down menu is where you are able to configure scan targets. What Scan Targets are is the list of devices you’d like to have scanned. For example if you were to create a target with 192.168.20.0/24 for the target then all devices of the 192.168.20.0 network (.0 to .255 due to the /24) would be scanned by the vulnerability scanner if a scan was to use the target.
To create a new target click on the New Target button found on the top left of the Targets page (Looks like a Page with a star next to it).
Starting from the top you have the following options you can configure:
Name: Where you are able to put in the name of your target, we recommend naming it something that will give you or anyone else who might use the vulnerability scanner a idea of what is being scanned.
Comment: A short description of your scan, while not needed for the scan can be useful if you’d like to put in more info.
Hosts: Where you are able to add hosts for your target to use. Hosts can either be put in individually (192.168.2.1 for example), in a range (192.168.2.1-64 is a range that is accepted) or as a network with CIDR Notation (192.168.2.0/24 is a network).

NOTE: If using a IP Address range, make sure there is no space in between the two ends (192.168.2.1-64 not 192.168.2.1 - 64)
You can also able to add different IP Addresses that may not be together necessarily in order to grab a whole host of a different IP Ranges by putting a comma (,) in between different hosts. For example in the above image it shows a IP Range of 192.168.2.1-64 and the network address of 192.168.3.0/24 together.
Exclude Hosts: Same as hosts but instead it excludes a list of hosts from the targets, especially useful if you need some hosts in a Range or Network not to be scanned such as any ip address between 192.168.2.1-10 in the 192.168.2.0/24 network for example:
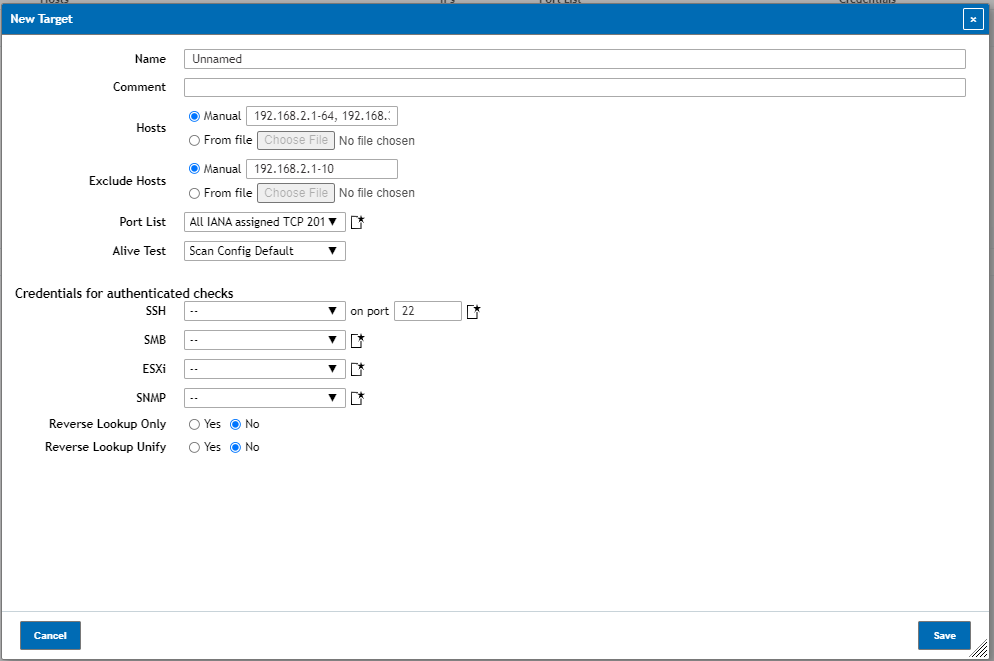
Port Lists: This is where you can select which ports you’d like to use to test for connections when doing an alive test. These can be configured in the Port List page.
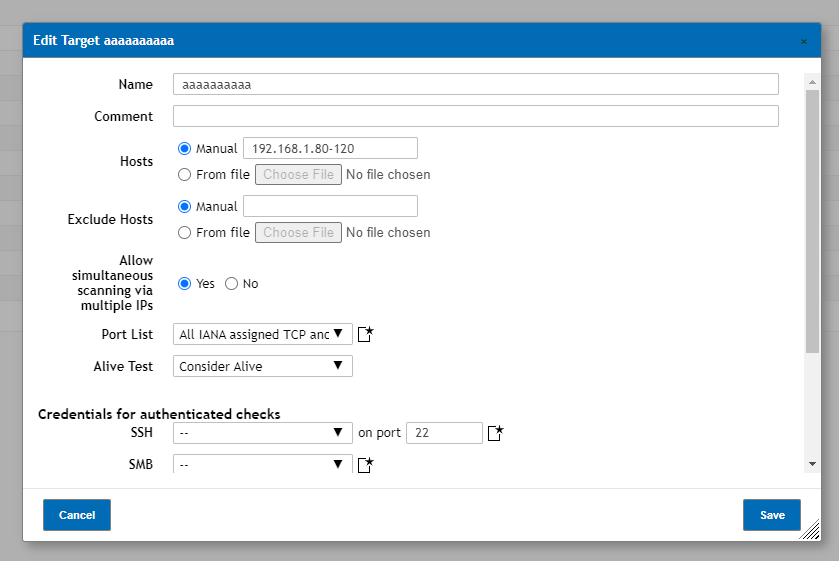
Alive Test: This is where you can select what kind of Alive Test you’d like to use for the initial discovery part of your Vulnerability Scan. The Default Scan Config should work fine for the majority of users but you are able to change the type configuration from here if need be.
NOTICE: For scanning all IPs within a target range regardless of whether a device is found to be present via initial discover scanning users can use the alive test “Consider Alive” to scan all ips within a range even if no hosts were found to be present. This is especially useful for networks that are locked down very tightly as majority of discover scans utilize ARP, Ping, TCP-ACk etc to find devices, which is not uncommon to be not allowed internally.
Credentials: Credentials is where you can set up the Vulnerability Scanner to do Authenticated checks, so instead of the scanner attempting to brute force its way into your device(s) it can use the credentials you provided instead to get into your network and scan from inside instead. Can be very useful if trying to find vulnerabilities that might not be visible from the outside easily.
Once you have your new Target setup and ready to go just click Save on the bottom right of the target window and the new Scan Target will be present on the table with the information you put in such as the IP Addresses you have being scanned and the amount of IP Addresses.
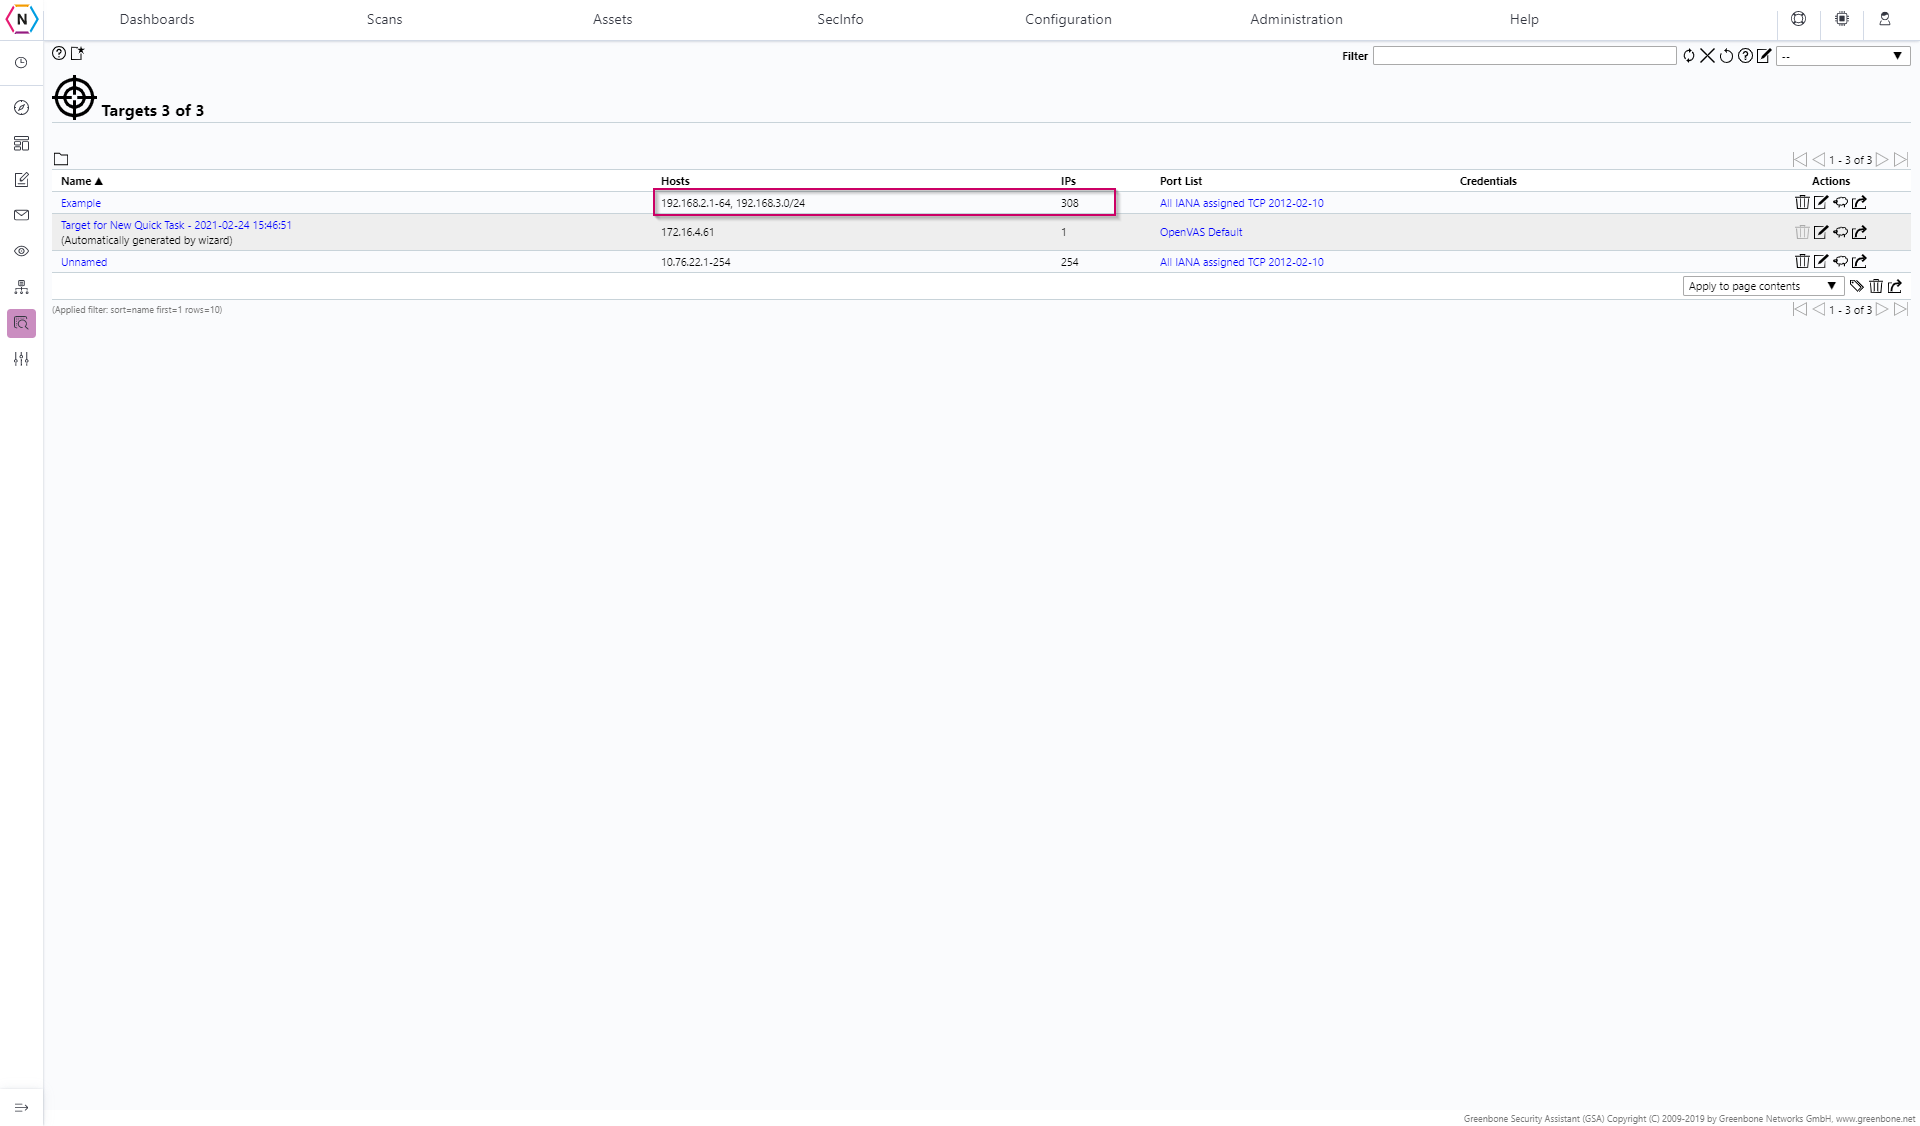
Another feature available on this page is that you can edit previously created Targets by clicking on the Page Icon located under the Action Column, this is also where you can Delete (Trashcan Icon), Duplicate (Sheep Icon) and Export (Box with arrow coming out) targets.
Port Lists
Similar to the Targets page but with Port Lists instead that can be used for Alive Tests. When editing or creating a new Port List you will be asked to give a list of TCP and UDP Ports. For example, if I wanted to see TCP Ports 1 through 5000 along side port 5044 and UDP ports 1 to 500 with port 540 as well I would input the following below:
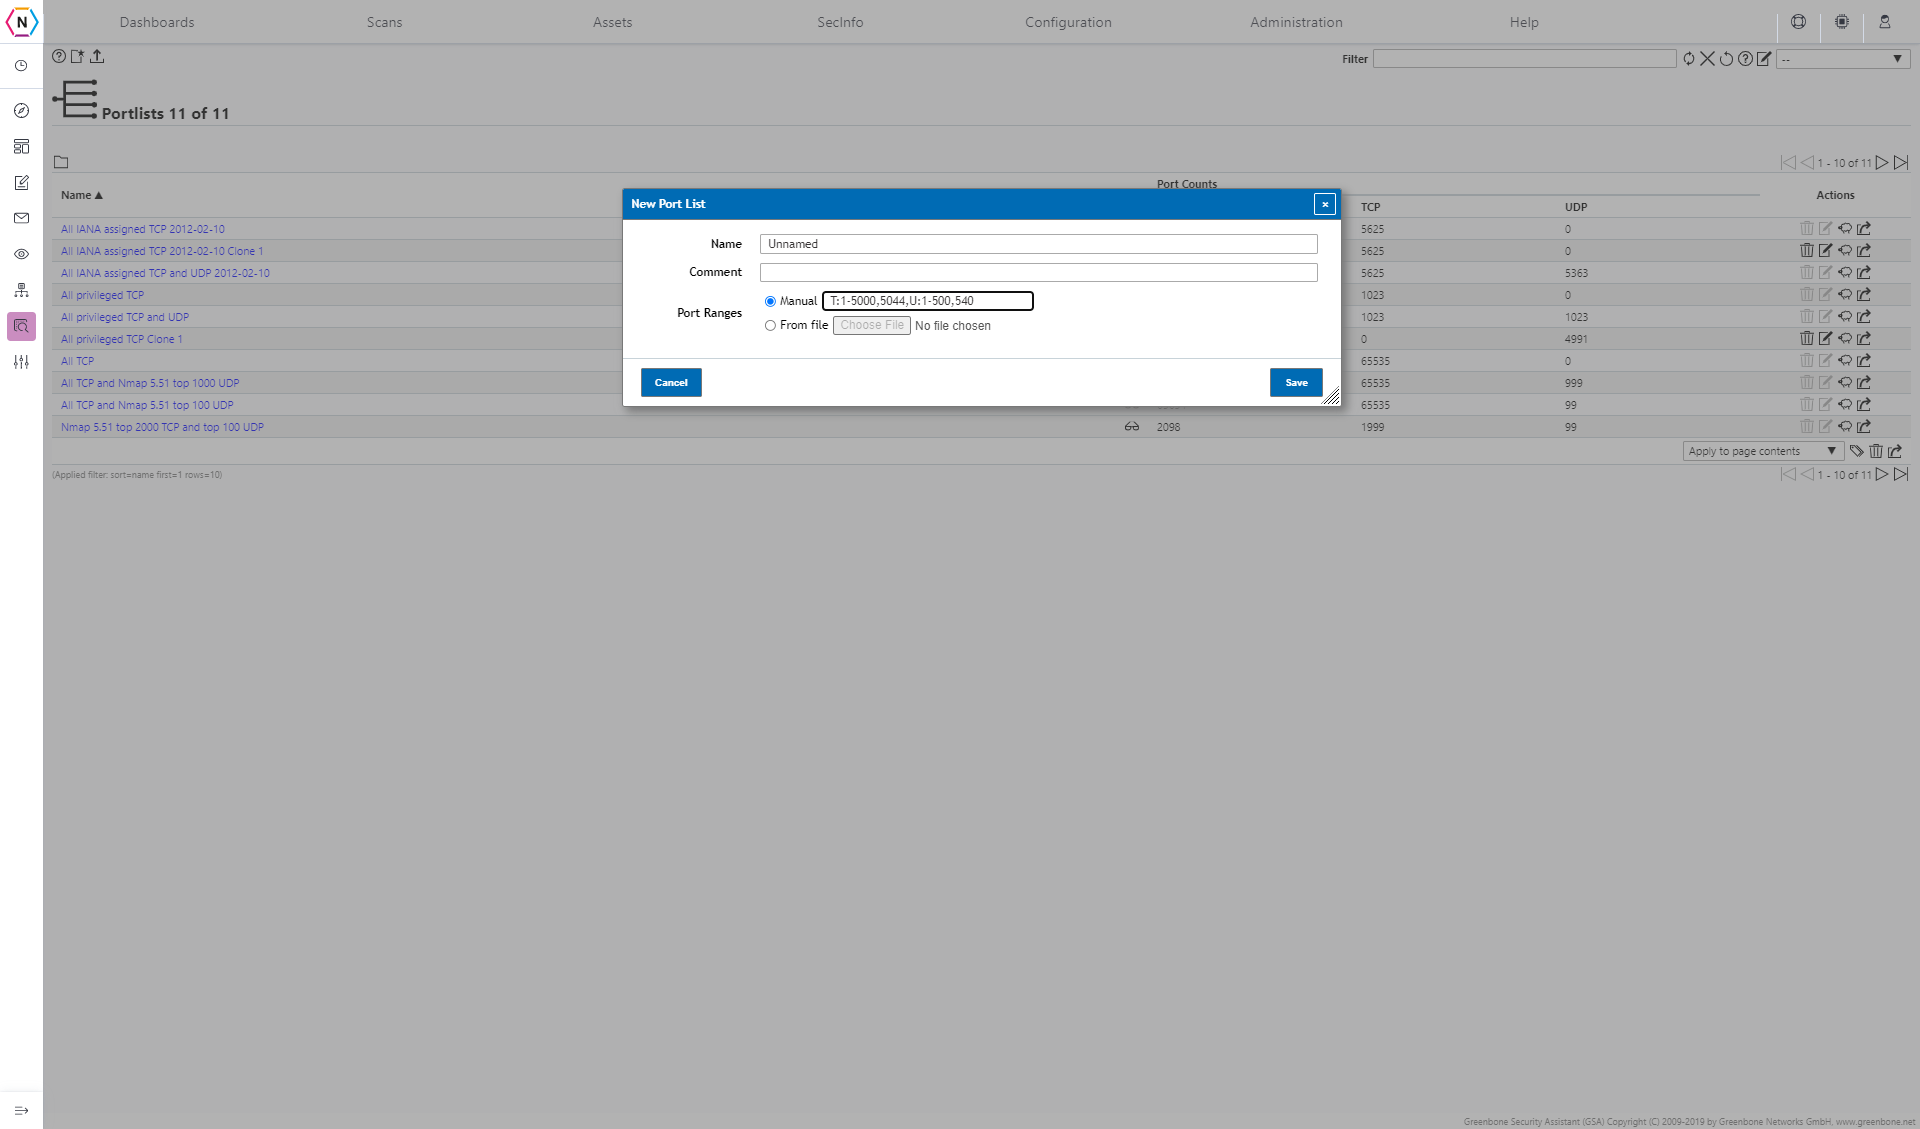
To create a Port Range, you start with T: followed with any port / port range for TCP separated by commas. Next once you have all of your TCP ports inputted put a comma at the end of your TCP Port list and then put a U: to start your UDP Port list. Once both are done click save at the bottom right.
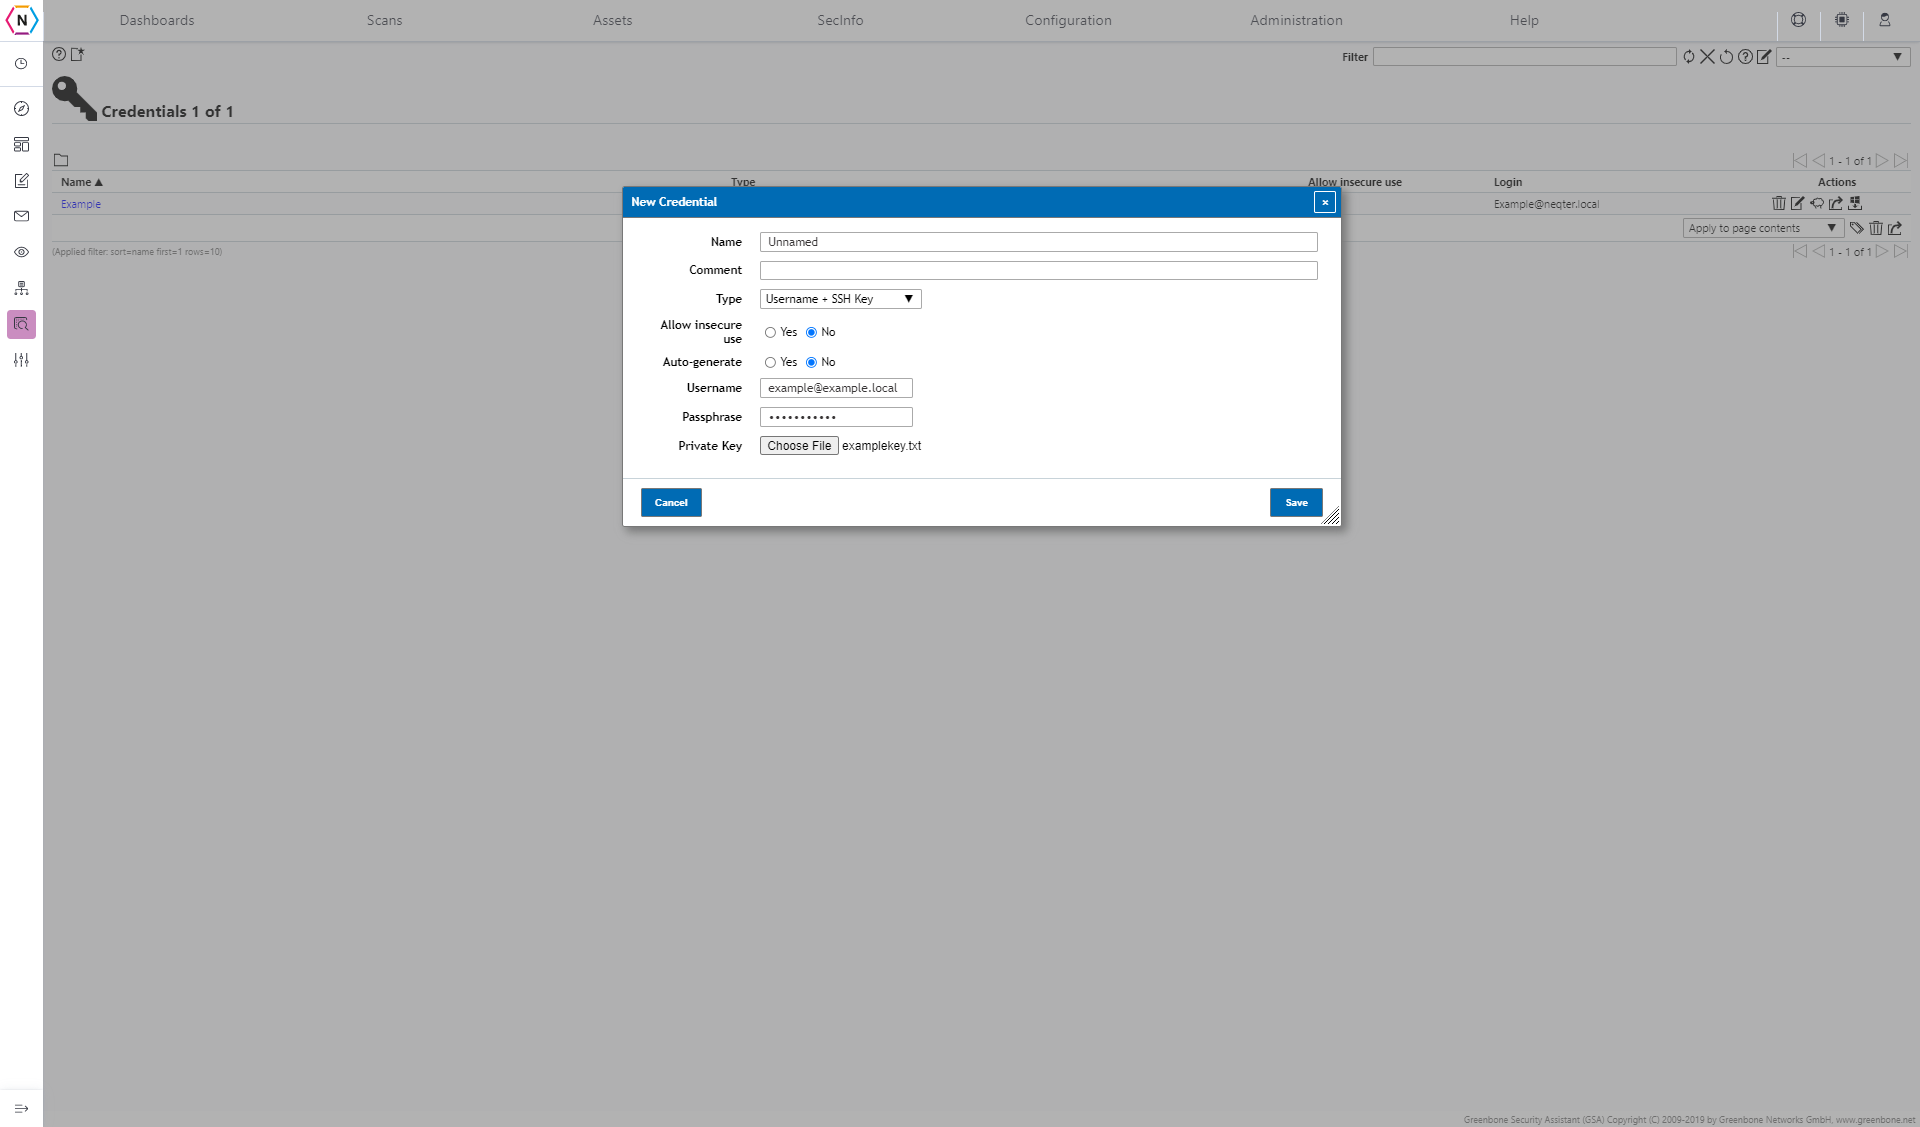
Credentials
Same with both Port Scans and Targets, you are able to edit, clone and create new Credentials from this page. When creating a new Credentials you’ll be asked to pick the Credential type and from there you will need to fill in the associated information needed. Some credentials may need keys or other types of files uploaded in order for them to work.

For example if making a SSH Key you will need a username, passphrase and Private key.
Scan Configs
The Scan Config Page is where you are able to edit and create your very own Scan Configurations using the list of Vulnerabilities found under the Sec Info Page. Like the Targets, Port Lists and Credentials pages you are able to edit, clone, delete (outside of the default scans) and create scans on this page.
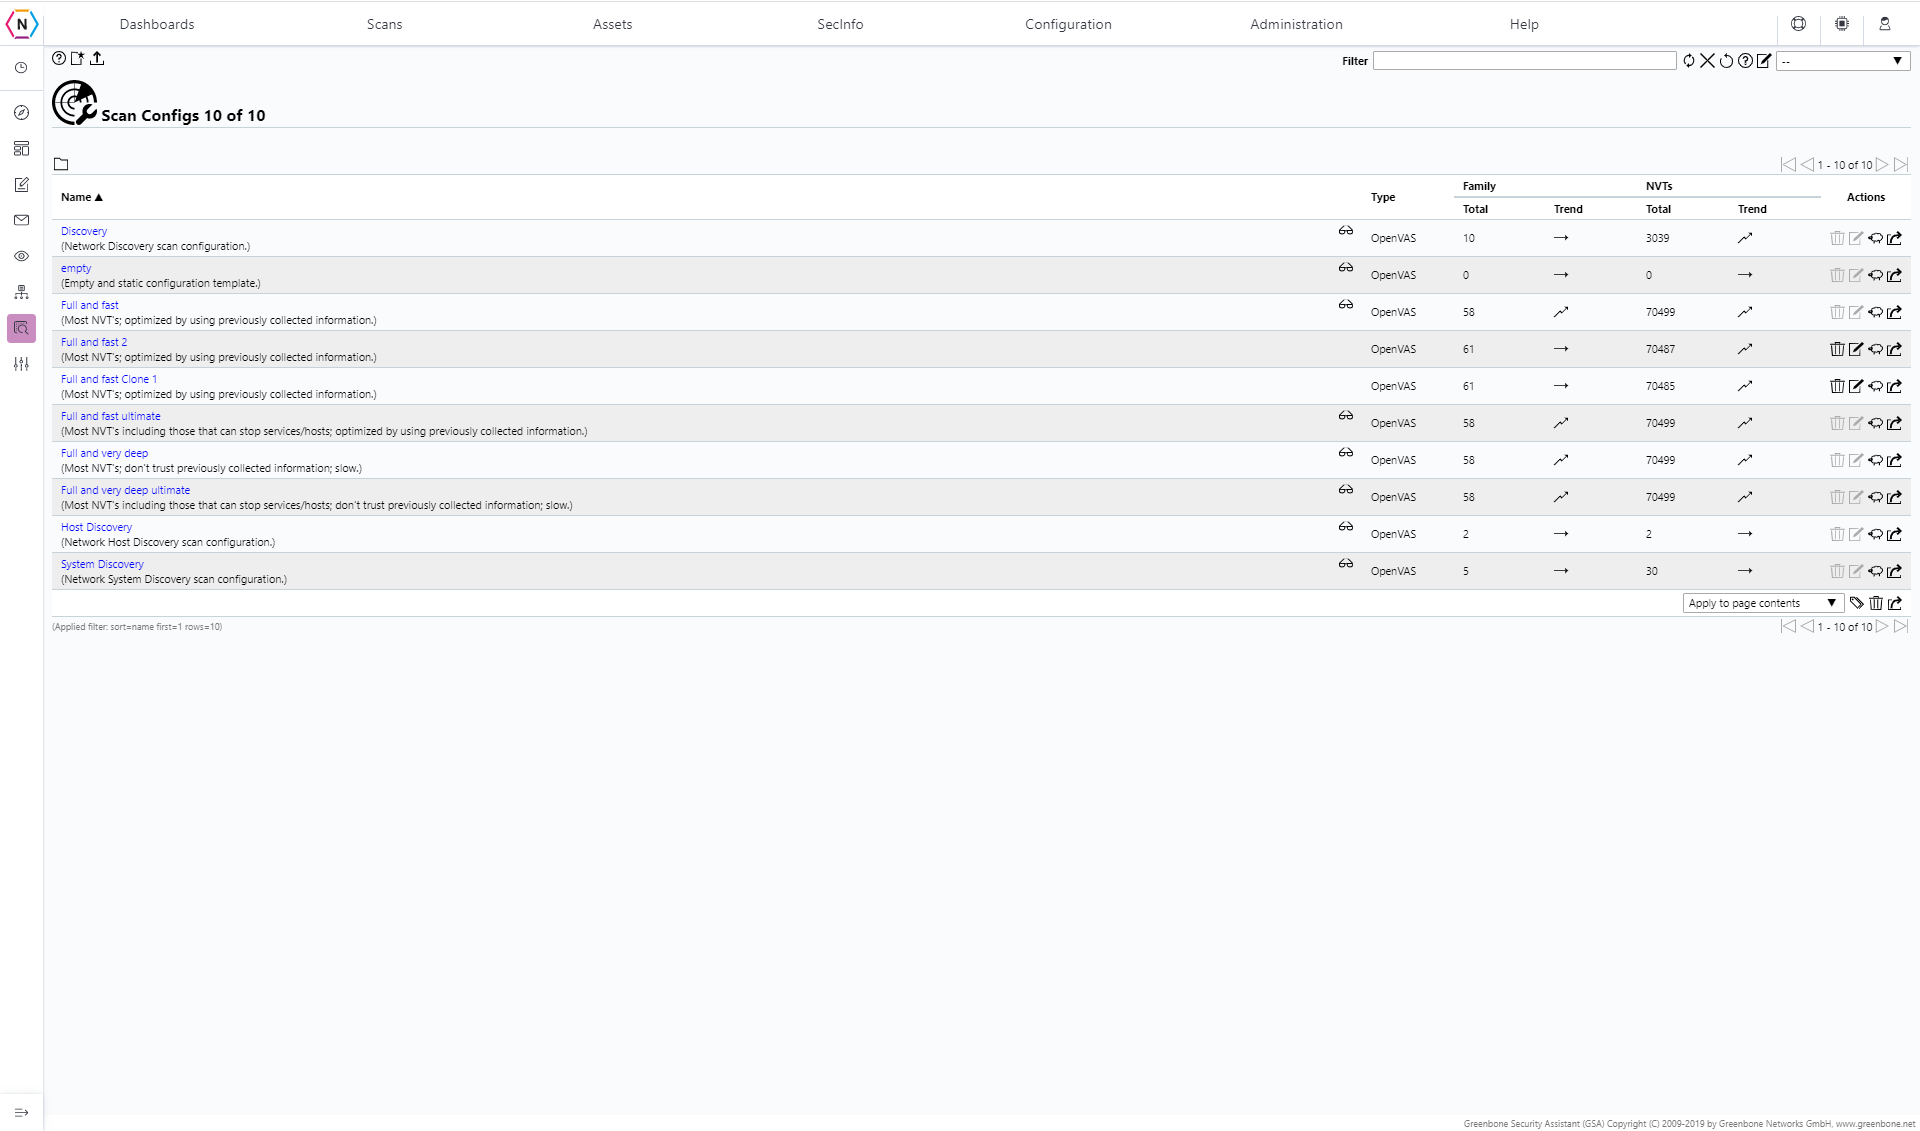
When first entering this page there will be a list of pre-configured scans that are available for use in the creation of a vulnerability scan task. Below is a list of default scans and what they cover:
Discovery:
Use to try to discover machines on a network. Will use some vulnerabilities in order to achieve getting an as accurate as possible picture of the targeted network.
Full and fast:
This is the default and, for many environments, the best option to start with. This configuration is based on the information gathered in the prior port scan and uses almost all NVTs. Only vulnerabilities are used that will not damage the target system. Plugins are optimized in the best possible way to keep the potential false negative rate especially low.
Full and fast ultimate:
This configuration expands the first configuration with NVTs that could disrupt services or systems; they may even cause shutdowns on some systems (especially older ones) and has the potential to disrupt your network during the duration of the scanning process.
Full and very deep:
This Scan is similar to Full and Fast but instead of using previous scans to help pick and choose what NVTs need to be tested against each device it will use all it has available each and every time unlike Full and Fast which ignores previously tested vulnerabilities that have been proven to be patched.
Full and very deep ultimate:
This Scan Config combines both Full and very deep and Full and fast ultimate’s configurations into one config! A Very slow and possibly disruptive scan.
Host Discovery:
Only uses NVTs that discover target systems. This scan only reports the list of systems discovered and does not use any major vulnerabilities to do so!
System Discovery:
Only uses NVTs that discover target systems, including installed operating systems and hardware in use.
For a good majority of users the default scan configuration should cover everything they will need but for some who might want a more narrowed down scan config you are able to create your own scan as well.
Just like with all the other configuration pages, you can create a new scan by clicking on the top left page icon. This will create either a new empty Scan Config from scratch or you can choose to use the full and fast scan as a place to start from. From there you can pick and choose what vulnerabilities you’d like to test for.
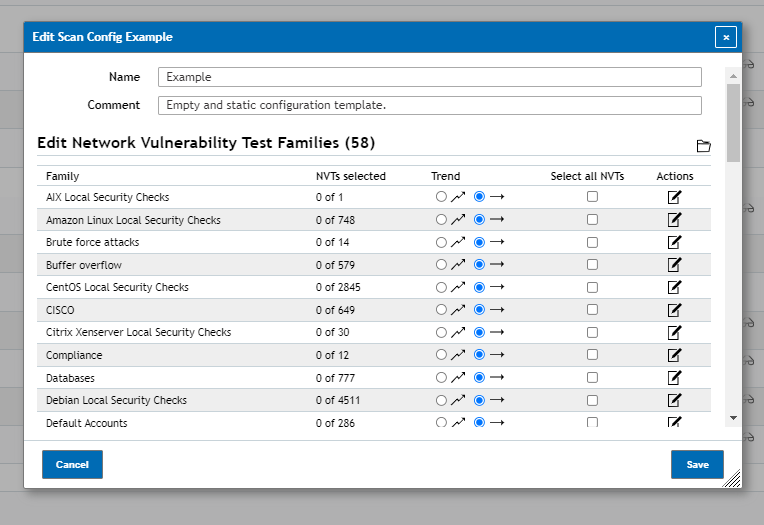
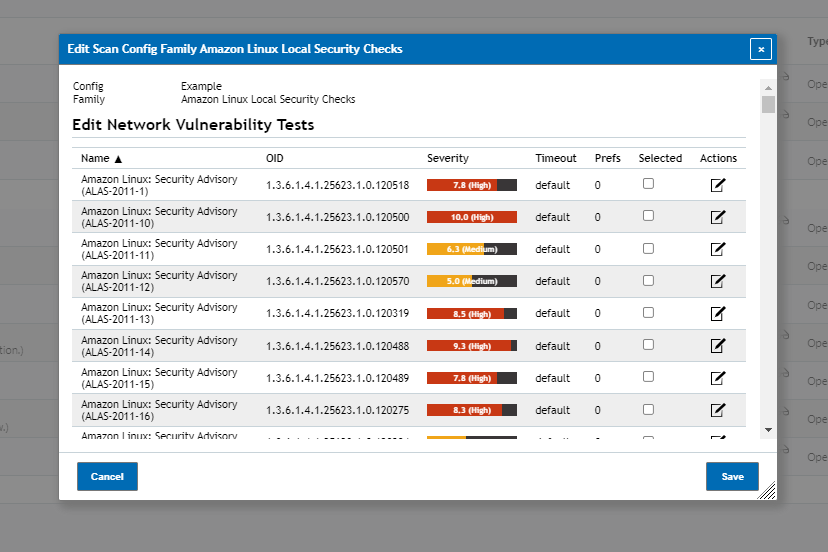
Vulnerabilities are broken down into different categories from which you can either select entire categories to be used during scanning or if you need only a few specific vulnerabilities you can click on the Edit Scan Config Family Action (Page with pencil icon) next to the category the vulnerability is found under to select the vulnerabilities you need.
You can use previously created scan configs or scan configs outside of full and fast as a foundation for a new scan via cloning them, you can do this by clicking on the Clone button (sheep icon) found next to the scan you’d like to use. You can also delete and edit custom scans as well by clicking their respective buttons.
Schedules
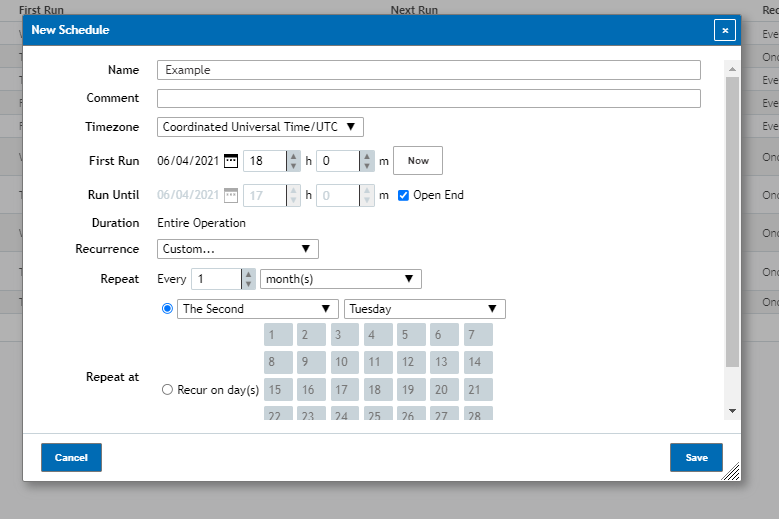
Schedules can be used by your Scan Tasks to have scans run automatically without users being needed to manually start the scan. To create a new Schedule click on the Create icon on the top left of the page (looks like a page with a star).
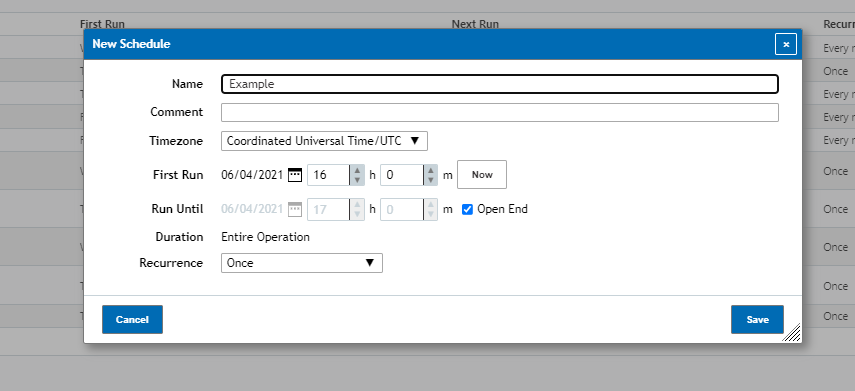
To create a schedule it will need to be given a name and then a timezone that it will be using as a reference (by default UTC). Once a name a timezone is given the schedule will then need the date you’d like to have the scan start on and from there you’ll then be asked to select how often it occurs. This can go anywhere from a daily, weekly or monthly scan to as complex of a scan as one that runs on the second tuesday of every month.
NOTICE: Times presented are in zulu / military / 24h format. For a example, if a scan is to be set at 8pm local time it’d be set to 20.00 for the start time
After everything is finished you can click Save to complete your schedule. Similarly to other pages under the vulnerability scanner you can also Clone, Delete and Edit previously created Alerts (Sheep, Trash can, Paper & Pencil icons respectively).
Alerts
Alerts are used by Scan Tasks in order to tell who to send an report to about said scan and what information to include. To Create a new alert click on the Create icon on the top left of the page (looks like a page with a star).
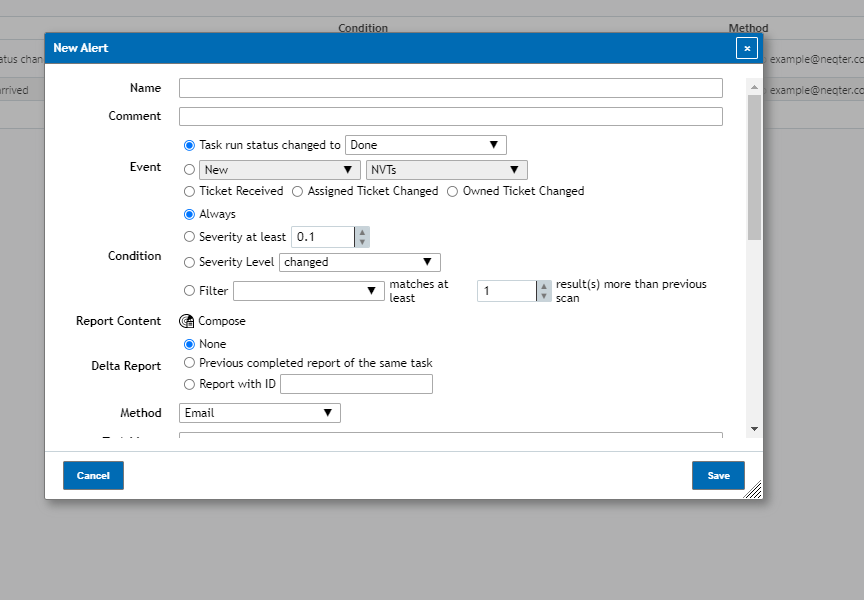
You’ll then need to configure the information you’d like to use / send. Outside of naming the alert you are creating you can also configure the following:
Event: The Event Section is where you can choose when you’d like to have a alert generate an report. By default it is set to send to an report out every time a scan is complete but you can also have it send if the task starts, if any new NVTs are detected and more!

Condition: Under the Condition section you are able to further modify when a alert generates an report. By default it is left on Always which essentially means no conditions are applied but you can change it to only allow an report to be generated if a vulnerability with a severity of at least a certain value is detected or if the highest severity of the scan increased, decreased or changed.
Method: The method drop down menu is where you can choose what method you’d like to use to send the report. By default the report will be sent via email but you can also have it send out through a variety of different means as shown below:
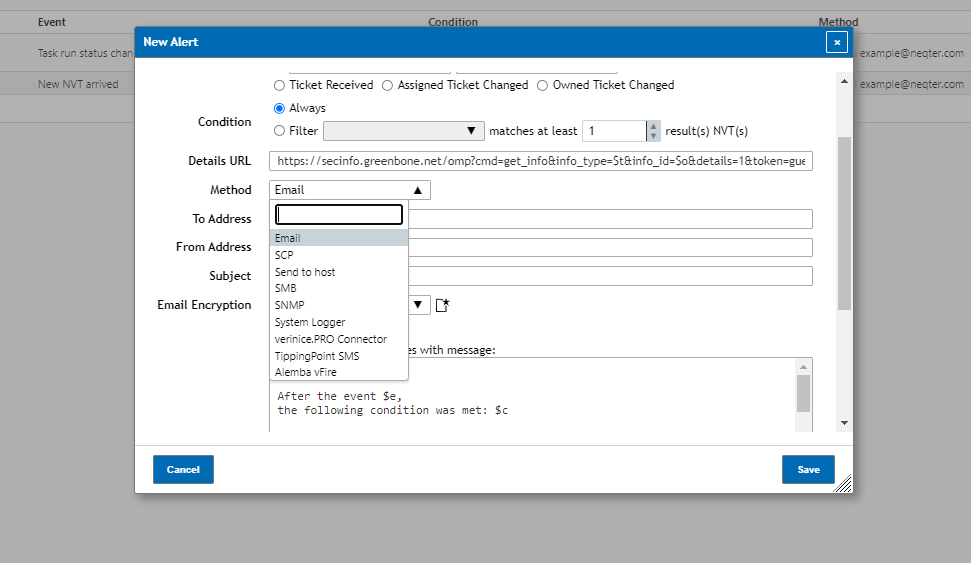
Email Encryption / Credentials: For some methods such as Emails, SCP, SMB and so on you can add encryption files or use Credentials to better secure the report you are sending out of the box.
Report Format: Some methods will also have the ability to not only send out a quick notification but also send a vulnerability report as well. Some methods such as SMB will require a report format to be chosen while other methods such as emails have it as optional.
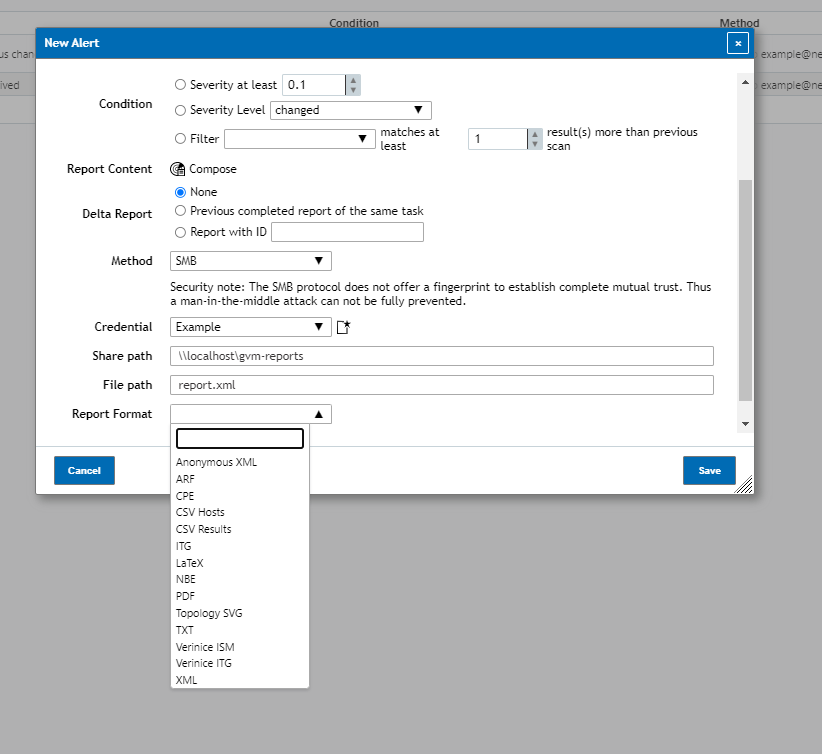
NOTE: The report formats you can choose from can change wildly from method to method.
Once your alert is configured click Save on the bottom right to complete your alert. Similarly to other pages under the vulnerability scanner you can also Clone, Delete and Edit previously created Alerts (Sheep, Trash can, Paper & Pencil icons respectively).
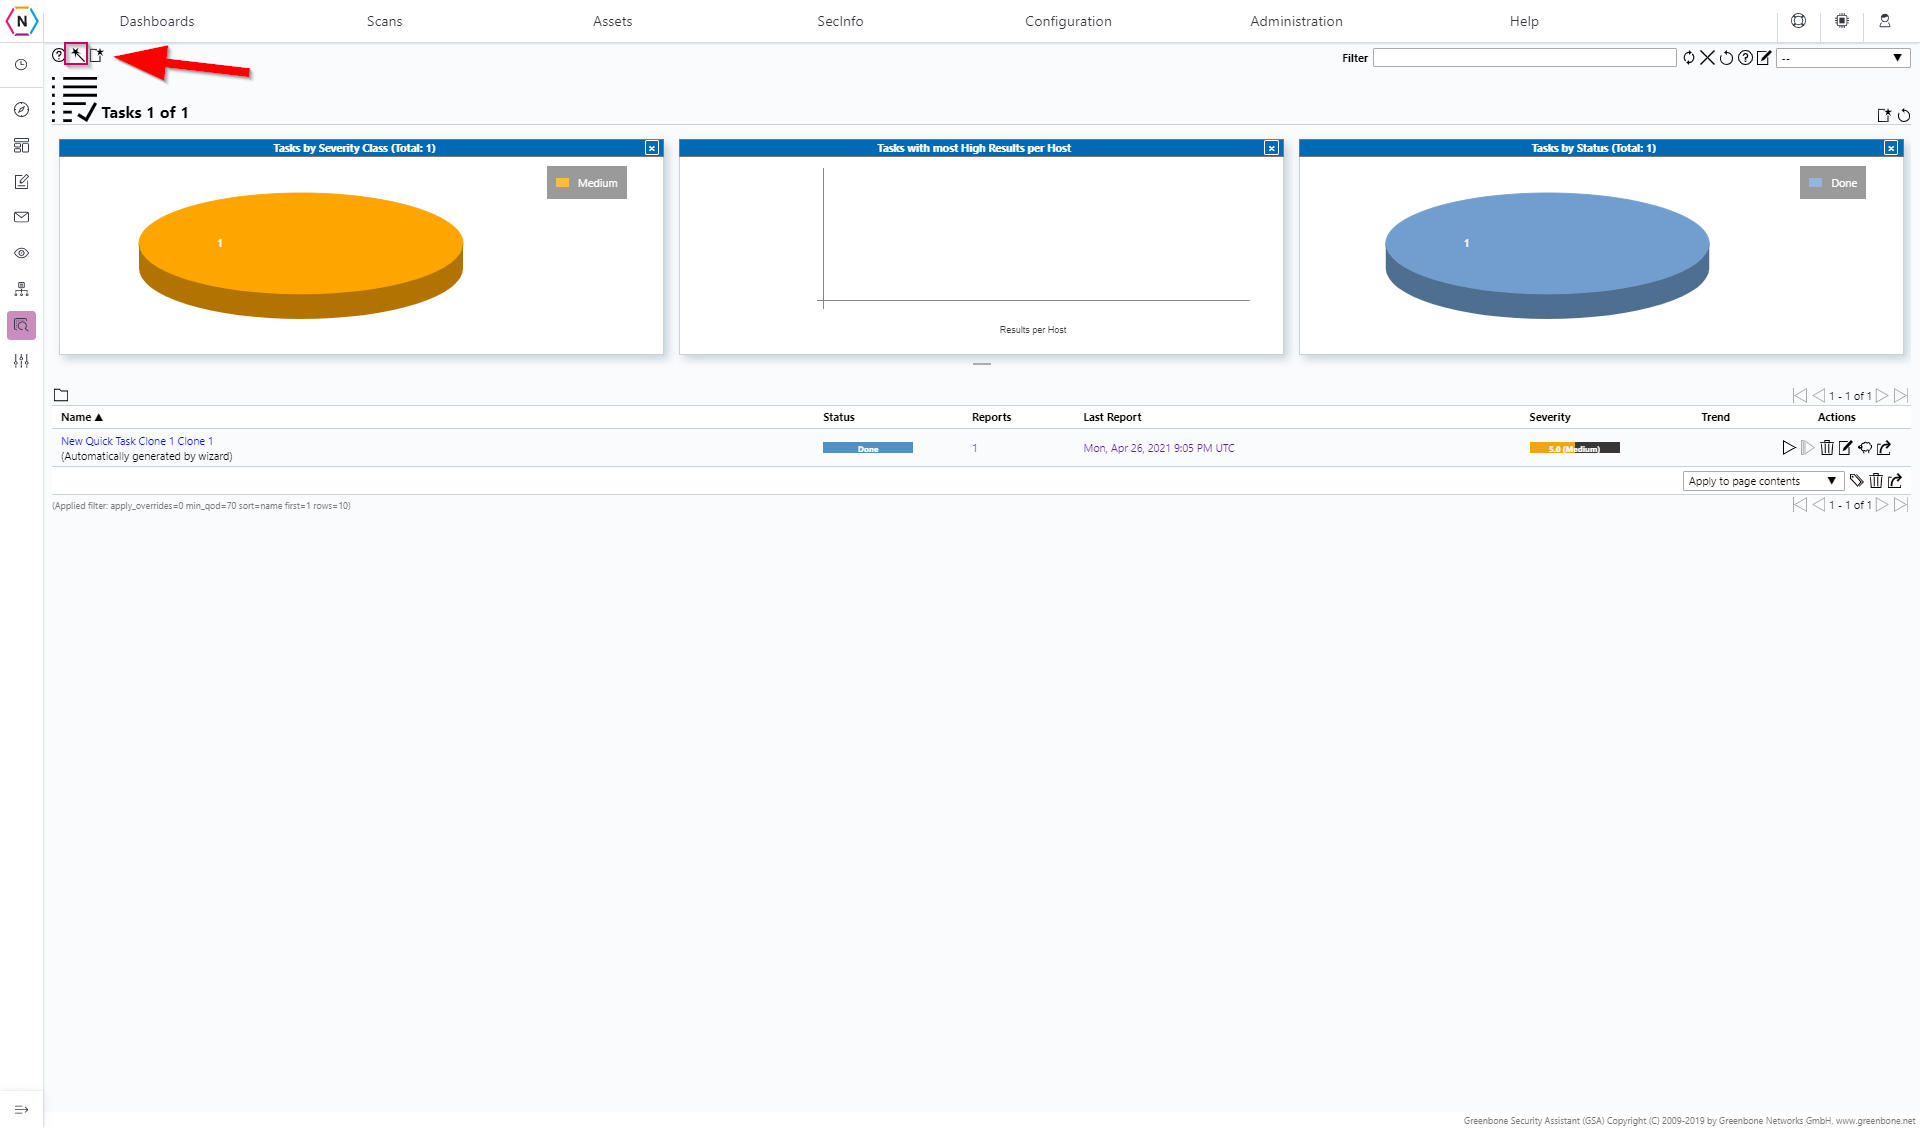
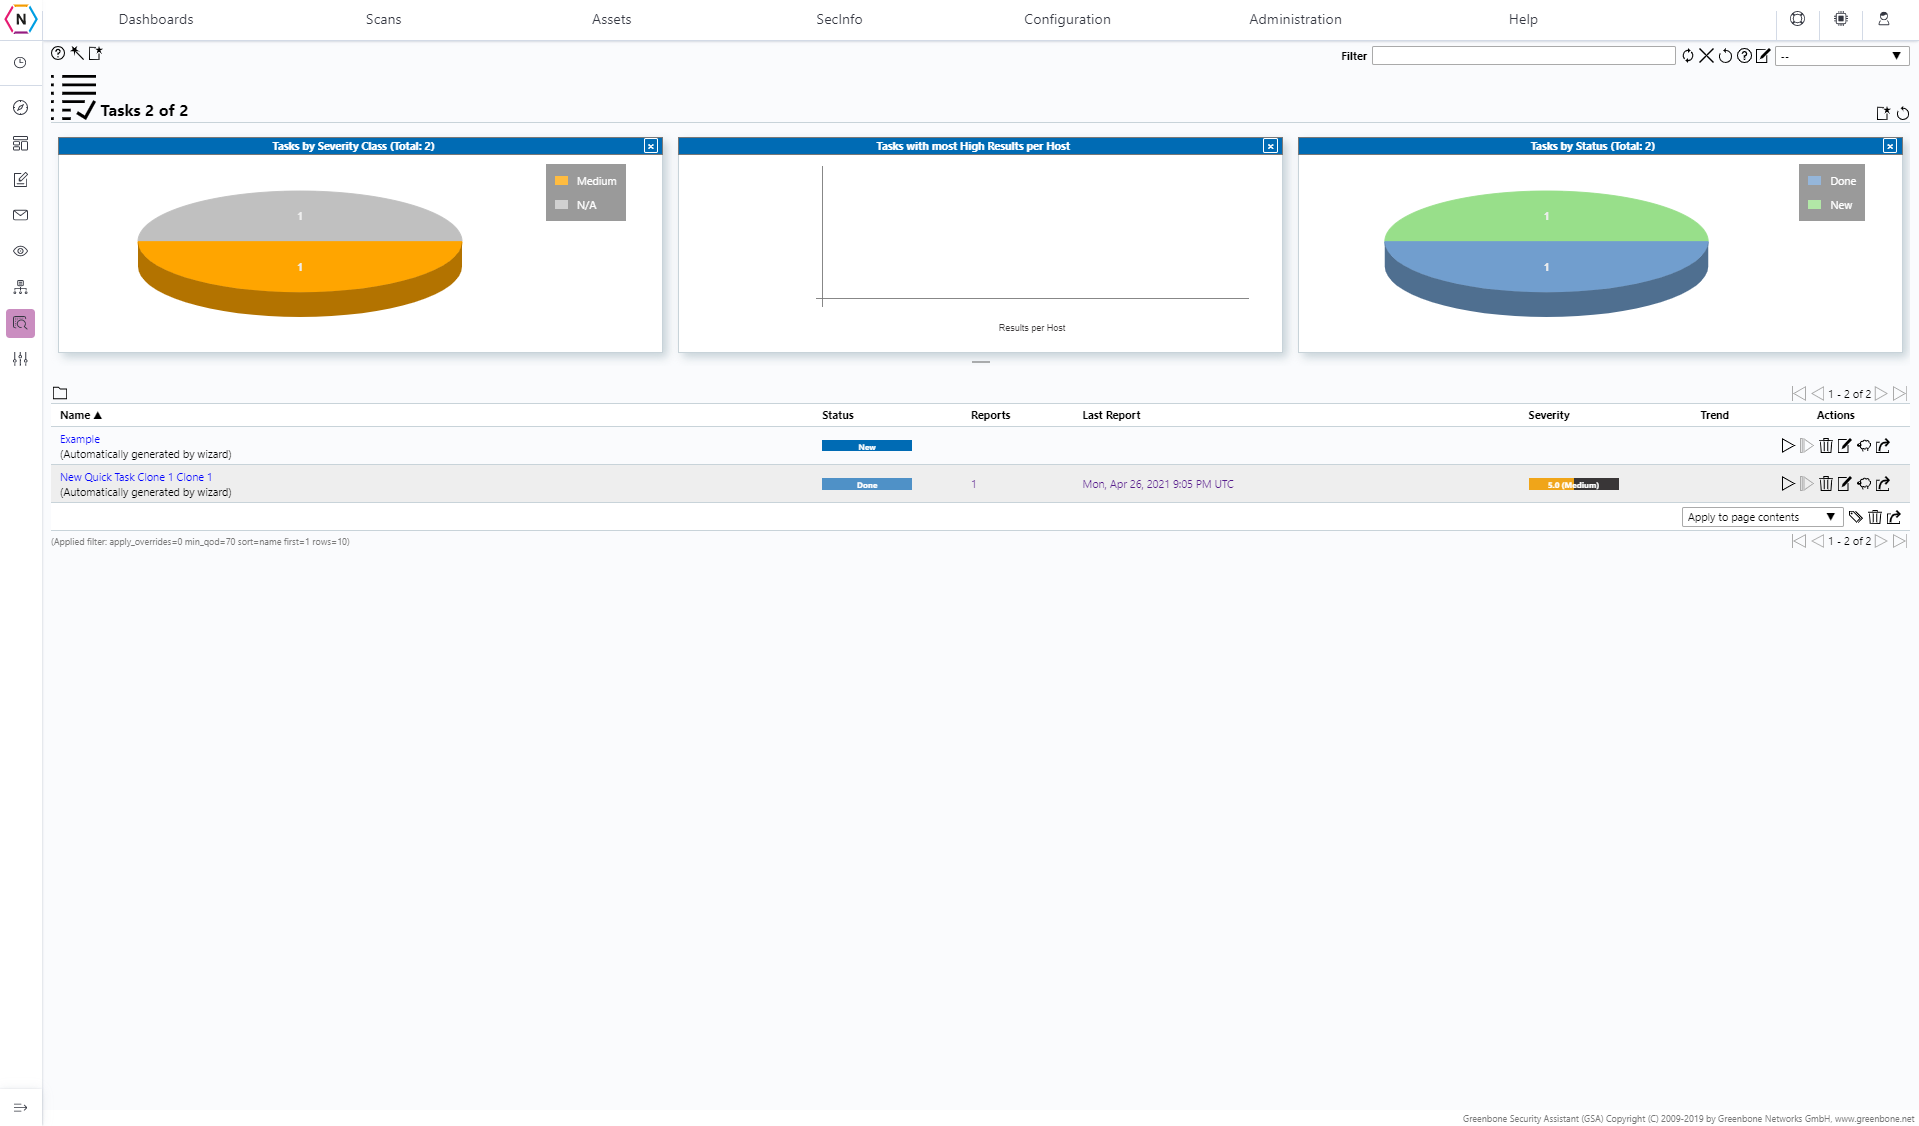
Scan Tasks
The Scan Tasks page, found under Vulnerability Scanner > Scans > Tasks is where you are able to configure tasks to start scanning your network for vulnerabilities! There are Three main methods from which you can create scans on your vulnerability scanner. The first method to create a scan is Task Wizard which can be found by hovering over the Wand icon on the top left of the page.
All you need to do using this method is input the IP Address, IP Range or Network Address you’d like scanned and then click Start Scan on the bottom right of the task wizard window.
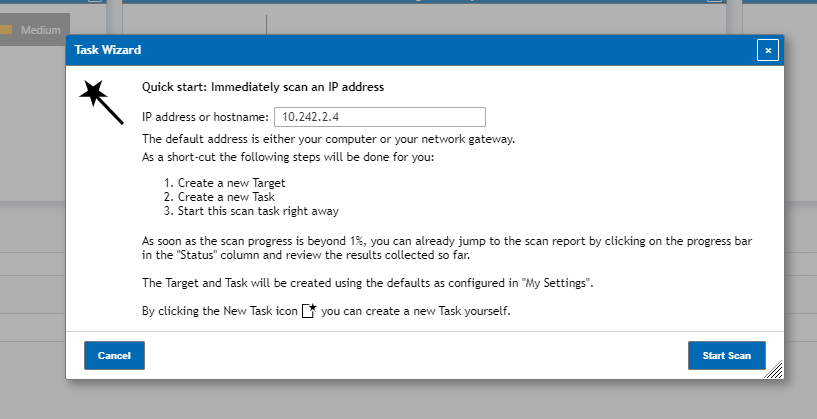
Using this method you can very quickly create and start a vulnerability scan almost immediately. The downside to using this method however is that many features that you normally can configure such as having it be on a automated schedule, having the task send out a report from the box, using a specified scan method and more is not available to be configured. In order to change those you’ll need to use one of the next two methods, the first being the Advanced Task Wizard.
To access the Advanced Task Wizard, go the same Wand icon on the top left of the page used to access the Task Wizard and instead select Advanced Task Wizard in the drop down menu. Once selected you’ll be greeted with the following window:
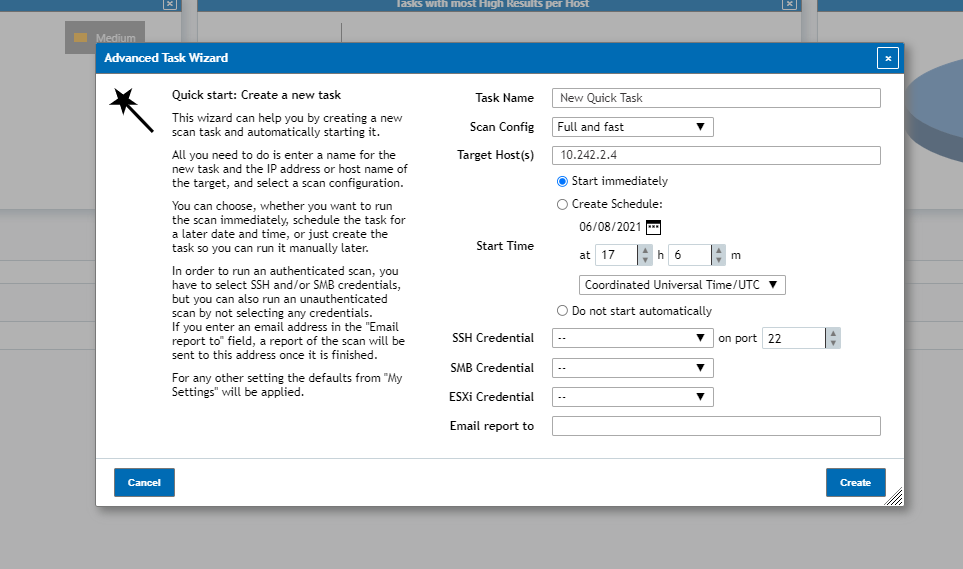
From this window you can not only configure what IP Addresses and Name the scan task will use about also the following:
Scan Config: There are a number of Scan Configurations that can be used for the vulnerability scan task by default with each scan config determining what vulnerabilities will be used against the hosts targeted for the scan.
Start Time: From here a scan can be configured to start immediately, start manually or to have it scheduled to automatically start on the date and time selected.
Credentials: You can use Credentials setup on your vulnerability scanner in order to do authenticated scans, which will use said credentials in order to bypass certain protections you may have setup for a deeper scan.
Email Report to: The scan task can be setup to use an email address set here to send a report to after completing.
Once the scan is ready click Create on the bottom right of the window to create a new scan.
The Advanced Task Wizard is relatively fast, easy to use and somewhat malleable allowing users to create a much more in depth scan task quickly and efficiently. However there are a few features missing under the Advanced Task Wizard that can only be configured when creating a new task using either the New Task (Paper with star icon on top left of page) or by editing previously created tasks.
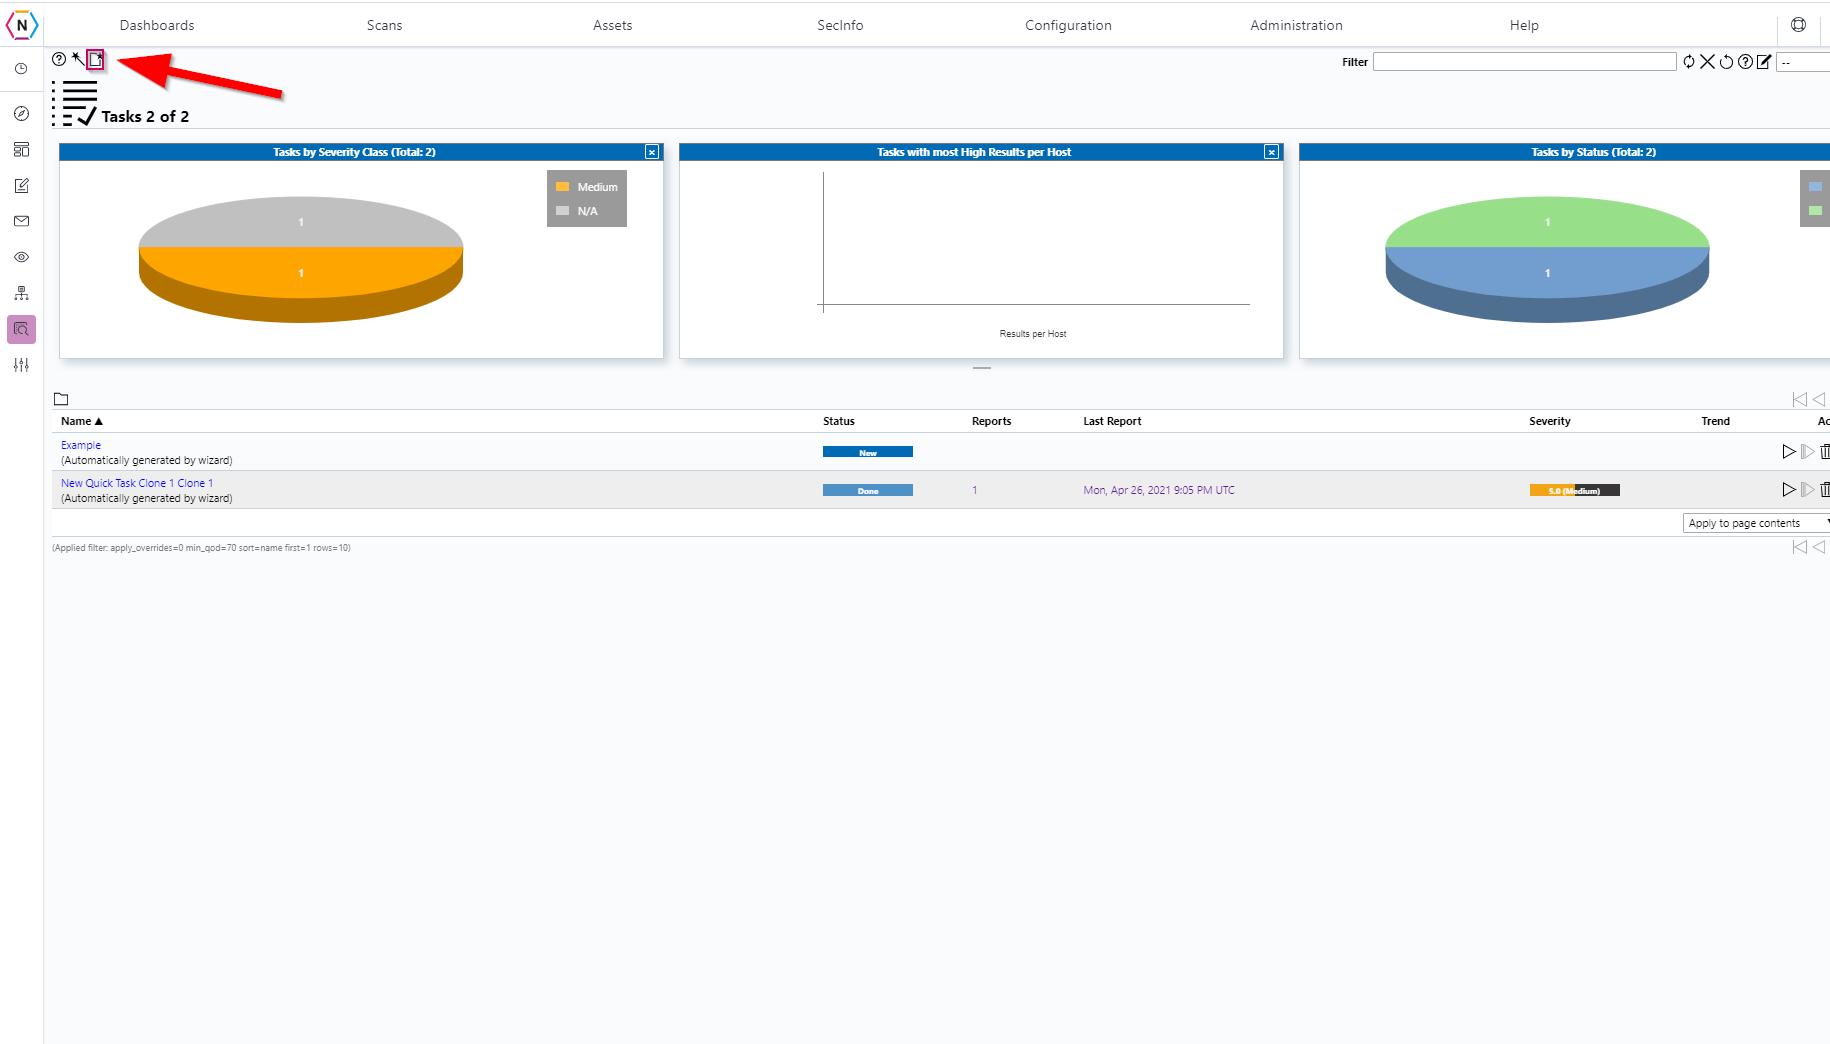
When starting to setup a new task using the New Task window you’ll be asked to input the following:
Scan Targets: What devices you’d like to have scanned, can be either setup by clicking on the Create a New Target icon or by clicking the drop down menu with previously created Targets.
Alerts: While not required for a scan task to be created, Alerts allow for the device to send a report out via smb share, email, snmp and so on so that users don’t need to go onto the device itself to see the results of the scan task.
Schedule: While not required for a scan task to be created, Schedule is used in order to have the scan automatically start on a specific date as well as to have the scan run periodically as well if wanted.
Add Results to Assets: If left on Yes the scan task will automatically populate the Assets section of your vulnerability scanner with information found via scanning. If this feature is turned off then any information found by the vulnerability scanner will not be documented on Assets.
Min QoD: Minimum Quality of Detection determines what vulnerabilities will be kept to be listed under the Reports and Results pages. Each vulnerability has a QoD ranging from 1 to 100 assigned to it with 1% meaning there’s a 1% chance of the vulnerability being credible and 100% meaning there is a 100% chance of a vulnerability being credible. By default it is set to 70% as this will allow you to grab the majority of vulnerabilities detected without grabbing hopefully too many false positives.
Alterable Task: Alterable Task determines whether the task can be edited after being created. By default this option is left at No which means only a few sections of the scan task can be changed once created.
Auto Delete Reports: Determines how many Reports are kept for this scan task before the vulnerability scanner begins to remove reports (starting from the oldest). By default it is left at never delete but this can be changed to as many as 1200 reports before the vulnerability scanner begins deleting.
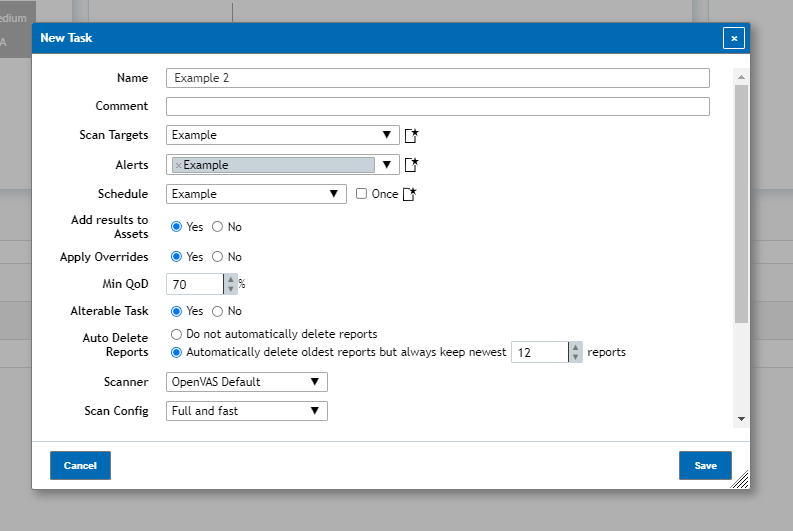
Scan Config: There are a number of Scan Configurations that can be used for the vulnerability scan task by default with each scan config determining what vulnerabilities will be used against the hosts targeted for the scan.
Network Source Interface: Determine which interface to use when scanning a network. If left blank it will use the default interface of the NeQter Device (Ethernet 0).
Order of Target Hosts: Determines what order the targeted hosts will be scanned. Sequential order will have hosts scanned starting from the lowest ip address and Reverse order will have hosts scanned from the highest ip address down. Random order will select hosts at random until all hosts are scanned.
Maximum Concurrent executed NVTs per host / scanned hosts: Determines the maximum amount of NVTs (or hosts) being used (or scanned). By default it is 4 NVTs per host used at a time with 20 hosts being scanned at a time.
Once you’ve finished setting up your New Task click Create on the bottom right of the window to finish and similarly to other pages under the vulnerability scanner you can also Clone, Delete and Edit previously created Scan Tasks (Sheep, Trash can, Paper & Pencil icons respectively).
Reporting & Results
The reports / results pages are where users can find a list of vulnerabilities detected by the Scan Tasks created by users. While Results page will give a list of vulnerabilities found by All Scan tasks the Reports page is broken down by scan task and from there broken down further for each of the task’s individual Runs if applicable.
Results
The Results page is where you find a list of all vulnerabilities found by your Scan Tasks.
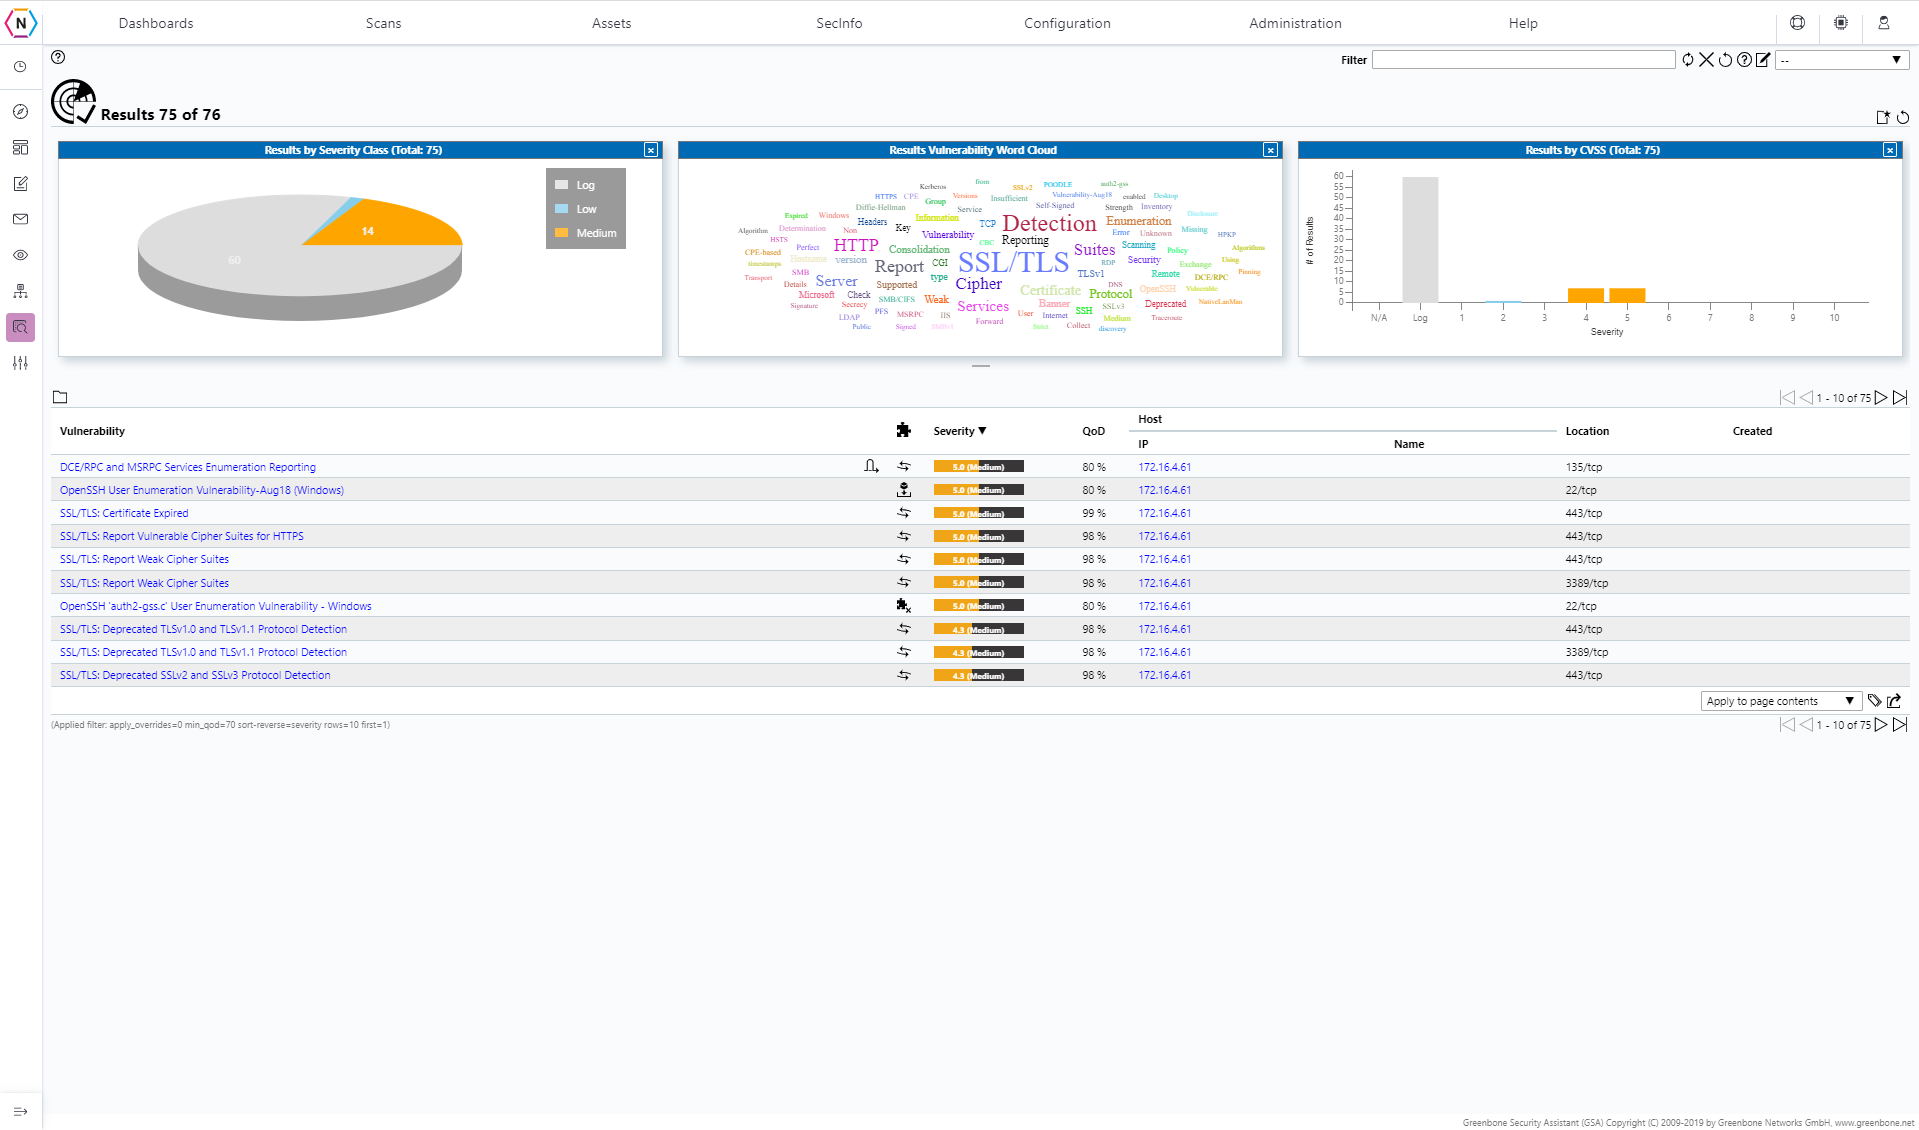
You can use this page to navigate from vulnerability to vulnerability and see what was detected, you can also Open each vulnerability listed by clicking on it to get information about the vulnerability, what devices are affected and possible solutions to patch it.
Reports
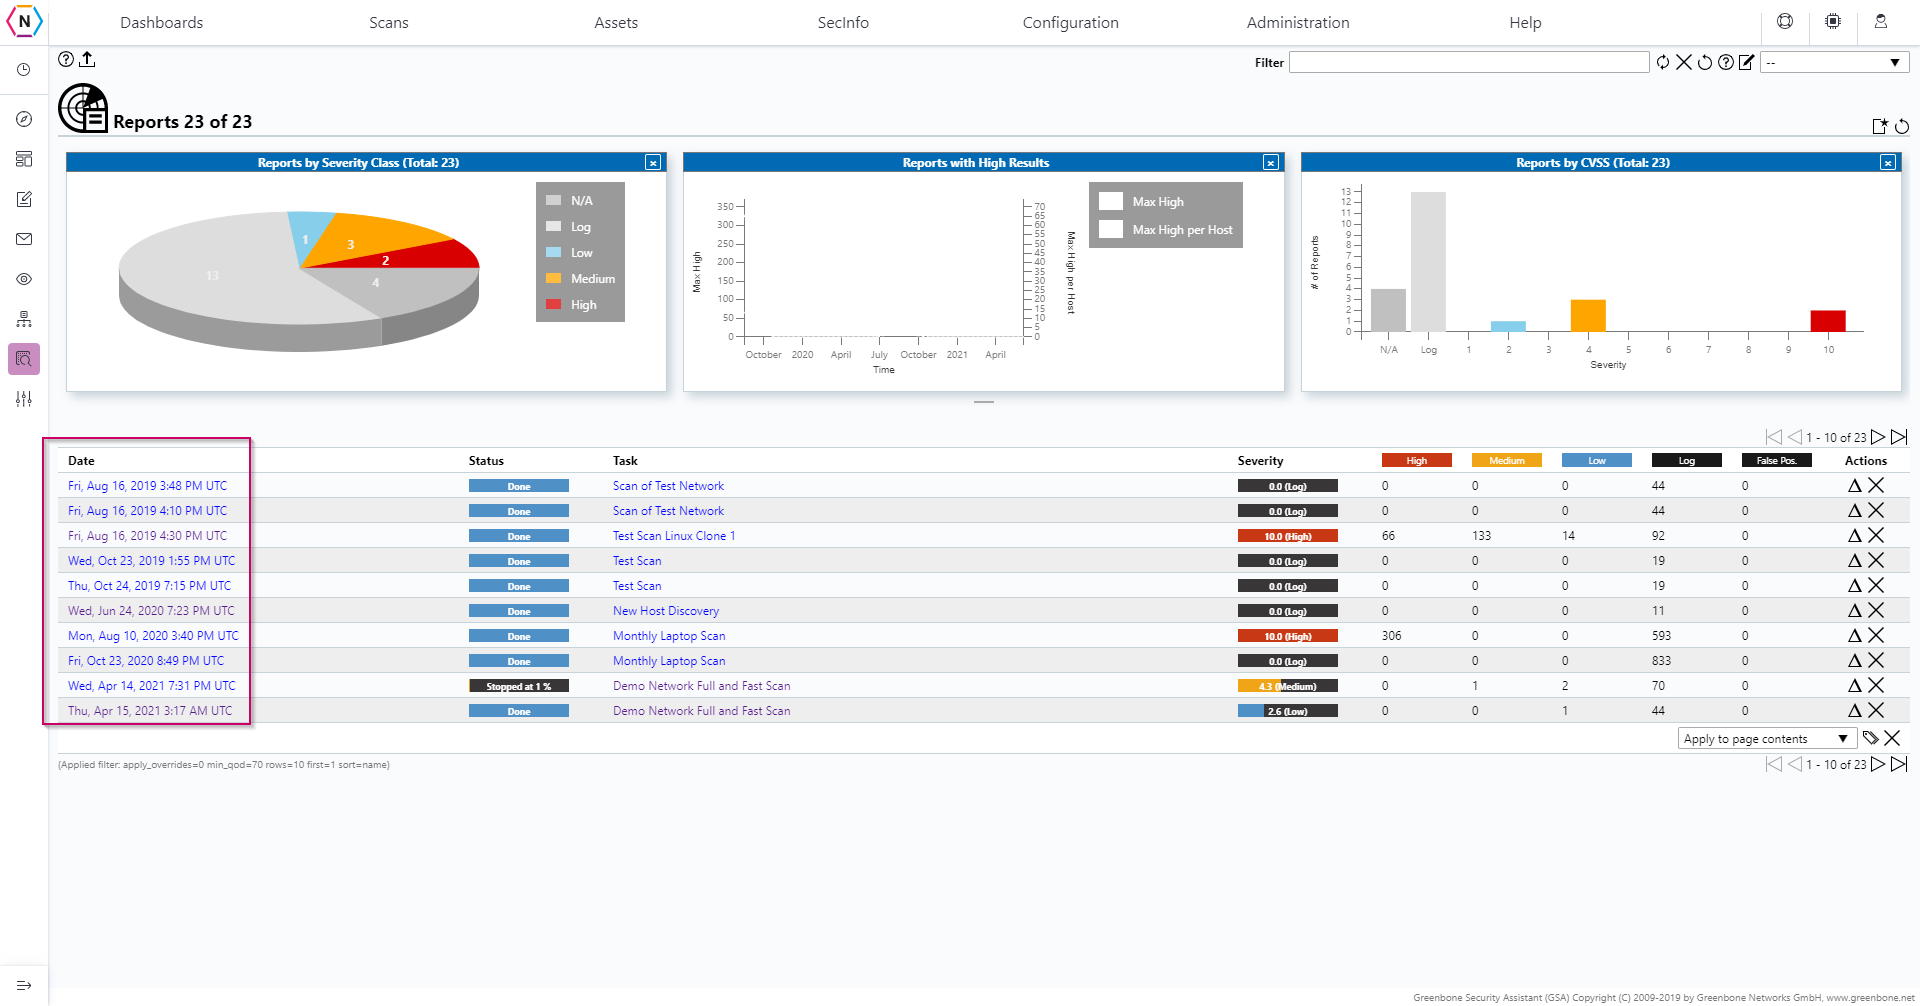
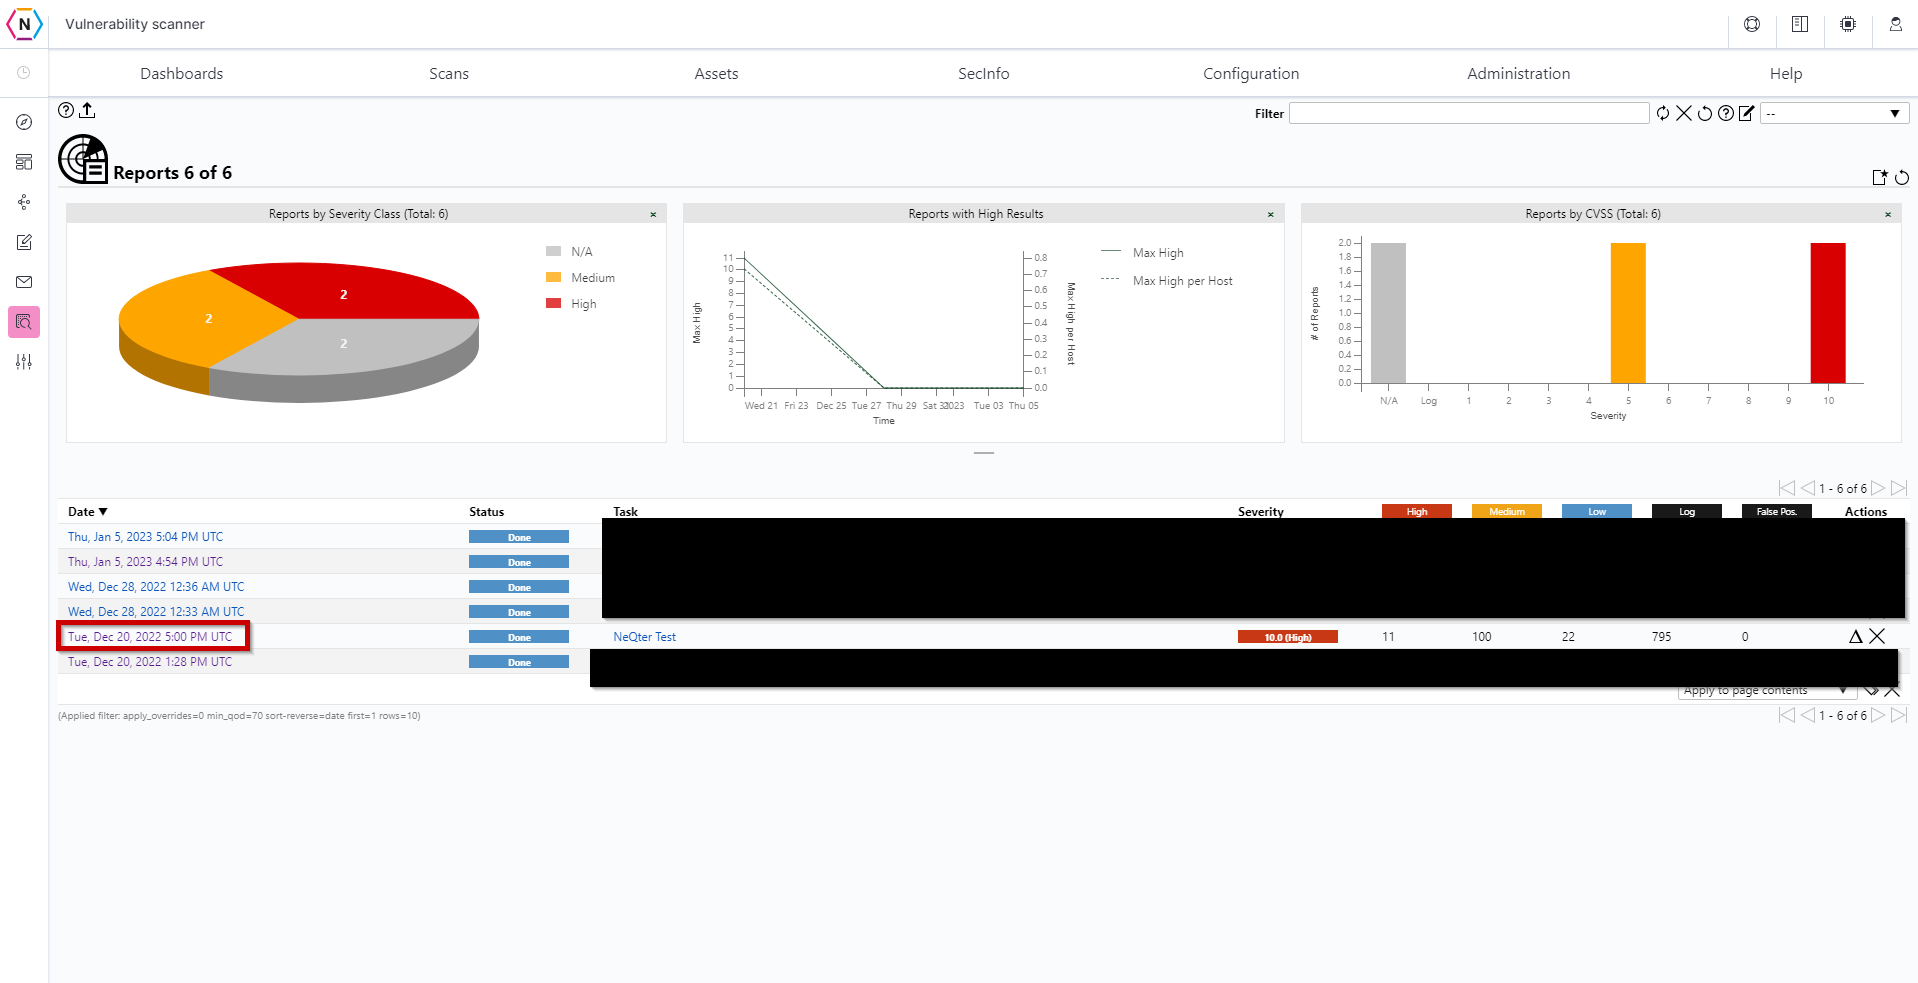
The Reports page is similar to the Results in that you can find more information about specific vulnerabilities detected by your Scan Tasks here. However, the difference between results and reports is that you can select from all of your scan tasks and choose a individual scan task to see the results of on the reports page. The page is organized in a way to make finding specific scan task results you’d like to see easier with the page showing each scan task’s date when it was ran, status, task name and severities of the vulnerabilities detected.
To see the results of any particular scan you will need to click on the Date found next to the scan task you’d like to view.
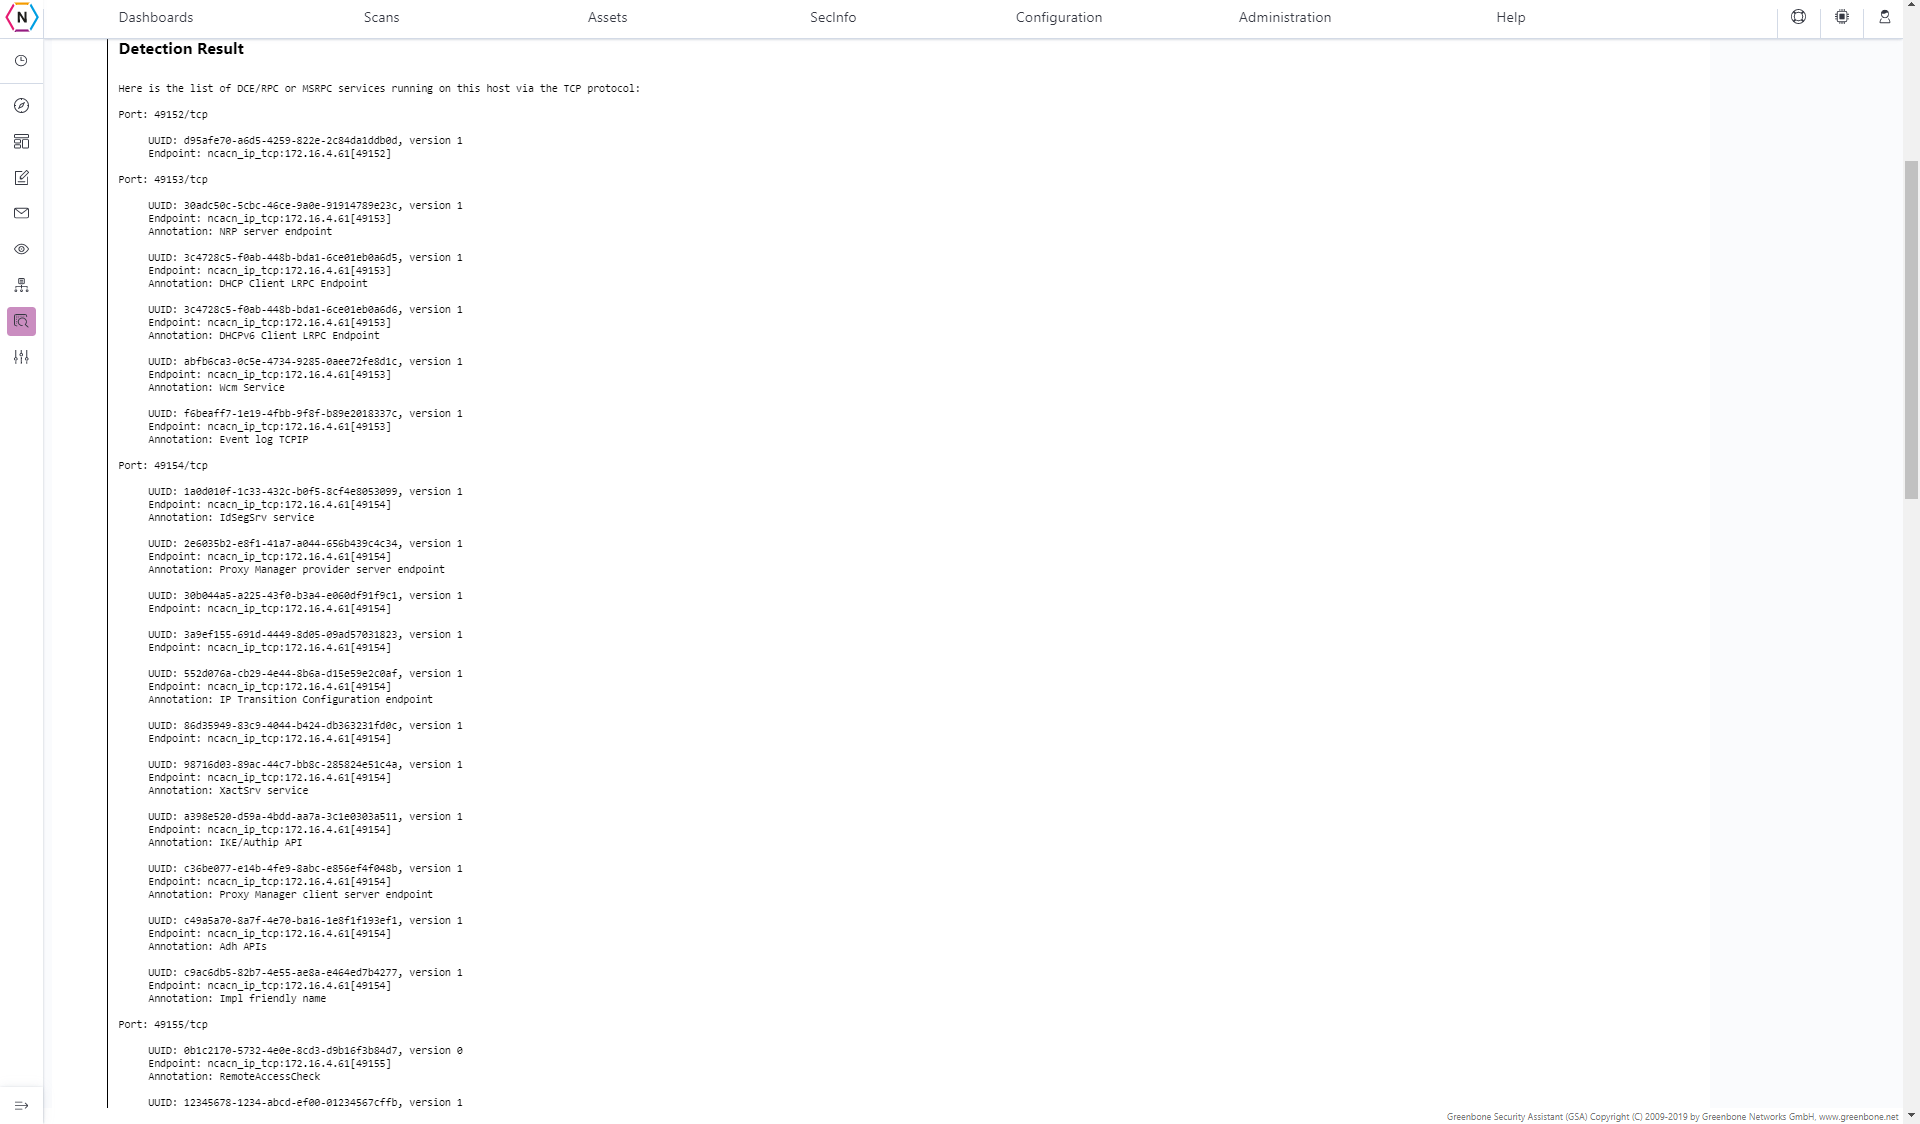
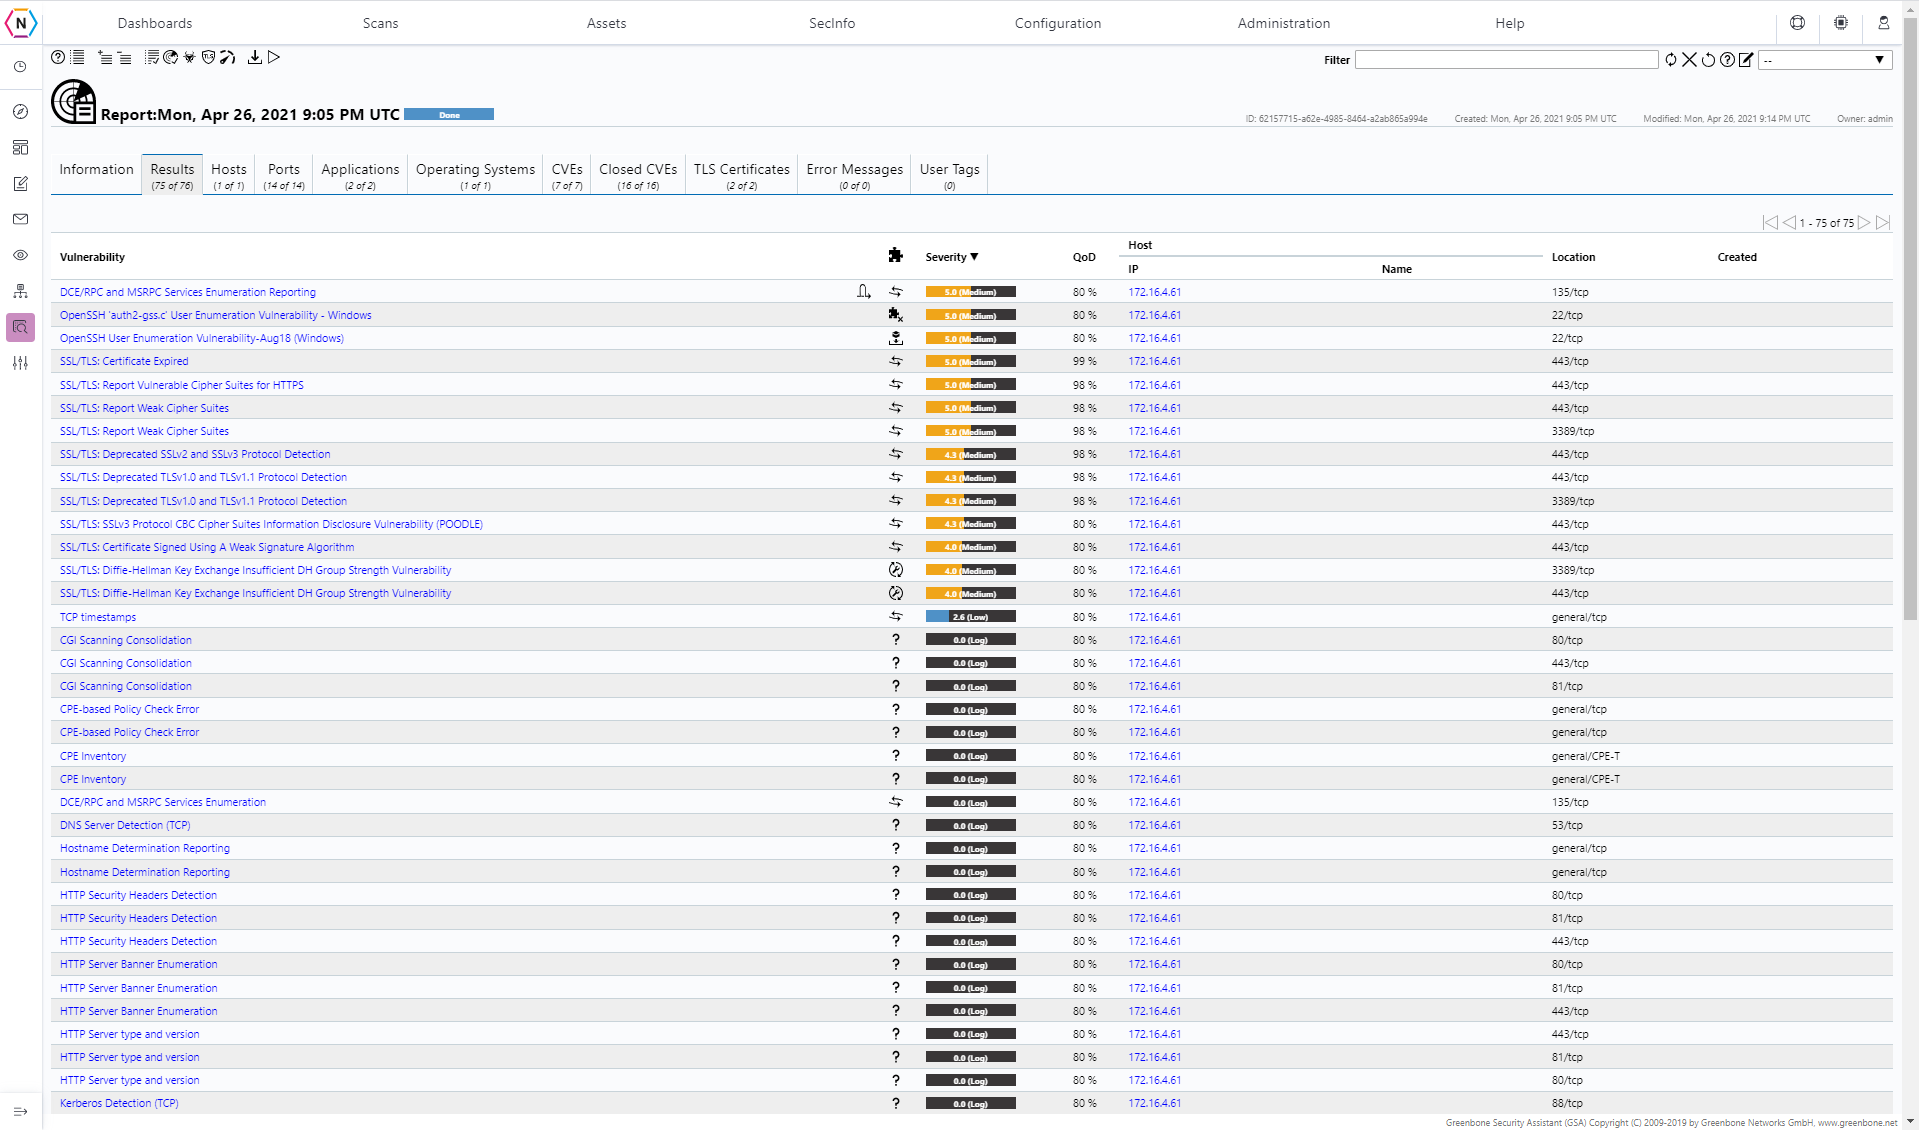
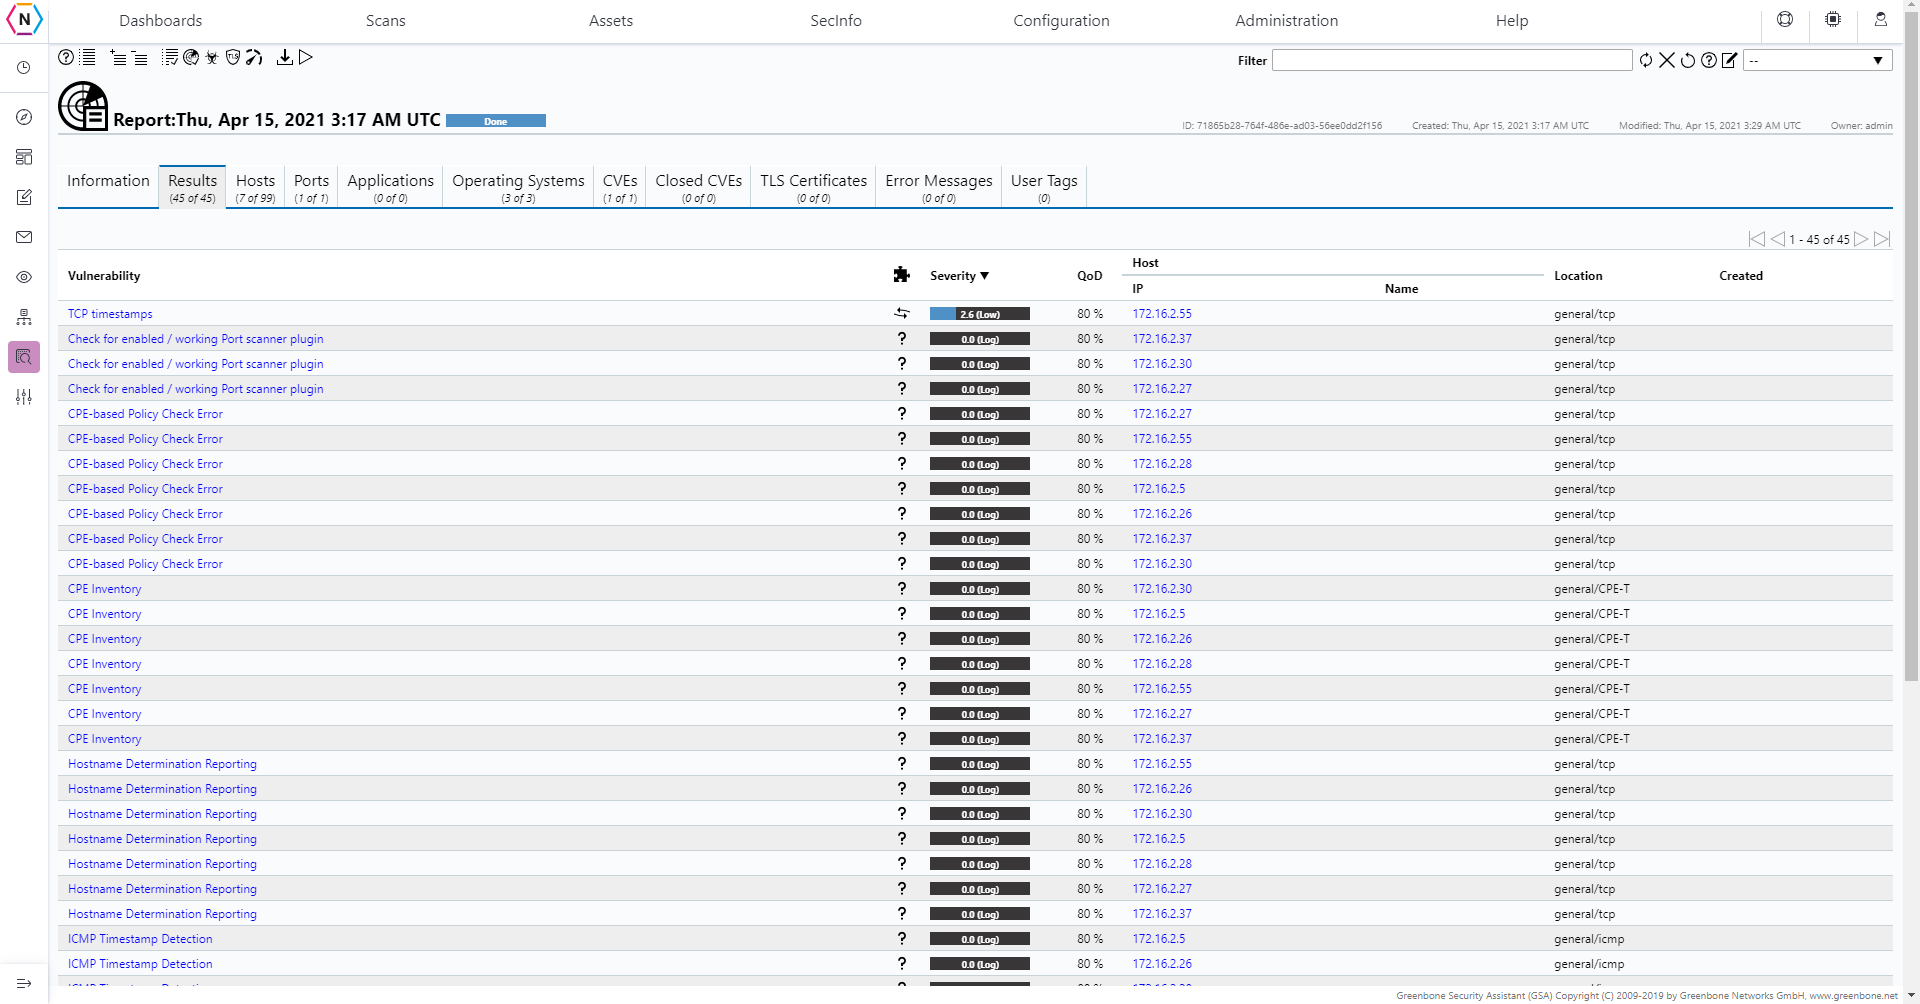
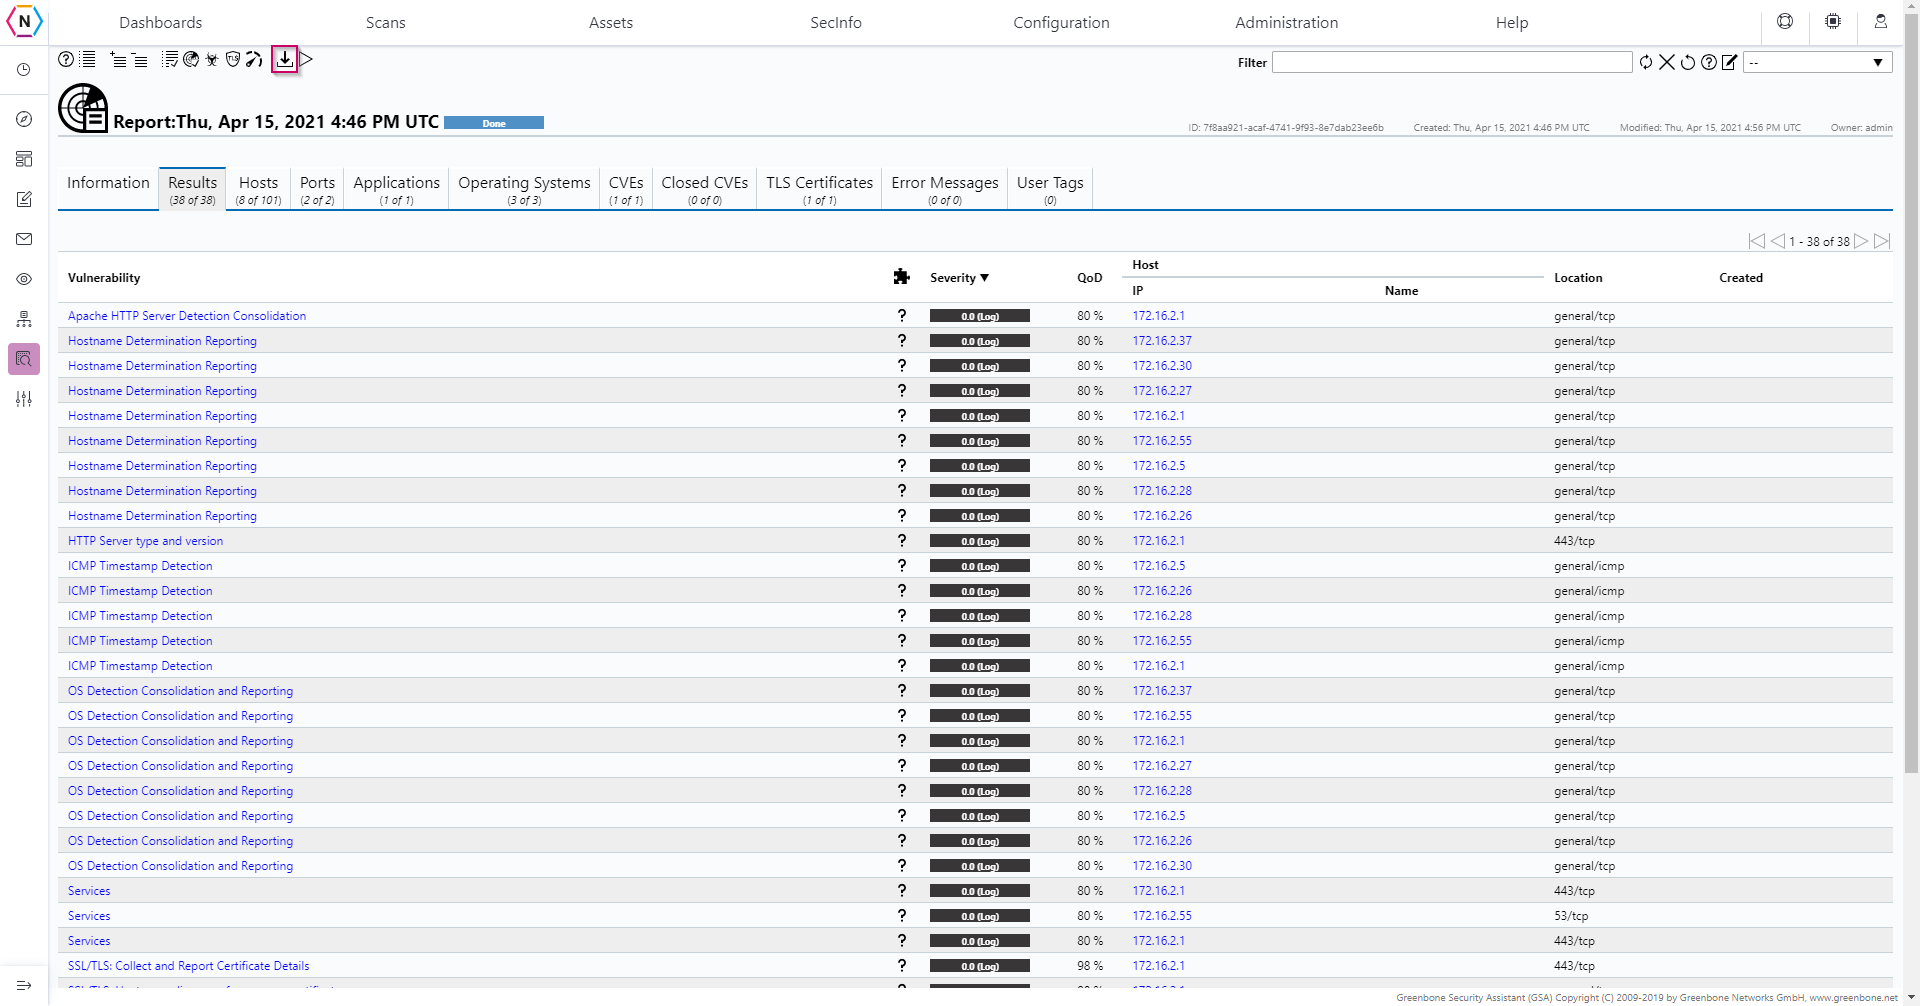
Once you’ve selected the scan task and the specific occurence under said task you’ll be greeted with a page filled with the vulnerabilities found during the scan.
From here scan task reports can also be exported by clicking the Download filtered report on the top left of the page.
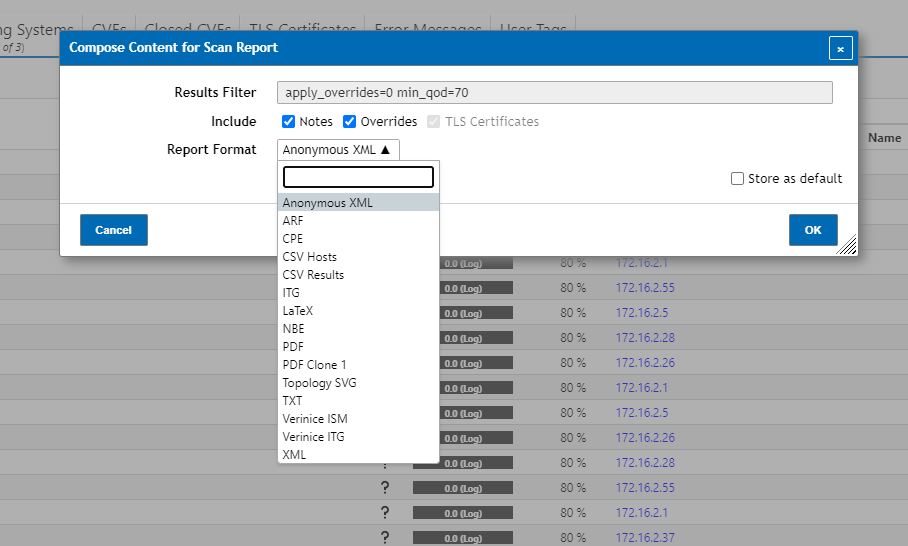
Once you have the Compose Content for Scan Report window up you can select what format you’d like to have the scan report be in and then click Ok to start downloading the report to your current device.
Overrides
The Override tool allows users to filter out false-positives and other known inconsistencies that may pop up in a scan. For example, if a User has a NVT they are aware of existing BUT knows they’ve mitigated it even if it is still detectable they may wish to put it down as a false positive or have it filtered out entirely from their scan reports. This is where overrides come in and give the user the ability to do so.
The preferred method of creating overrides is the following:
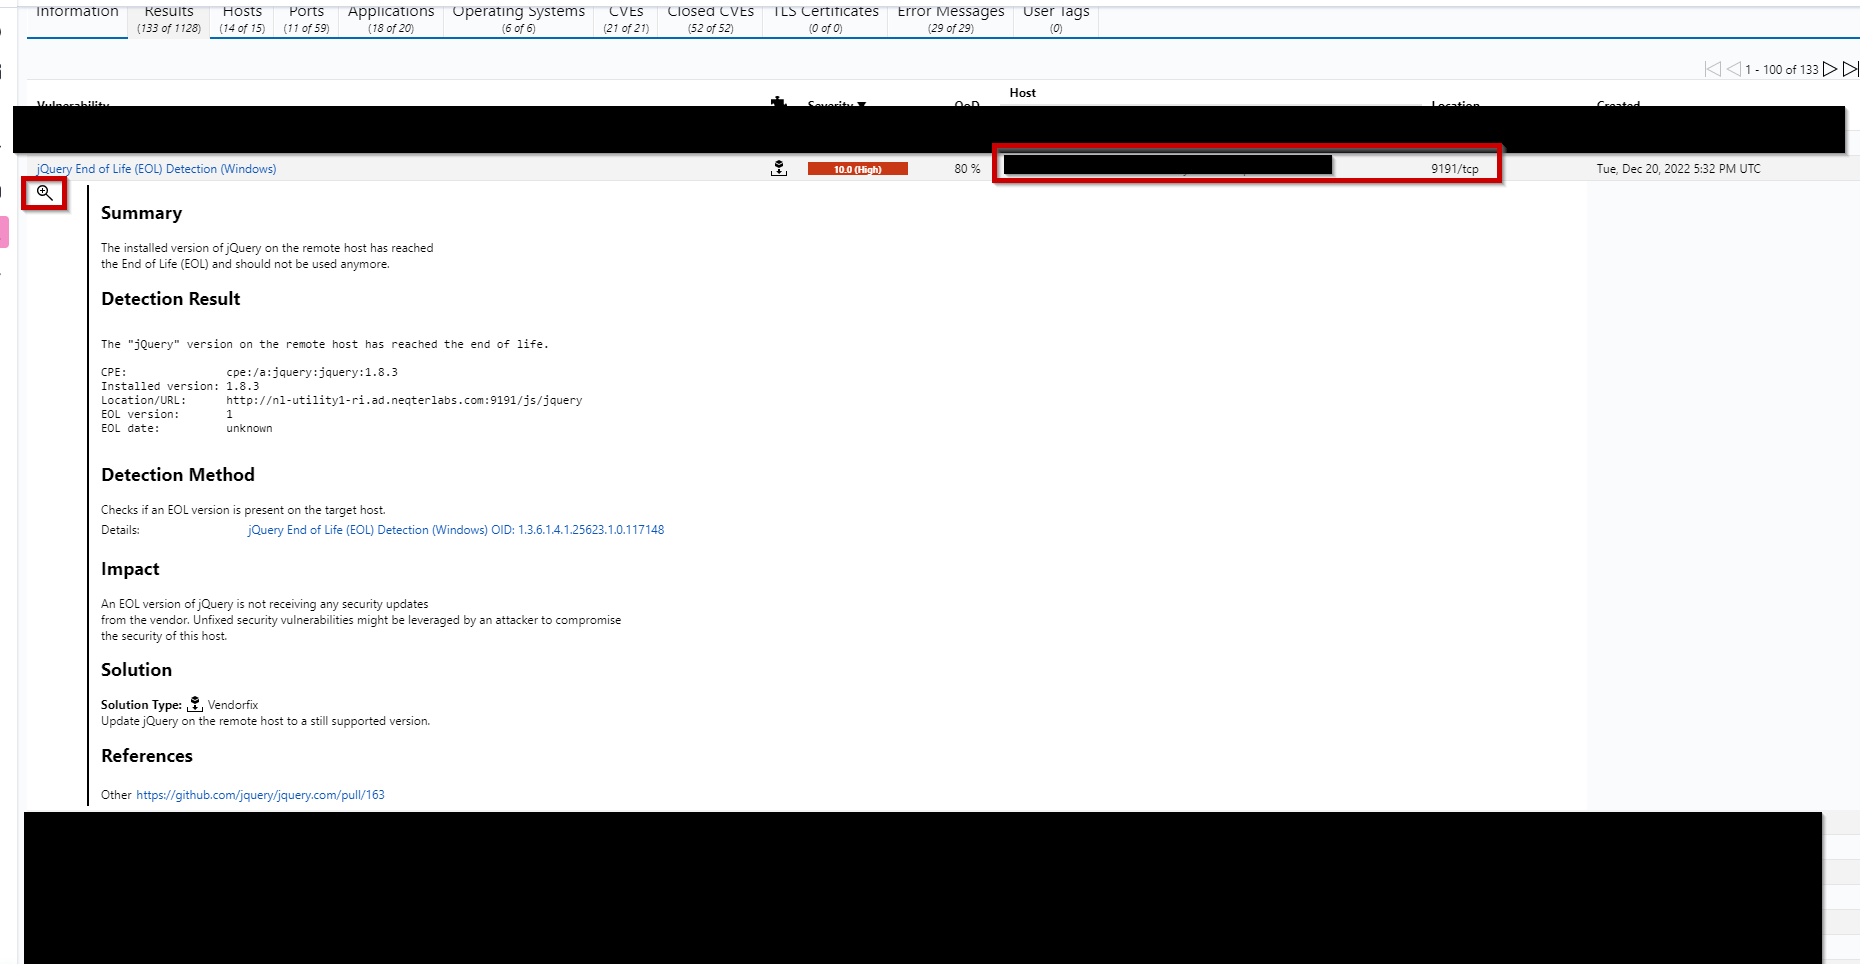
Step 1. Open a vulnerability scan report under Scans > Reports.
Step 2. Find the vulnerability that you’d like to make a override for, expand it open and click the magnifier found on the top left of the expanded vulnerability for more options.
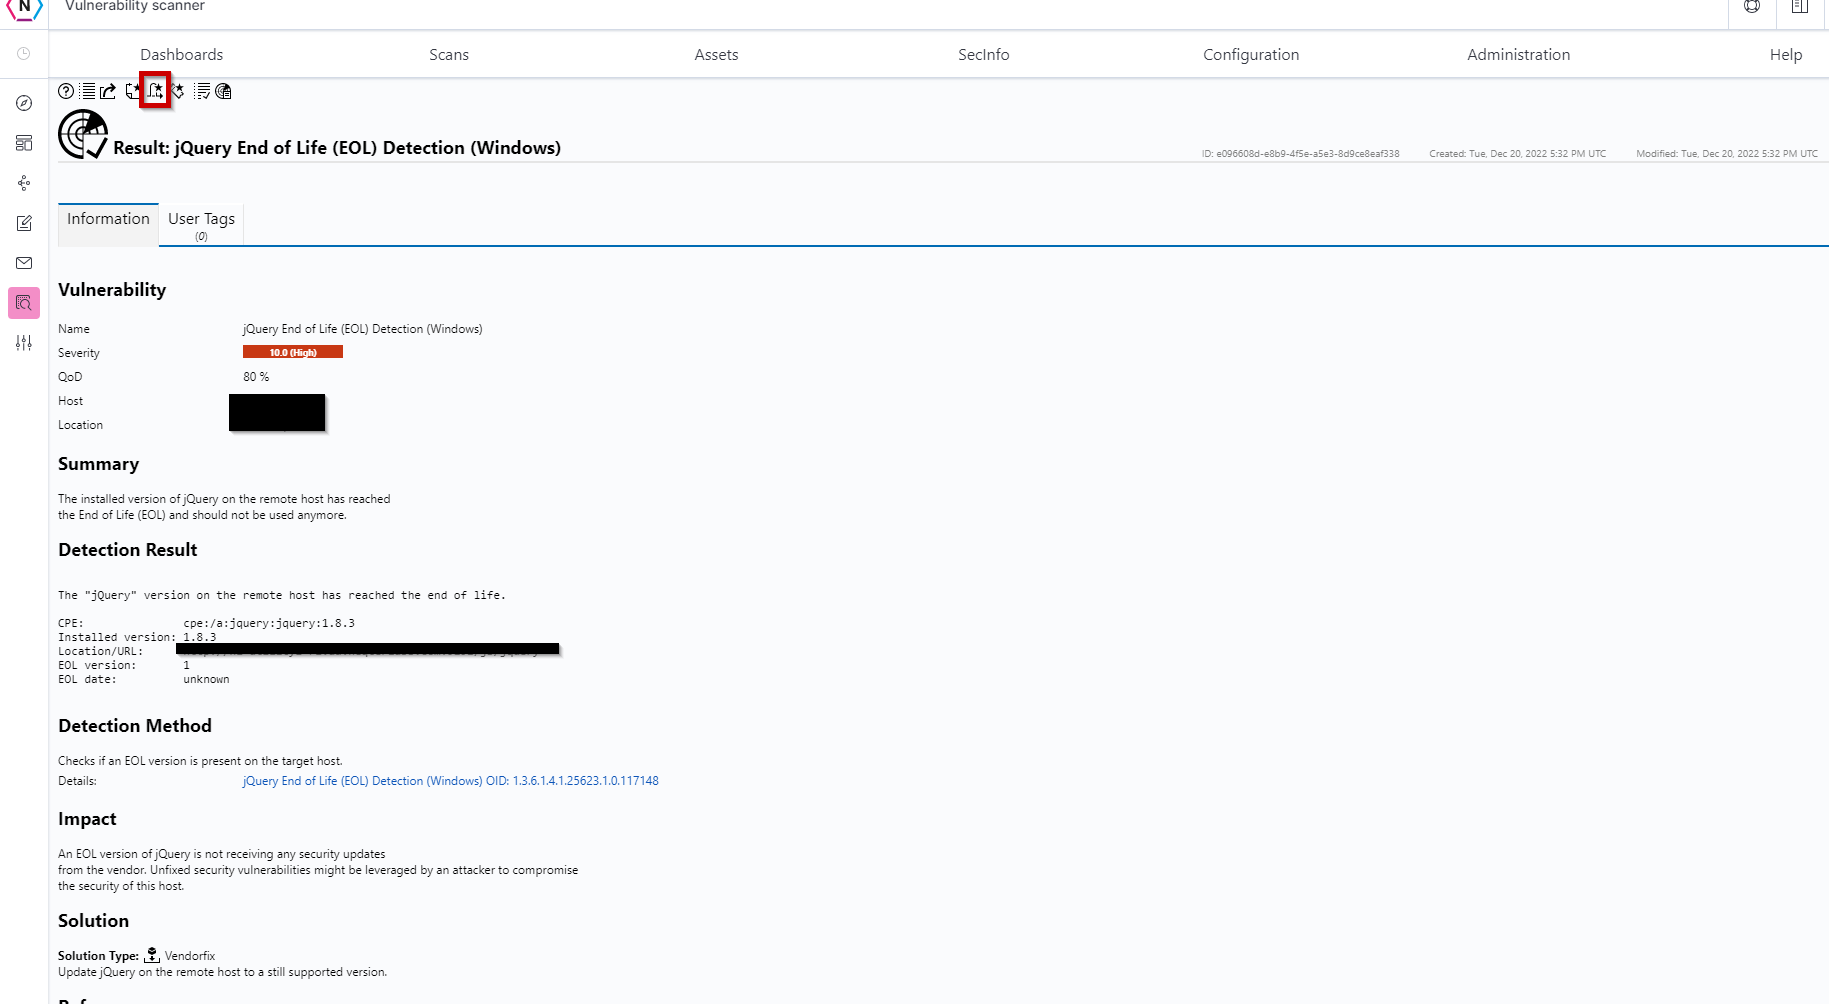
Step 3. Once on the Vulnerability’s Page, click on the override button on the top left of the page (should look like a parabola).
From here, you’ll be presented with options to help tailor your override to match with what you need.
Active: This options allows you to choose whether to have the override active or not or to have a set amount of time for it to be active before turning itself off.
Hosts: You are able to select a host or group of hosts for the override to apply to, you can also select any for it to apply to all hosts.
Location: Allows users to have only specified ports included in a override or to have any port affected by the vulnerability included.
Severity: Specifies if the scanned vulnerability requires a severity level or not for a override to apply.
New Severity: This is where users can have the override change the severity level of a vulnerability matching the parameters set previously, for example, setting it to False Positive changed the overridden vulnerability to be a False Positive for its severity instead of what it would have by default.
Task: Allows override to only apply to certain scan task results / reports. Can be changed to Any to have override to apply to all scan task reports / results.
Text: Where users can place a description to help differentiate overrides from one another.
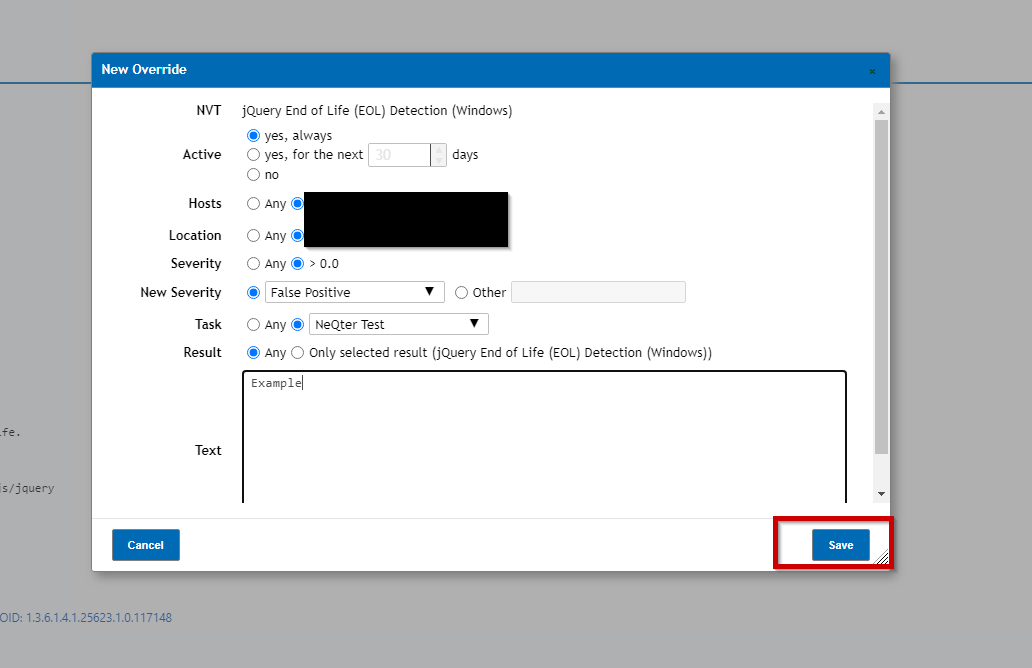
Once the override is finished click Save on the bottom right to complete.
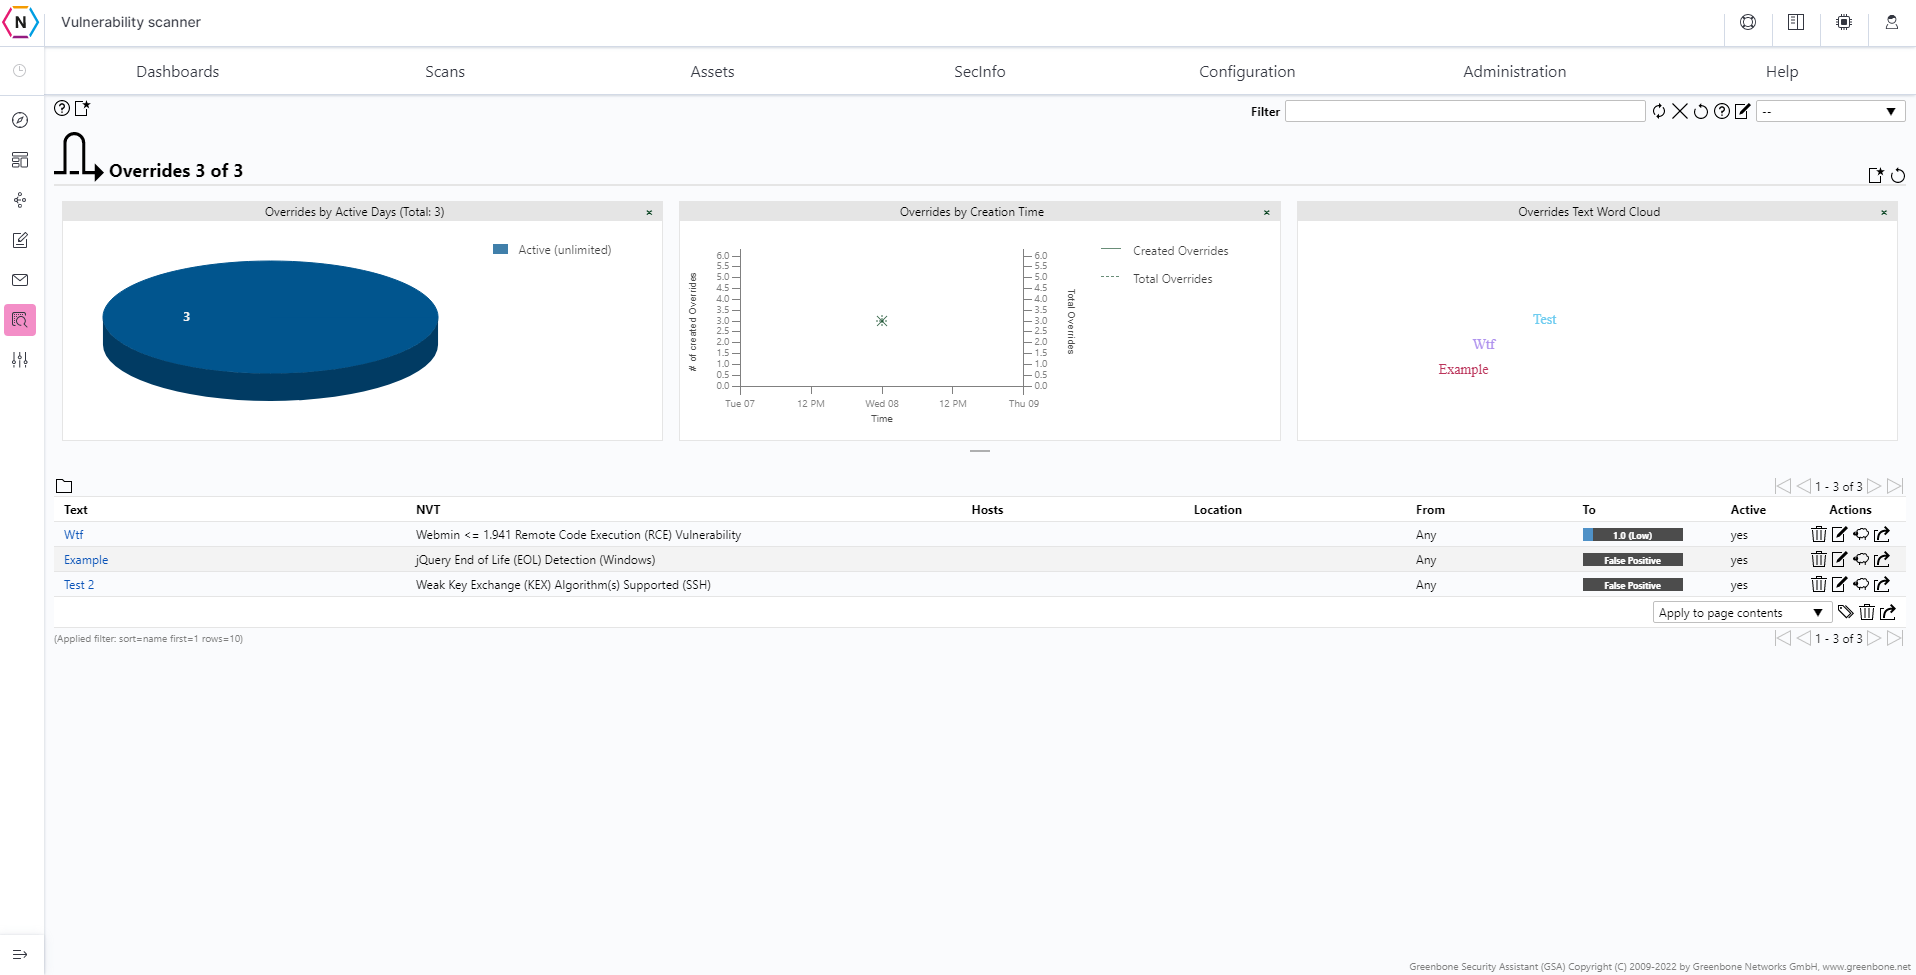
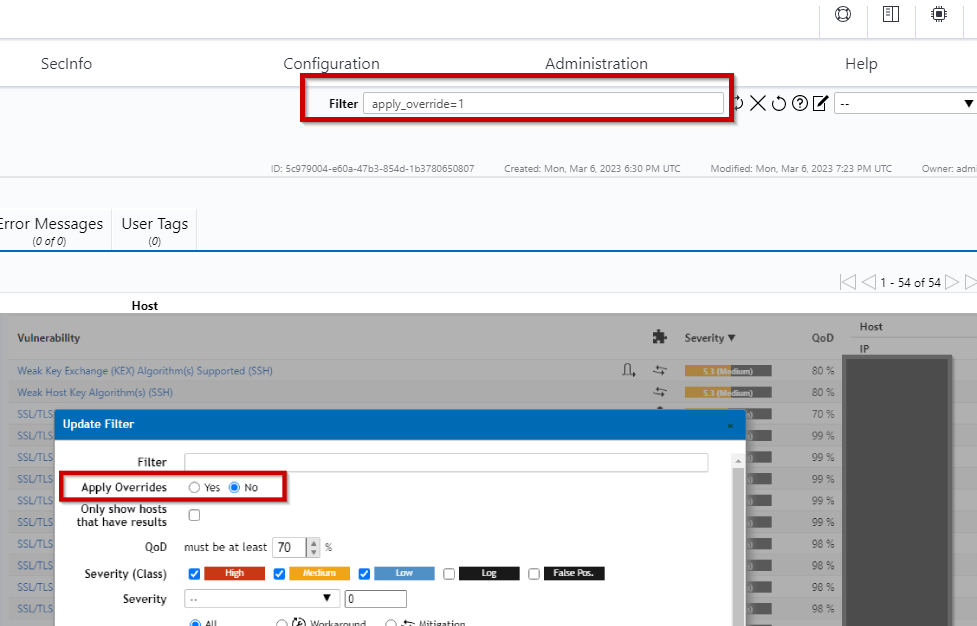
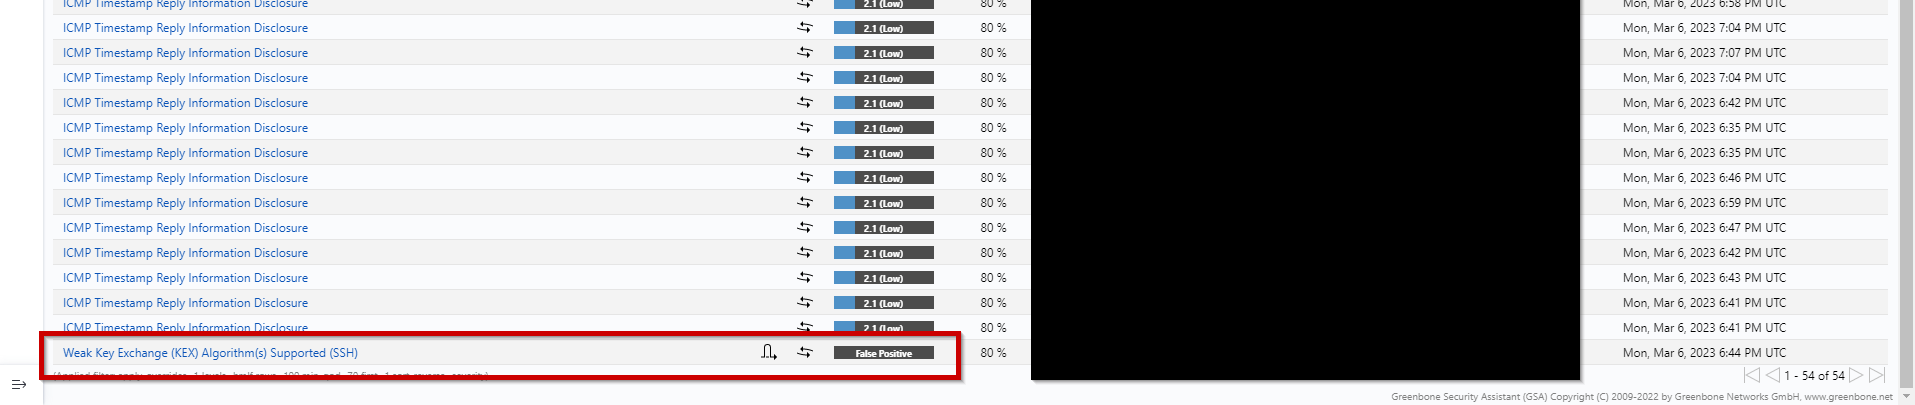
After an override is made it will appear on report / result list(s) like the one shown in this separate example:
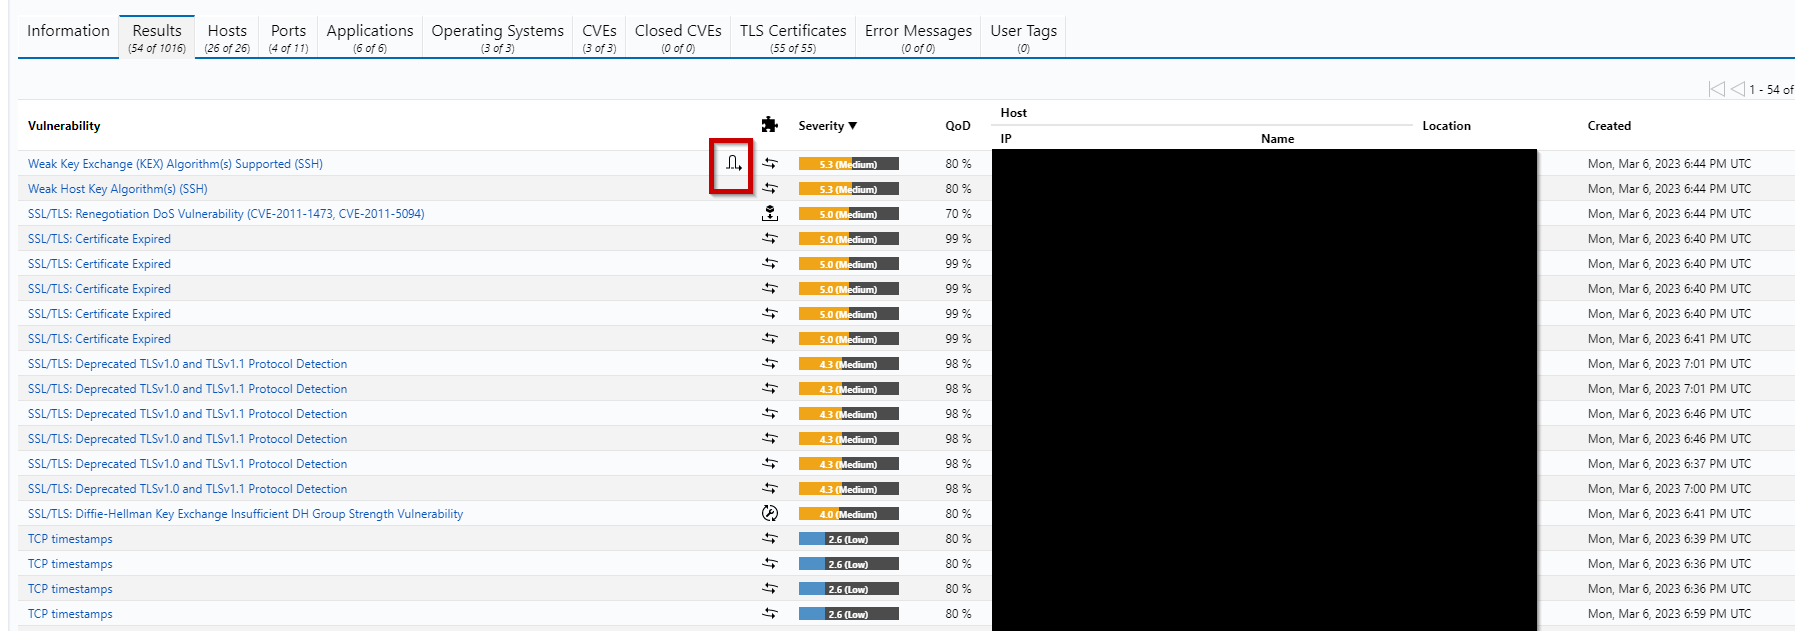
By default it will only appear like such unless the filter apply_override=1 is added by either inputting it into the filter box on top or by creating a saved filter with apply overrides enabled.
Once changed, any severity level changes will also be applied on report & result pages.
NOTICE: All scans made BEFORE version 2.15.3 will not be able to have overrides applied to them. Only scans made after updating to 2.15.3 will have this feature available fully.
Assets
Asset management is where you can find a list of all assets found via your Scan Tasks. It is broken down into the following sections:
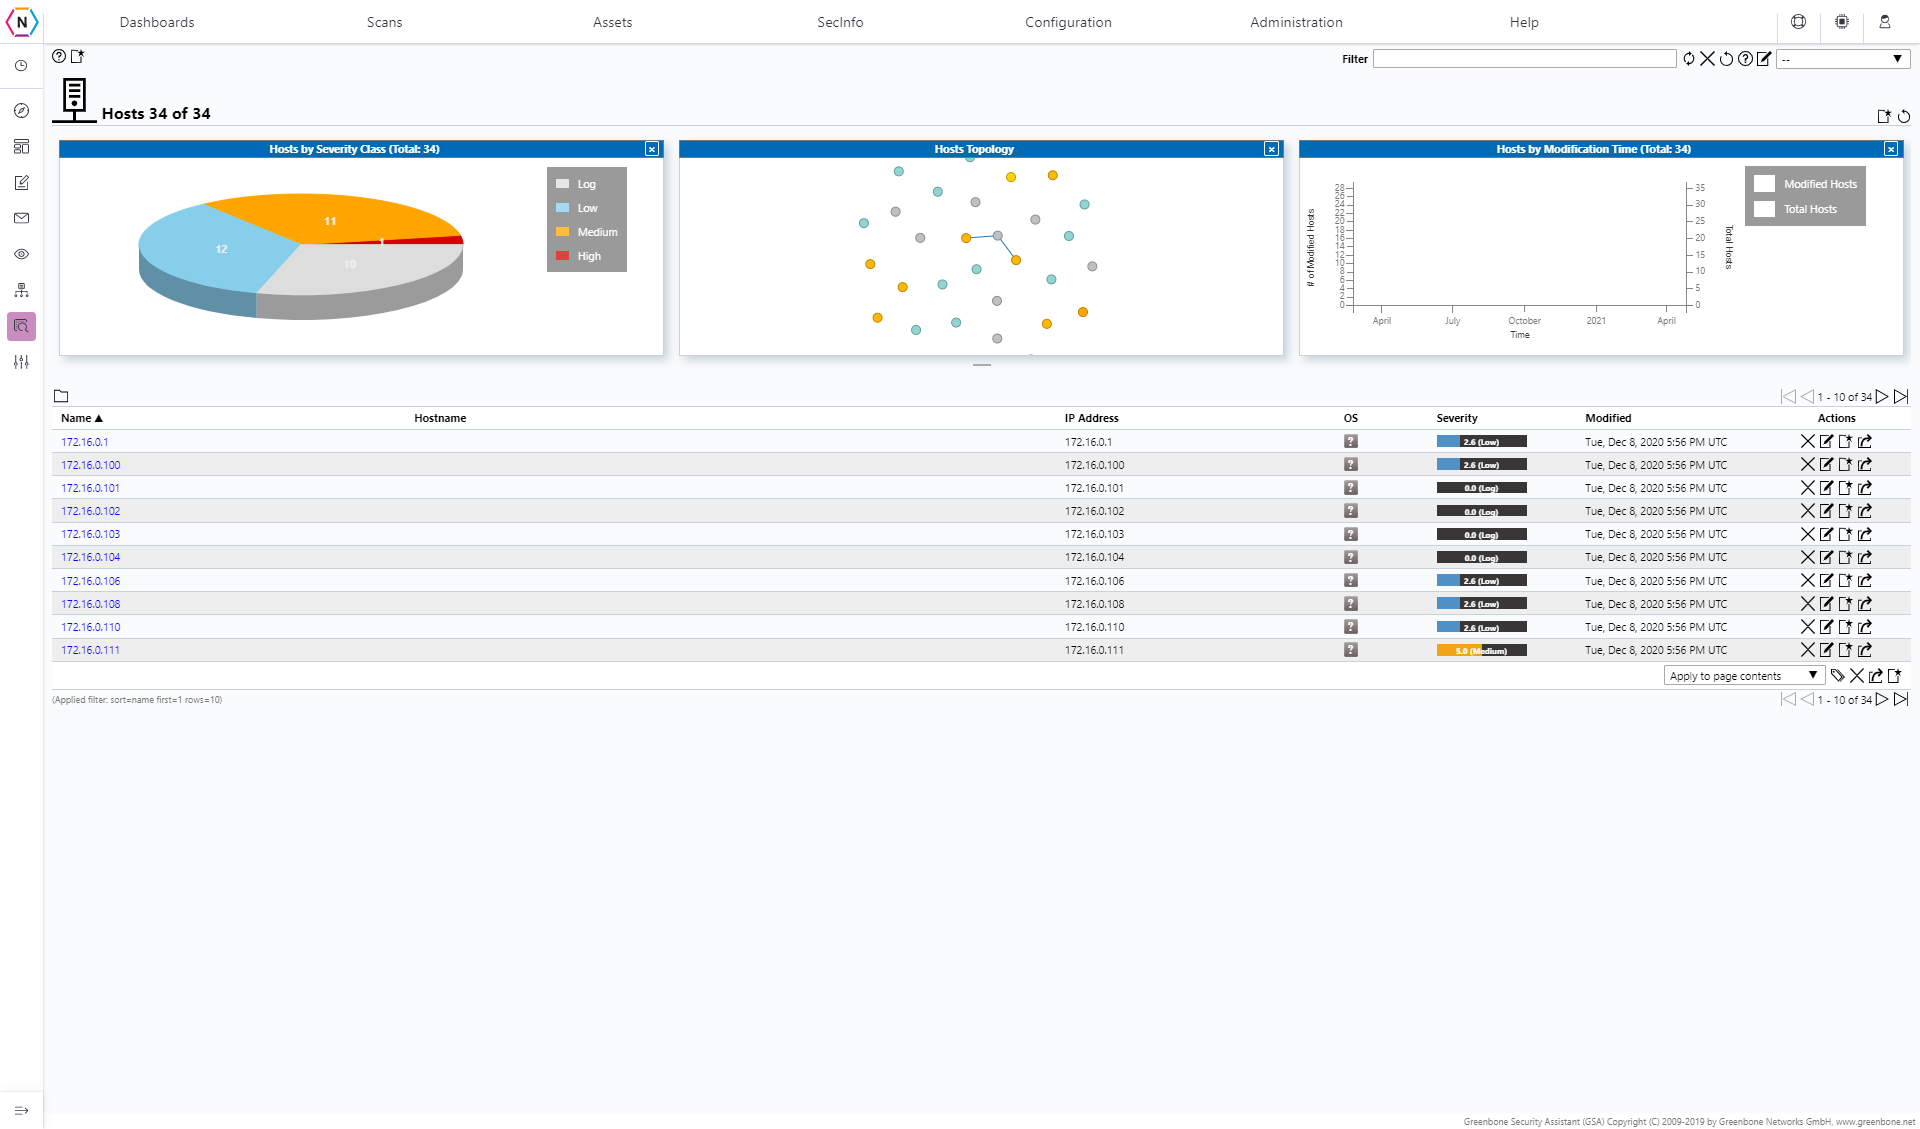
Hosts
The Hosts tab is where you can find a list of Hosts and relevant data about them such as each Host’s Name, IP Address, OS, Vulnerability Severity Class, Last Updated an action tab from which actions can be performed.
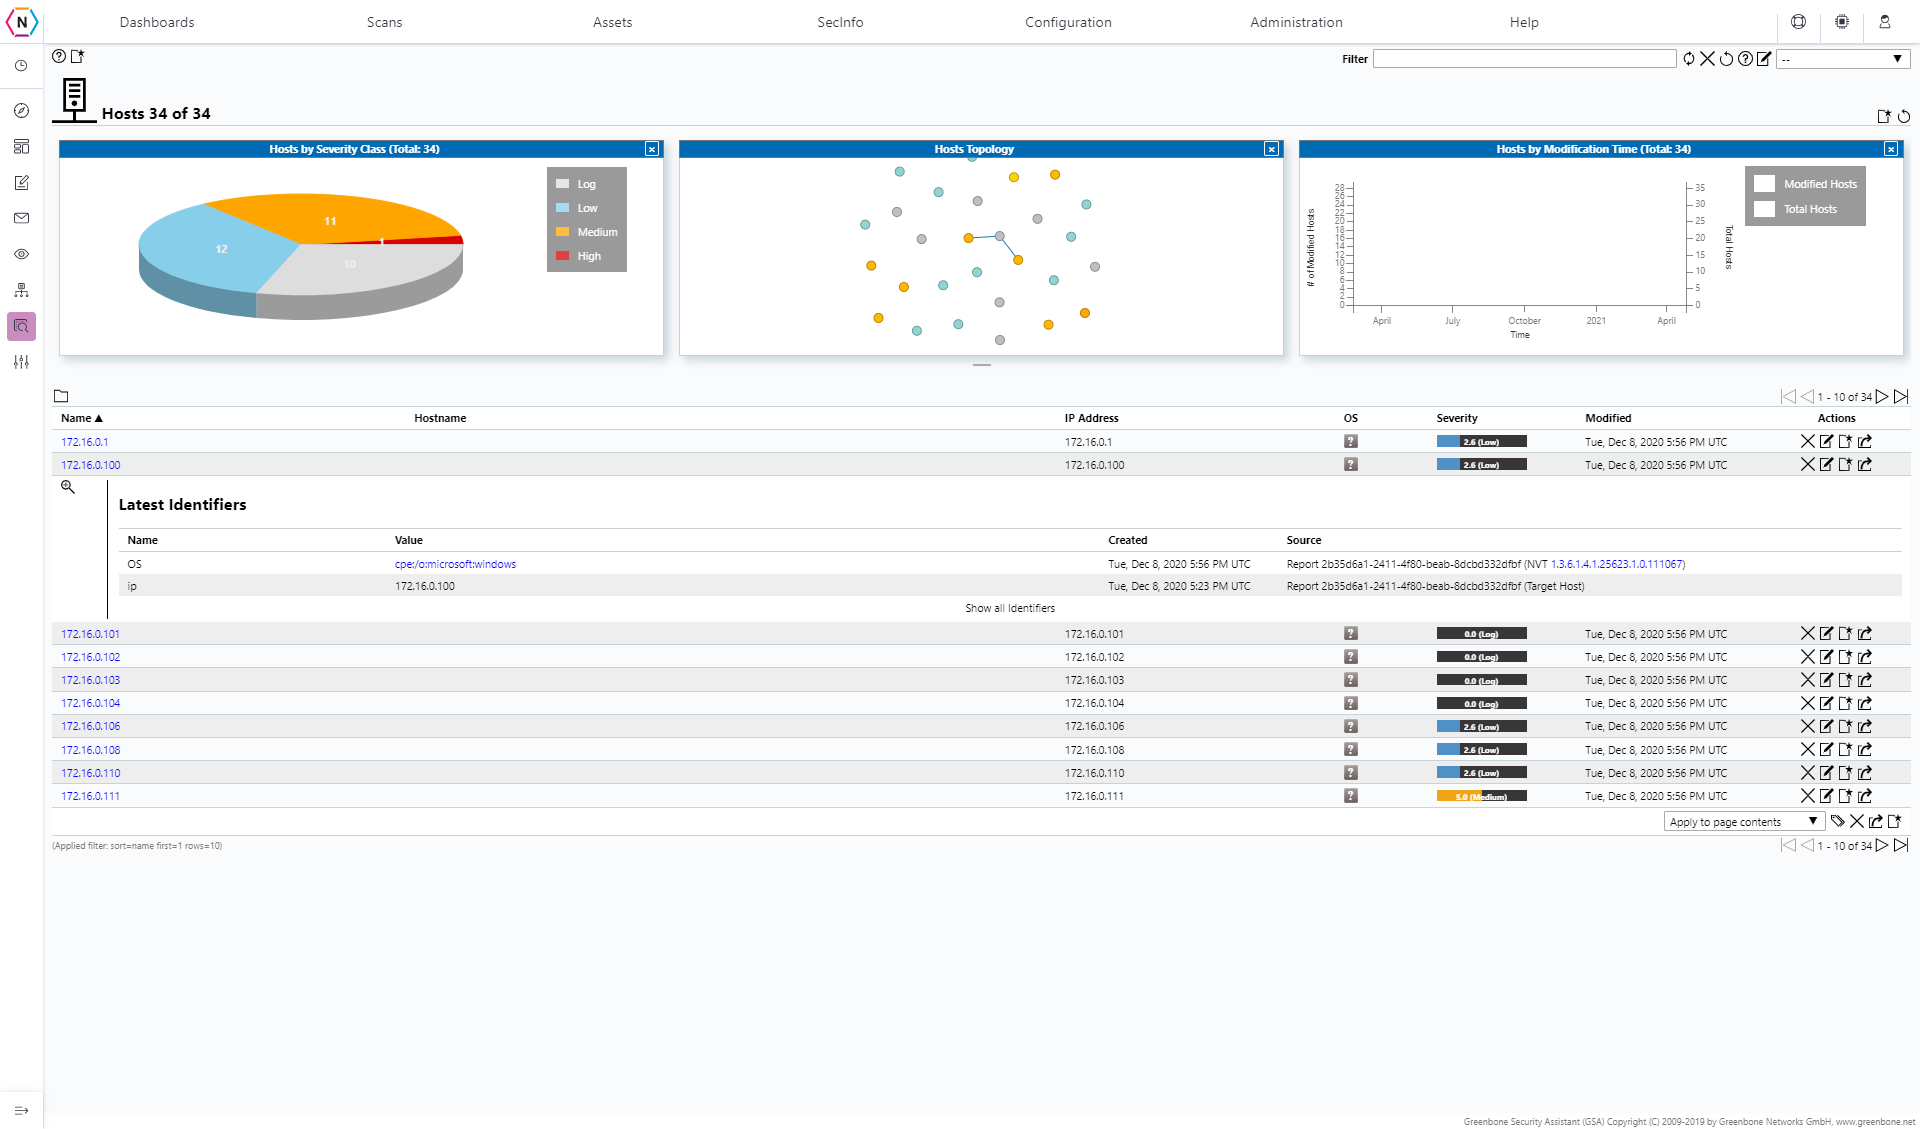
NOTE: You can also select a host in order to get more information collected about it as shown below:
Operating Systems
This tab is where a list of all Operating Systems detected by your scan tasks along with relevant data on each OS can be found. Here you can find out the Name of the Operating Systems, their Latest, Highest and Average Severity Level, the number of hosts that use the operating system, when it was last updated and actions that can be performed by the scanner in regard to the listing.
TLS Certificates
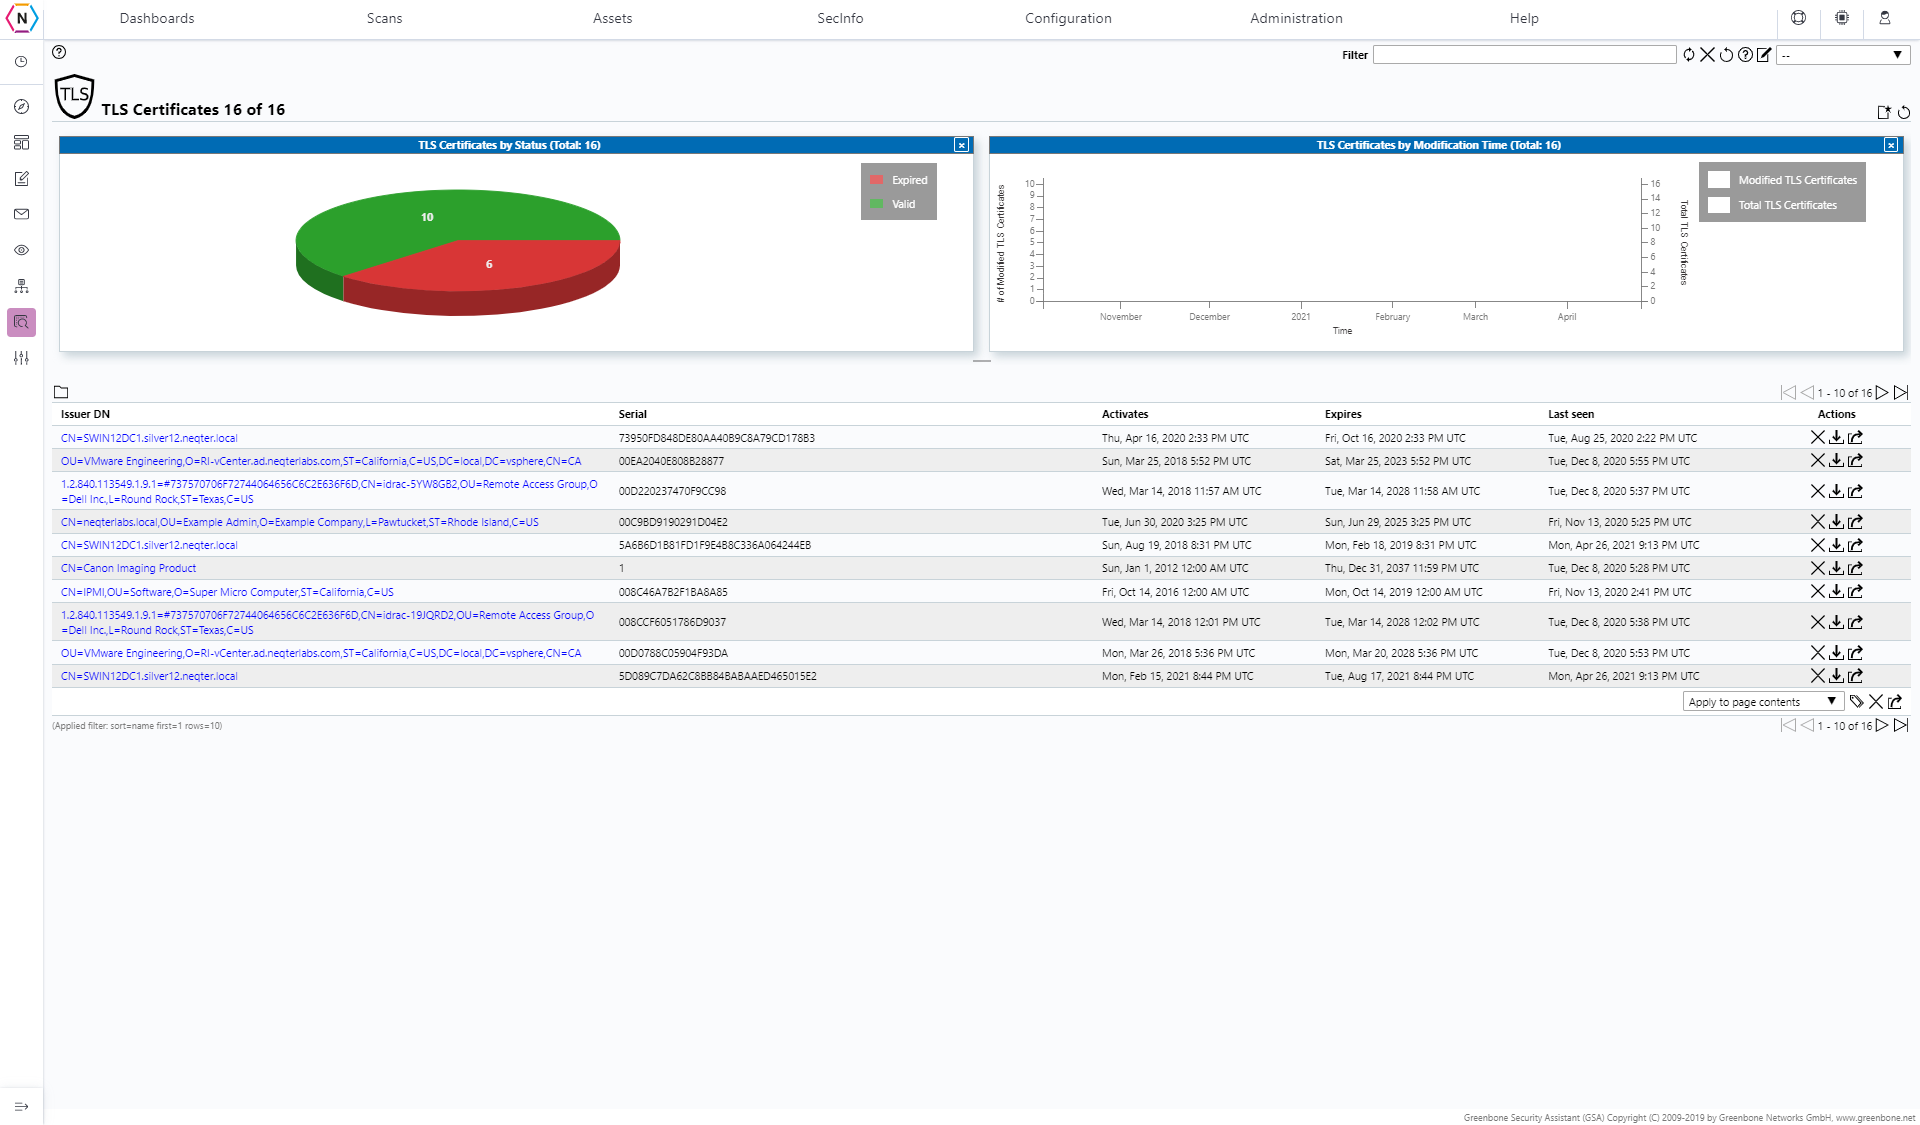
This page is where you can find a list of TLS Certificates that your Scan Task was able to detect. The list of TLS Certificates are broken down into the following categories; Issuer DN, Serial Number, activation date, expiration date and when it was last seen. You are also able to export, delete and download your Certs via the actions available next to each certificate.
Administration
The Administration tab is where you are able to find miscellaneous information about your vulnerability scanner system such as:
Trashcan
The Trashcan page is where you can find deleted items on your vulnerability scanner. Items removed / deleted on your vulnerability scanner are not permanently removed but instead placed here until the trashcan is emptied. You can empty the trash can by either clicking the Empty Trash button on the top right or by clicking Delete next to the item you’d like to remove from your system.
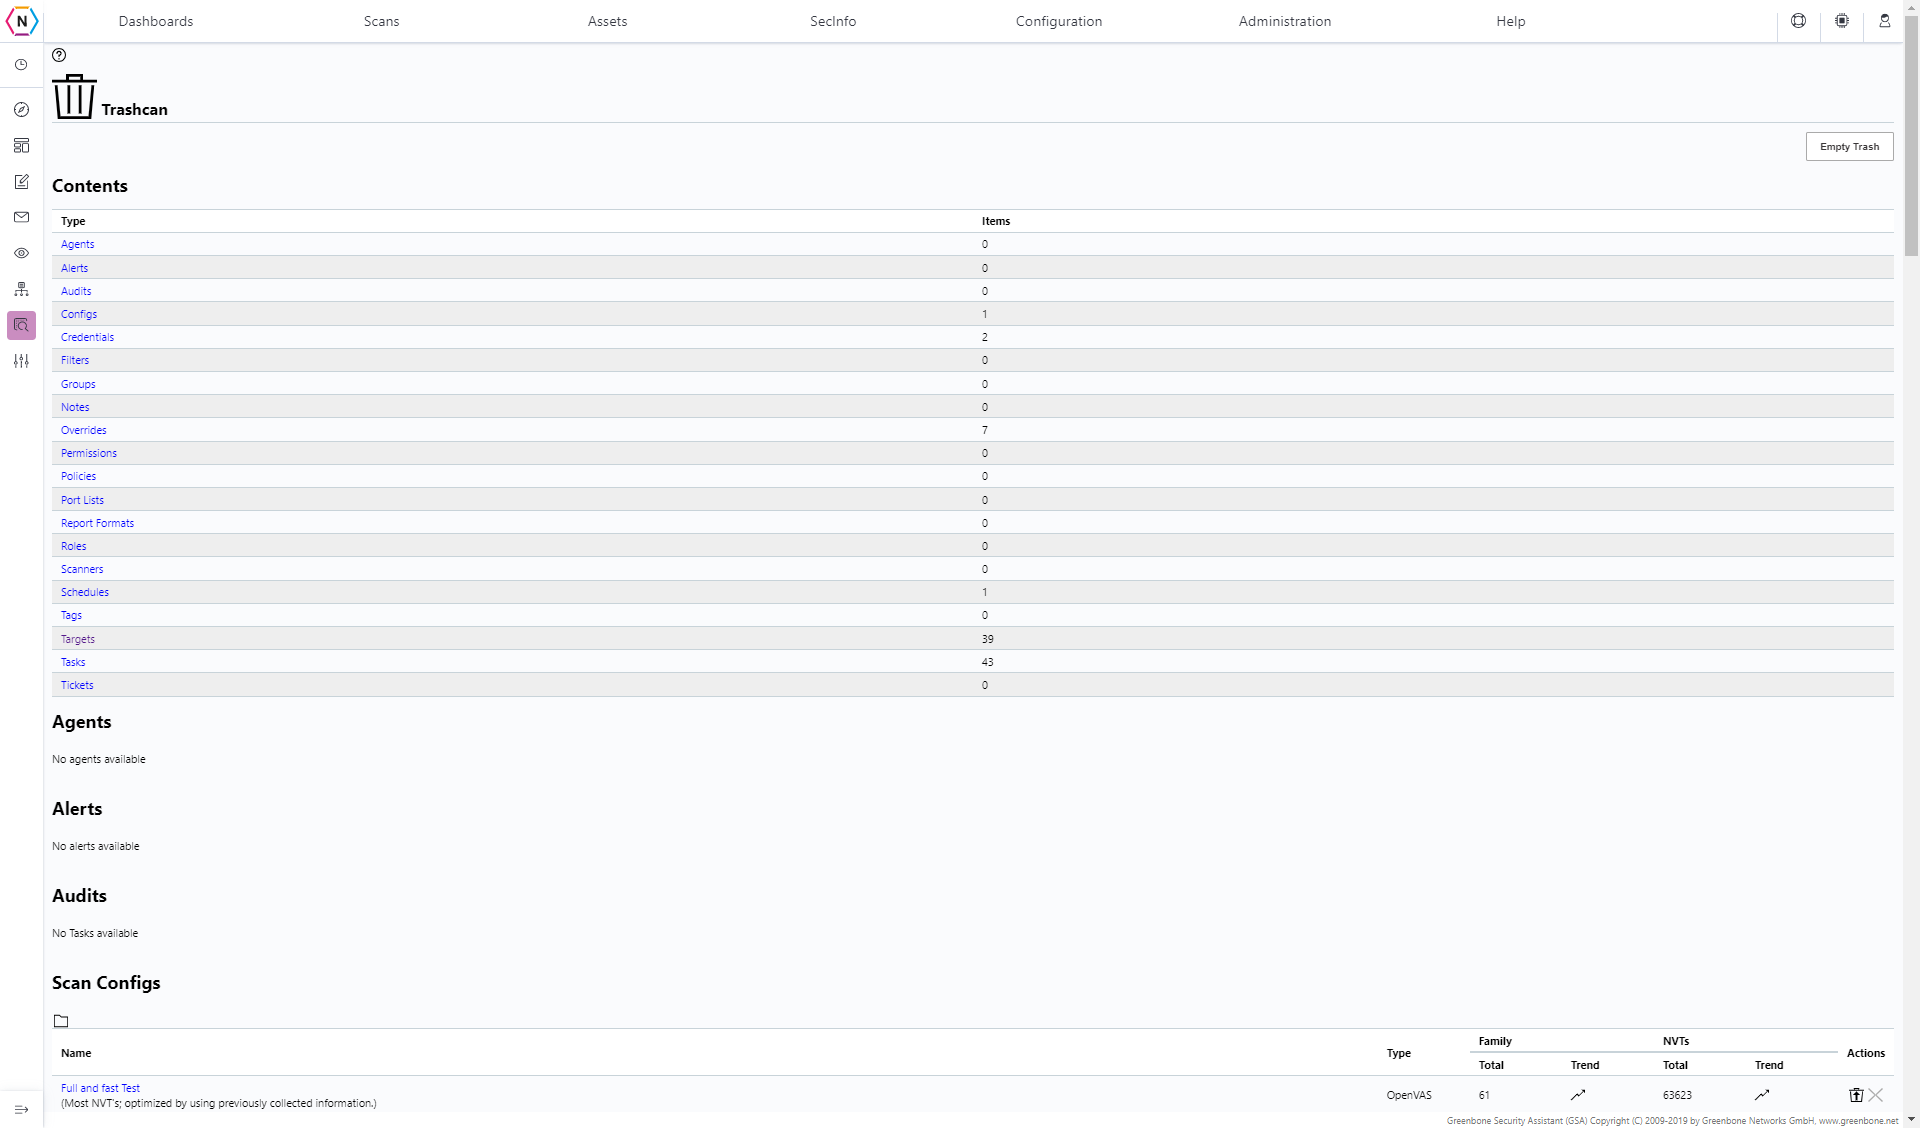
All Items found in the trashcan are seperated into different categories and it is under each of these you can view and remove individual items. You can also Restore items here as well which will bring them back to their respective sections in the vulnerability scanner.
Feed Status
The Feed Status page is where you can see what version your vulnerability scanner’s Vulnerabilities are up to date to.

NOTE: While it is normal for this page to sometimes show dates to be a few days behind if the status of your content falls behind by more than a week please check your access control(s) and make sure port 873 is allowed access. If you are sure that port 873 is allowed through your network to the neqter device contact NeQter Support to help rectify this issue!