NeQter Labs Initial Setup Guide
Firewall Setup
In this section we will look at how to have logs collected from your firewalls by your NeQter Client. Due to the amount of different Firewalls available we will only be looking at common firewalls the majority of users interact with, however if you have any questions about unsupported firewalls, if the documentation listed is different from what your firewall shows or if the Firewall is supported directly by neqter but not listed here please contact support@NeQterLabs.com for further assistance.
Sophos Configuration
You can configure your Sophos Firewall to send syslog information to the NeQter client by following the instructions below:
1. Go to System Services > Log Settings and click Add to configure a syslog server.

2. Enter a Name for the NeQter Client.
3. Enter the IP Address of your NeQter Client. Messages from the device will be sent to the entered IP Address.
4. For the Port number that the firewall will use for communicating with the NeQter Client enter 514.
5. Select the Facility from the available options. As an example, we have selected the default value i.e. DAEMON.
NOTE: Facility informs the NeQter Client of the log message’s source. It is defined by the syslog protocol. You can configure the facility to distinguish log messages from different devices. This parameter helps you identify the device that recorded a specific log file.
Available options:
DAEMON (Default): Information on the services running in the device as daemon.
KERNEL: Kernel log.
LOCAL0-LOCAL7: Log level information.
USER: Logging based on users who are connected to the Server.
6. Select the Severity Level from the available options. Severity level is the severity of the message that has been generated. The firewall logs all messages with a severity level equal to or greater than the level you select. For example, select Error to log all messages tagged as Error as well as any messages tagged with Critical, Alert and Emergency. Select Debug to log all messages.
Available options:
Emergency (Default): The System is not usable.
Alert: Action must be taken immediately.
Critical: Critical problem/error.
Error: An Error has occurred.
Warning: Warning of a problem/error.
Notification: Normal, but significant.
Information: Informational.
Debug: Debug-level messages.
7. Select the Format from the available options.
8. Click Save to save the configuration.
Fortigate Setup
To set up your Fortigate Firewall to send logs to the NeQter Client, follow these instructions:
1. Log in to the FortiGate web interface.
2. Select Log & Report > Log Setting or Log & Report > Log Config > Log Setting (depending on the version of FortiGate).
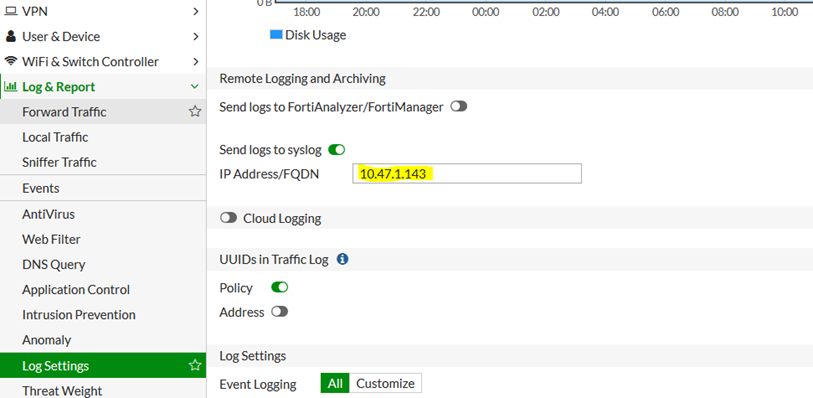
3. Select the Log to Remote Host option or Syslog checkbox (depending on the version of FortiGate).
4. Enter the IP address and port of the NeQter Product.
5. Select the logging level as Information or select the Log All Events checkbox (depending on the version of FortiGate).
6. Select the facility as local7.
7. Click Apply
Barracuda Configuration
1. Go to CONFIGURATION > Full Configuration > Box > Infrastructure Services > Syslog Streaming.
2. Click Lock.
3. Set Enable Syslog Streaming to yes.
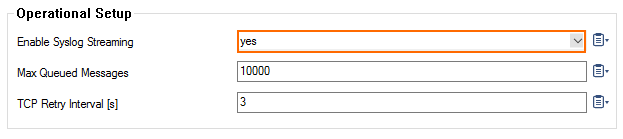
4. Click Send Changes and Activate.
5. In the left menu, select Logstream Destinations.
6. Expand the Configuration Mode menu and select Switch to Advanced View.
7. Click Lock.
8. Click the + icon to add a new entry.
9. Enter a descriptive name in the upcoming dialog and click OK. The Destinations window should open.
10. Select the Logtream Destination and select Explicit IP
11. Enter the Destination Port for delivering syslog messages. The Barracuda Networks CC syslog service listens on port TCP 5143 for SSL connections and on TCP and UDP port 5144 for un-encrypted streaming. The default is to use encryption for delivery; therefore, port 5143 is pre-configured.
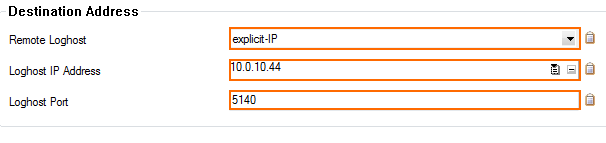
NOTE: When changing the port, you must also adapt the host firewall rule for syslog traffic to use the new port.
12. Select the Transmission Mode (TCP or UDP - default; for SSL connections TCP is automatically set).
13. Click OK.
14. Click Send Changes and Activate.
You may specify a particular address to be used in order to send the log data.
Watchguard Configuration
To configure your Watchguard Firewall to send syslogs to your NeQter Client, please go through the following instructions:
1. Select System > Logging.
2. Click the Syslog Server tab.
3. Select the Send log messages to these syslog servers check box.
4. Click Add.
5. In the IP Address text box, type the NeQter Box’s IP address.
6. In the Port text box, make sure the port is 514 (the default port).
7. From the Log Format drop-down list, select Syslog. (Optional) In the Description text box, type a description for the server.
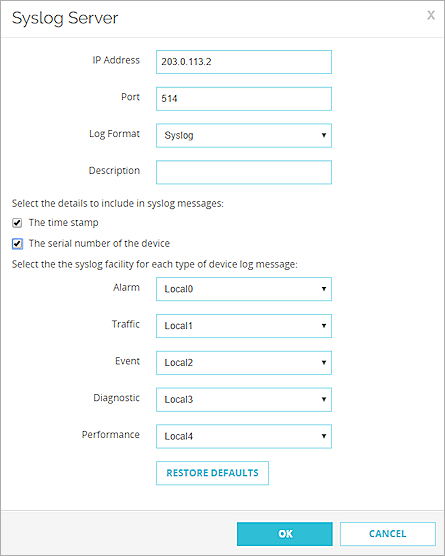
8. To include the date and time that the event occurs on your Firebox in the log message details, select the time stamp check box.
9. To include the serial number of the Firebox in the log message details, select the serial number of the device check box.
10. In the Syslog Settings section, for each type of log message, select a syslog facility from the drop-down list.
For high-priority syslog messages, such as alarms, select Local0.
To assign priorities for other types of log messages (lower numbers have greater priority), select Local1 – Local7.
To not send details for a message type, select NONE.
NOTE: To restore the default settings, click Restore Defaults.
11. Click Save.
Sonicwall Configuration
To setup your Sonicwall to send logs to your NeQter Client, follow the steps below:
1. Login to the SonicWall firewall as admin.
2. Navigate to Manage > Policies > Objects > Address Object.
3. Click Add at the top of the page.
4. Type in a name for the object.
5. Set the Type drop-down box to Host.
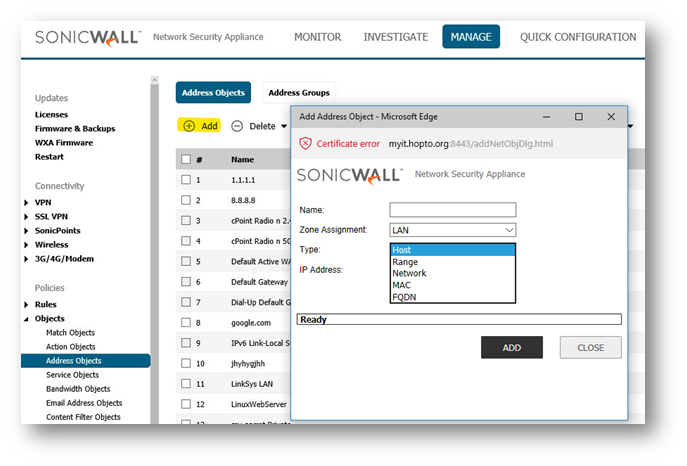
6. Type in the IP Address of your NeQter Client into the IP Address textbox.
7. Click Add to finish creating your Address Object.
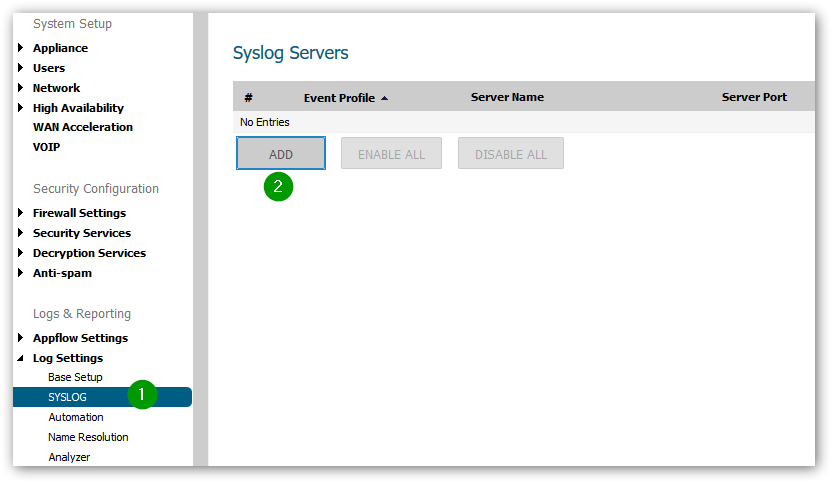
8. Navigate to Manage > Log Settings > SYSLOG.
9. Under Syslog tab, Click on the Add button.
10. Select the Name or IP address of the NeQter Client from the dropdown
NOTE: it should be the same as your previously created address object.
11. Select Syslog Format as ‘Enhanced’.
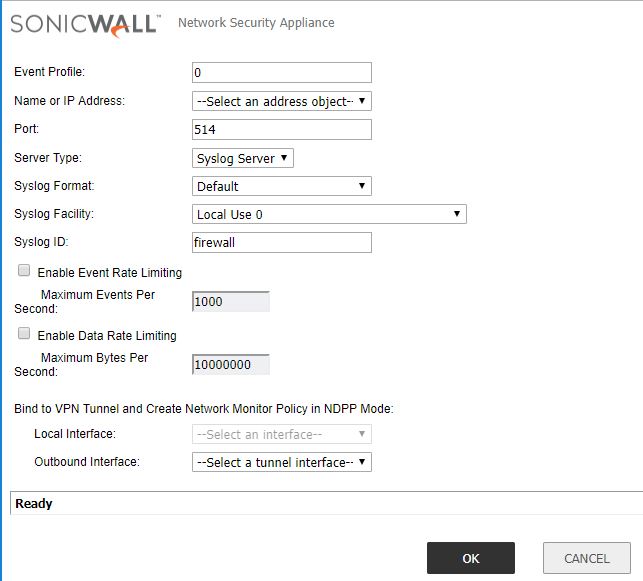
12. Click OK.
After a couple of seconds, newly added Syslog server will show up.
Synology Configuration
To setup your Synology device to send logs to your NeQter Client, follow the steps below:
1. Go to Log Center > Log Sending.
2. Check the box for Send logs to a syslog server.
3. Enter the NeQter Device’s IP address in Server.
4. For the port number make sure to use the default Syslog port of 514.
5. Select TCP under Transfer protocol.
6. Select BSD (RFC 3164) from Log format to send logs using the selected format.
7. Click Send test log to confirm the syslog server can receive the log successfully. If the NeQter Device does not receive the test log, please check your settings are correct.
8. Click Apply to save settings.