NeQter Labs User Manual
Table of Contents
NeQter Settings
The Settings page is where you can access different sub menus that can be used both setup and change the tools available to you on the NeQter client to better suit your needs, the page is represented by a icon that looks like a set of switches.
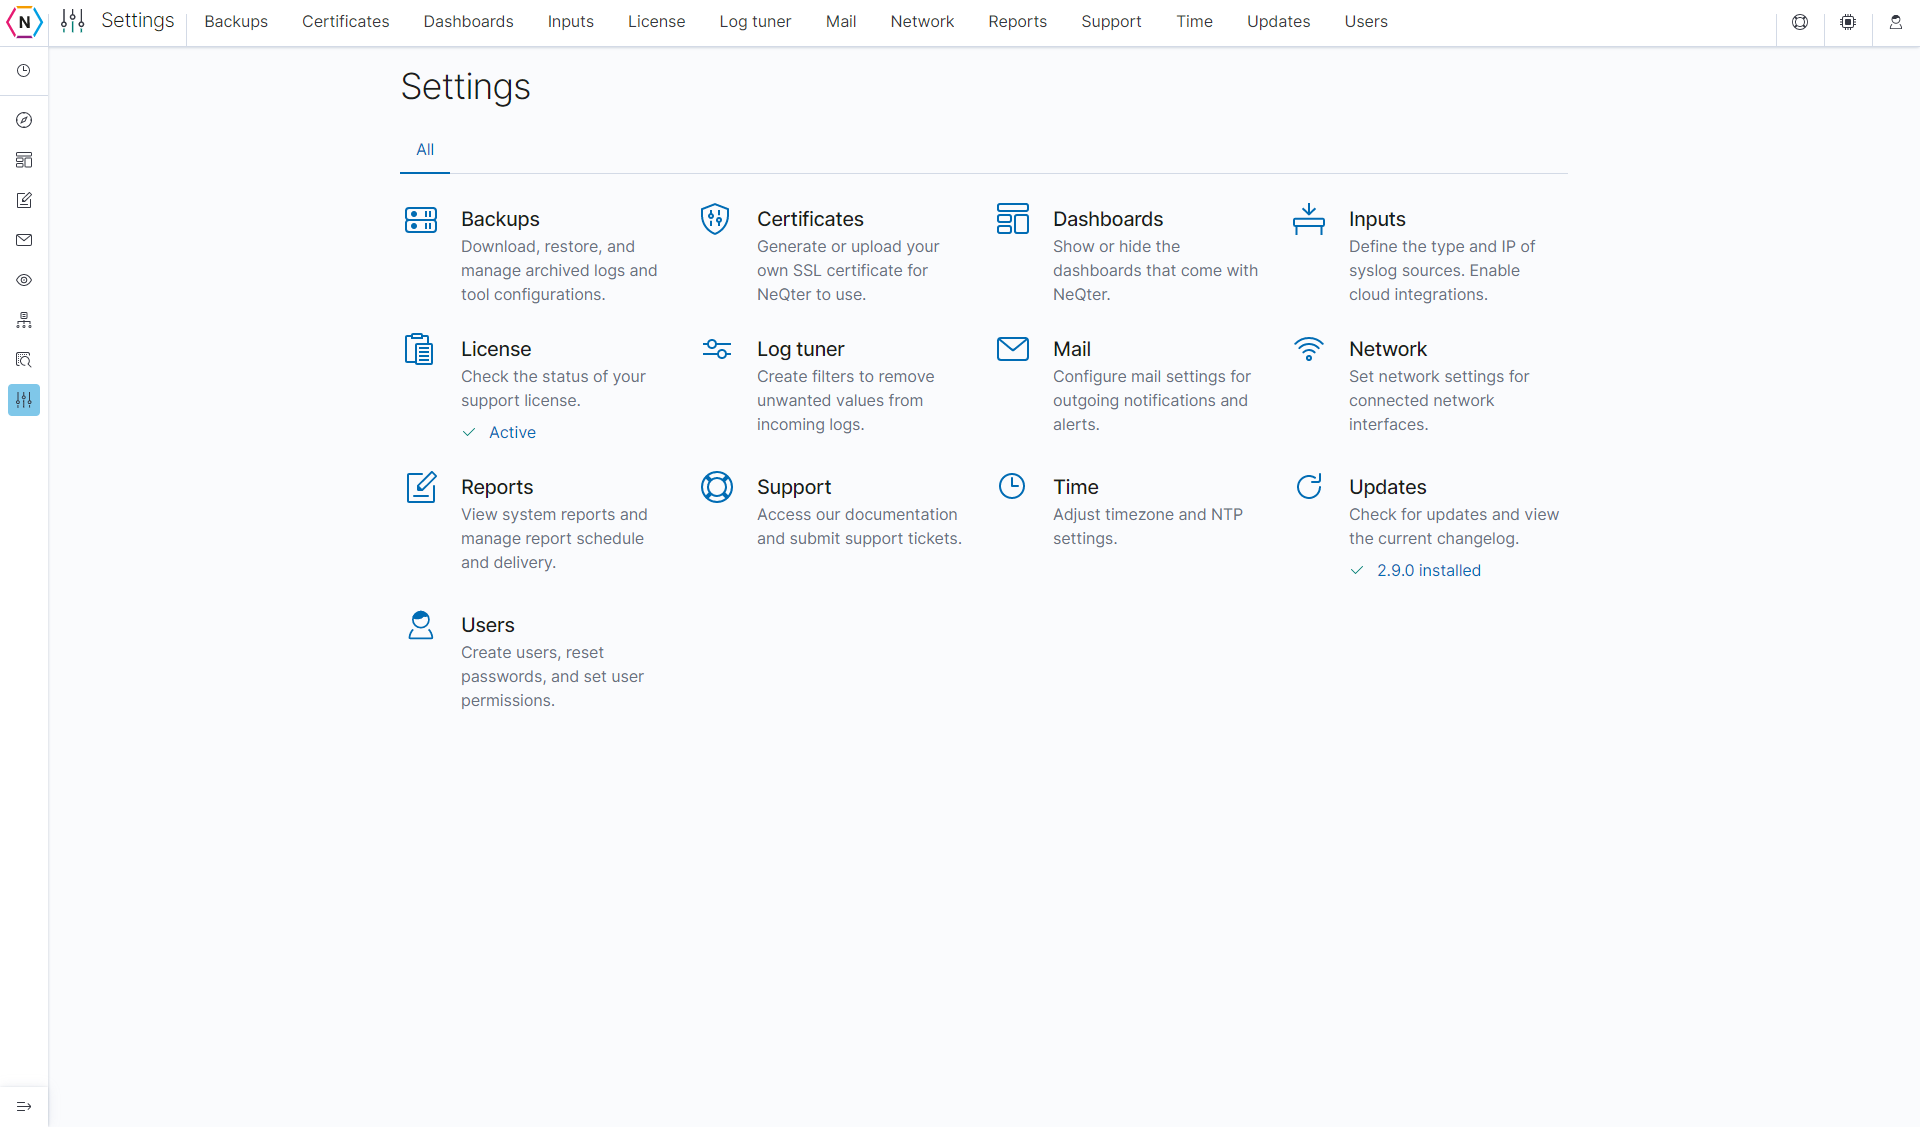
Backups
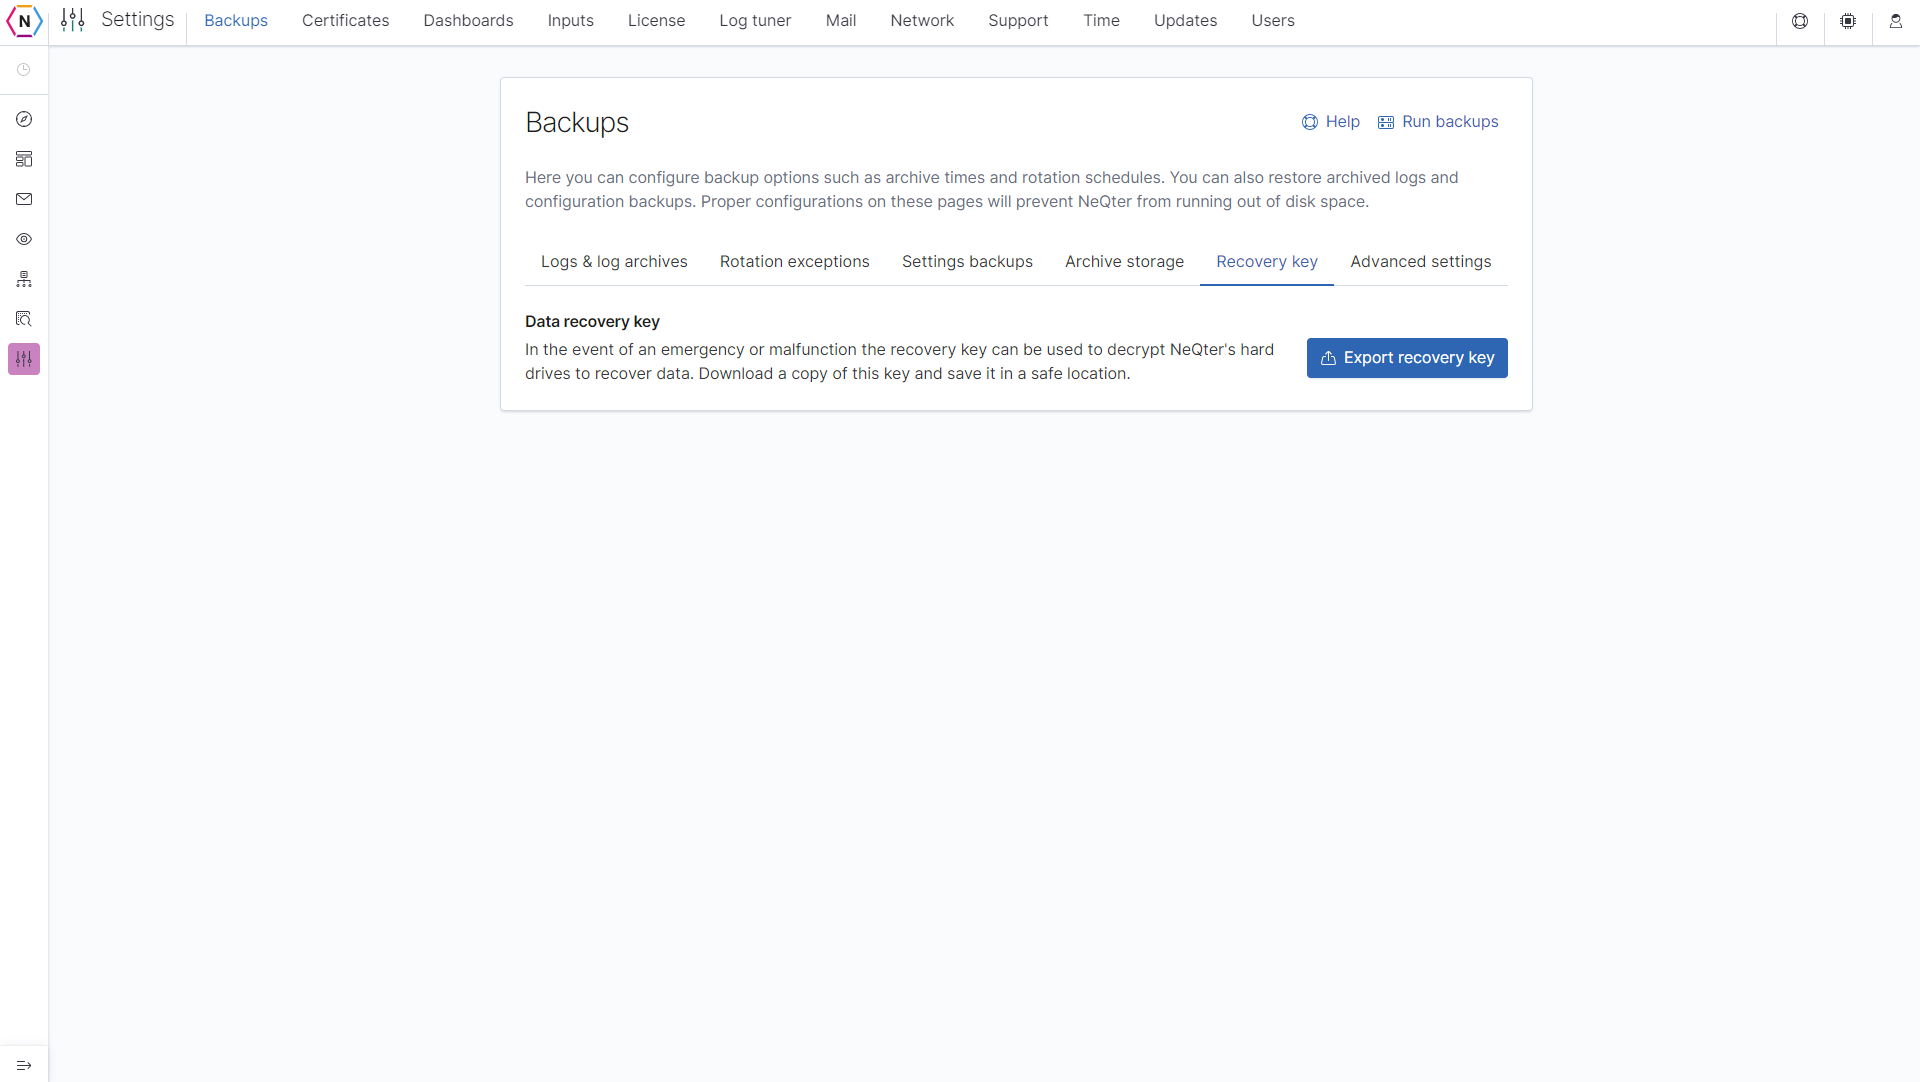
The Backups Page allows you to configure how backups are done on your system such as archive times and rotation schedules. From this page you can restore archived logs as well as download them. Making sure you have logs archived and ready to be restored in case of an issue occurring is a very integral part of becoming NIST Compliant, to access this section in your NeQter Client, go to Settings > Backups
Log types:
There are two types of logs in the eyes of the Backups system.
- Visualized logs: Visualized logs are logs that are searchable and visualized in NeQter’s dashboards. Visualized logs are stored within NeQter’s indices and take much more space to store than archived logs.
- Archived logs: Archived logs are logs that have been stored in a compressed format. Archives can live on NeQter’s internal storage or on an external file server. Because archives are compressed, they take much less space than visualized logs helping the NeQter Box save space. Archived logs can be restored back into NeQter’s indices in order to be visualized again.
Backup services:
Archival
The backup service runs every day at 1am. The backup service will begin by archiving all visualized logs that meet the user configured archive age.
NOTE: This operation cannot be interrupted once it begins. This process may take upwards of a couple of hours.
Deletion & rotation
The backup system runs every day at 1am. When archives are done being created then the deletion process will begin. The deletion process is when NeQter removes old archived logs from its storage. The age at which a log is deleted is user configured. Visualized Logs meanwhile go through a rotation process during this time in which they are checked to see if they should be compressed or not. Any log found to be older then the Retention Period Value (which goes by days) will be compressed and archived.
Run time
The system automatically runs the backup service every day at 1 am.
Configuration:
There are four separate options that must be configured for logs.
- Retain logs after how many days: This determines when logs will be deleted from NeQter’s database. This means that the logs will no longer be searchable from the logs tab or displayed in dashboards.
- Toggle log backups: Enables or disables the creation of log archives and subsequently most of the backups feature.
- Archive logs from NeQter after how many days: This represents the age at which a visualized log must be before it is archived. For example,if this number is set to 3 days then a log generated on Monday will be archived when the backup operating runs Thursday morning. As a note, this number must be less than when visualized logs are configured to be removed (the second and third configuration option on this tab).
- Retain log archives for how many days: This determines how long archived logs are to remain on the system before deletion. If a archived log is found to be on the system for longer than the set amount of days allocated then it is deleted.
NOTE: Once a archive is deleted there is no way to recover it!

Restore:
When restoring indices from the log archives you have the ability to choose which indices you would like to restore from that day. You can choose multiple indices, or just one. Until the restore is finished you will not be able to save settings, delete archives, or restore from any other archives.
NOTE: This operation cannot be interrupted once it begins. This process may take a long time.
Rotation exceptions
A Rotation Exception is a index that you have manually chosen to not be automatically deleted due to age during the backup service process. It will only be deleted when it reaches its specified removal date.
Adding exceptions
To add an exception, go to Settings > Backups > Rotation Exceptions and then click the Add Index button to select one or more indexes to be exempt from the default retainment period. From here you will be prompted to select the date of which the log will be deleted.
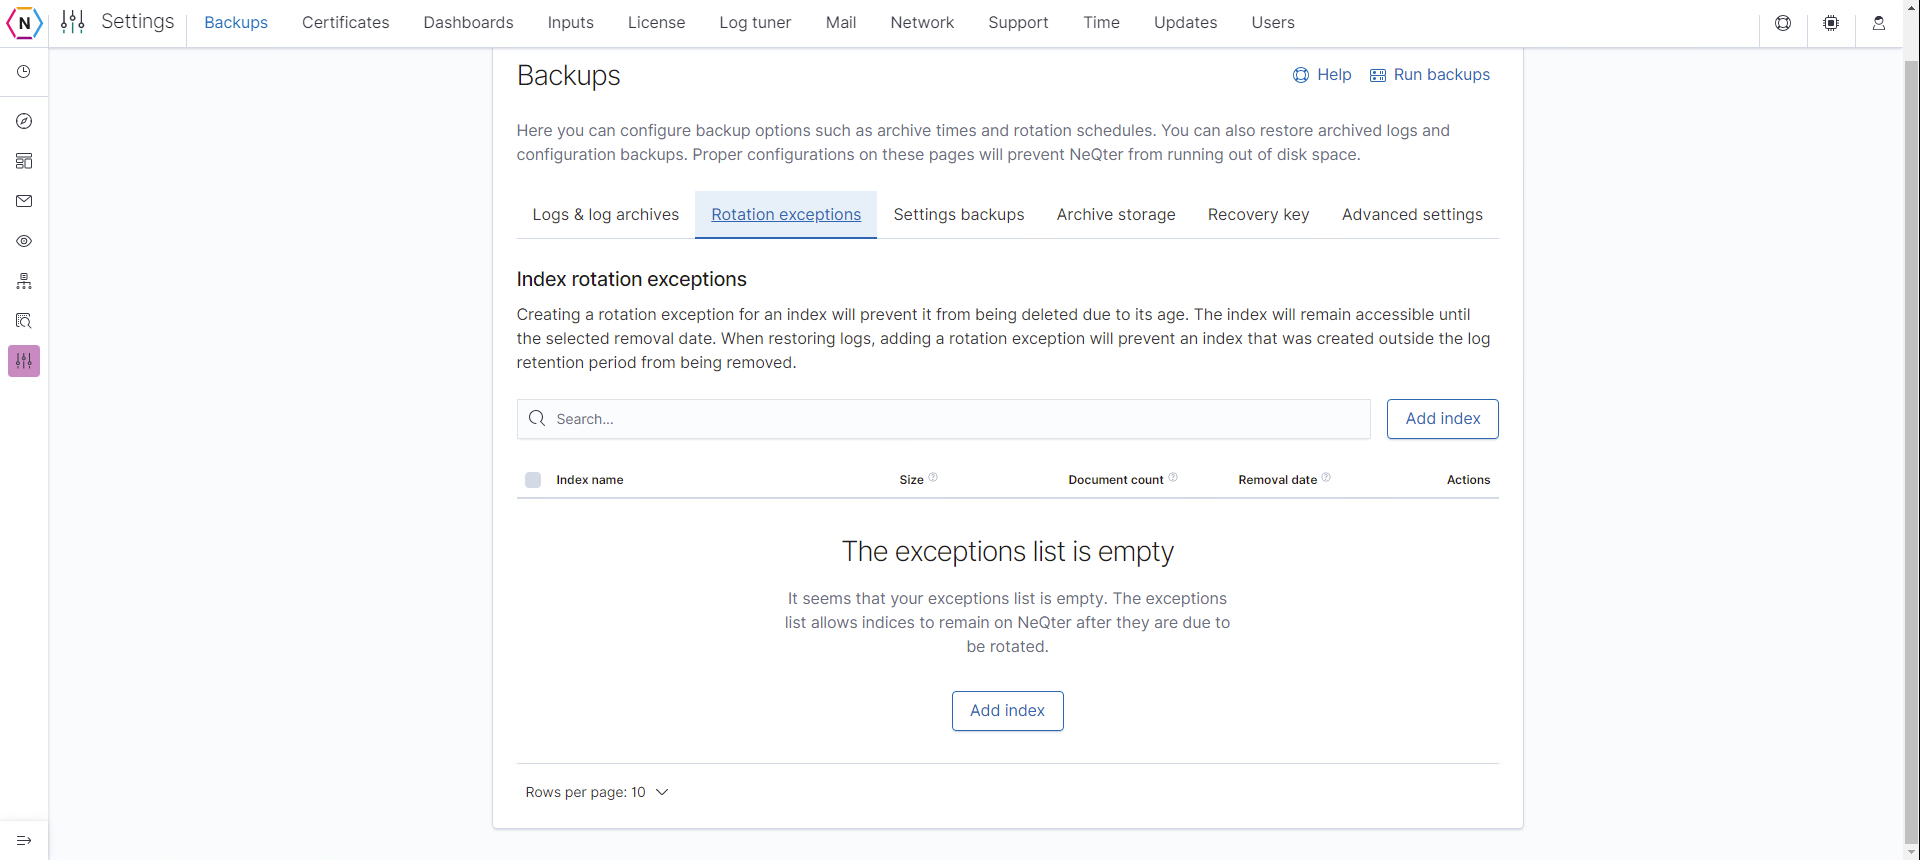
NOTE: Removing exceptions does not remove the index, it only removes the exception from said index, allowing the default backup settings to take effect during the next run time.
Settings Backups
The Settings backup tool is used to backup your configuration settings across the NeQter Core. For this backup tool there are two options that can be configured.
Toggle toolset settings backup: This will determine if a backup of NeQter’s tools and settings will be taken every night. Snapshots are taken every night at 1am, all tools on the neqter device are snapshot with the exception of network settings (this is stop potential conflicts with an existing neqter device in the scenario that this tool is being utilized to move settings from a existing and running neqter to a new device) . Retain toolset settings archives for how many days: This determines how long tool and setting backups will be stored before they are deleted.
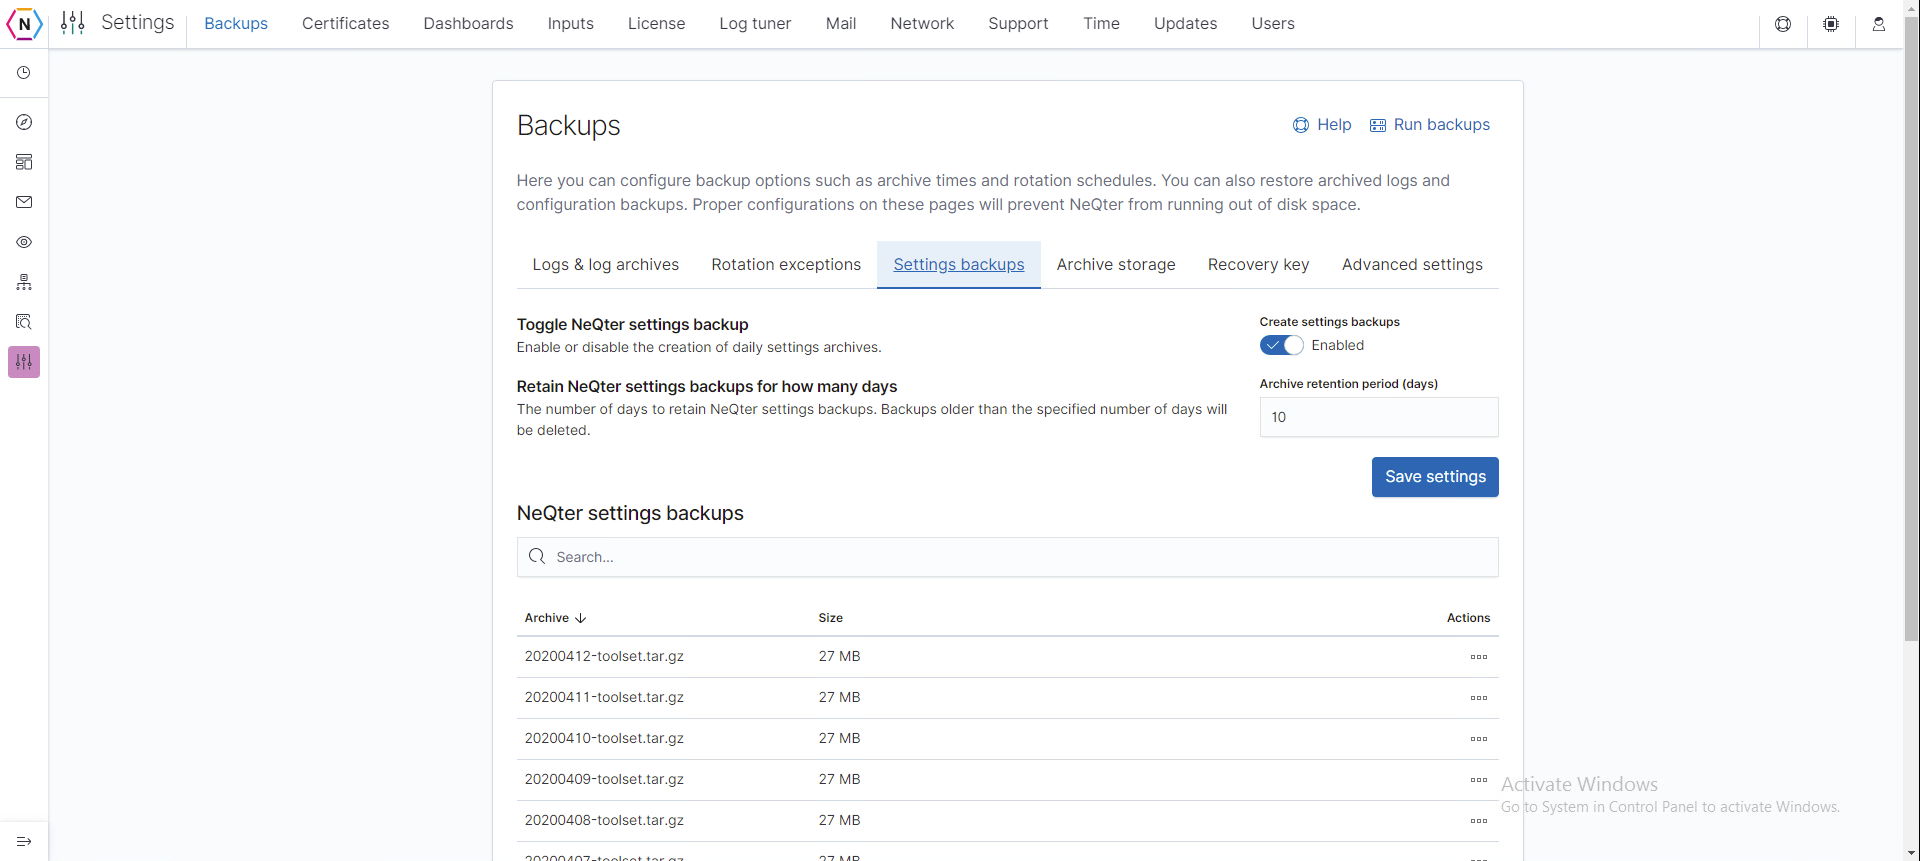
NeQter Settings Backup
The Archive of tools and settings backup archive files can be found displayed on this table. From here you can delete, restore and export backups. While deleting and exporting requires only selecting what you want and clicking the respective action, the restore action will bring up a prompt asking you what to restore. You can select to Restore either the Compliance or the Vulnerability Scanner Tools but the NeQter Settings will be not selectable (they will always be restored).
Once you have the items you’d like restored click Yes, restore these settings and now the selected tools will have the same settings as the ones found on the backup.
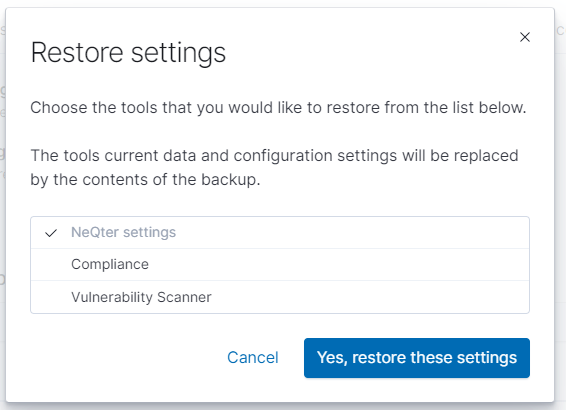
NOTE: Until the restore is finished you will not be able to save settings, delete archives, or restore from any other archives. During this period as well O365 and GSuite Inputs will be turned off and will require reconfiguration as well if previously configured.
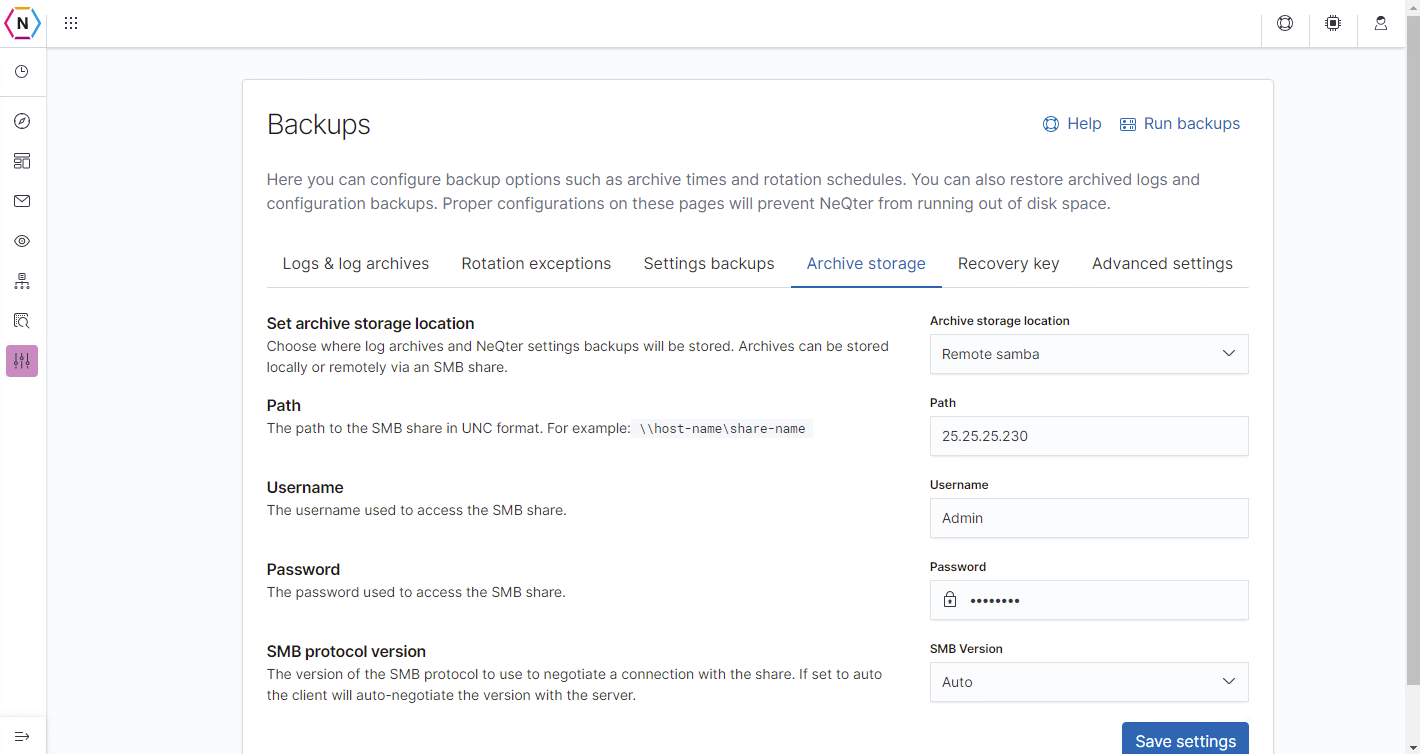
Archive Storage
Under the Archive Storage tab, there are several fields to configure including the following:
- Archive location
- Path
- Username
- Password
- SMB version
This is where your archives will be copied to. You will have the option of either having logs stored locally or sent to an SMB Share. When this option is set to SMB then your archives will be stored on the remote server that you have specified. Archives / backups stored on a remote server will still be rotated. The required configuration options for the remote server are:
- Path
- Cannot be longer than 4096 characters
- Leading and trailing slashes within the path will be removed
- Any backwards slashes, Windows format, will be changed to forward slashes
- Username
- Must be 1-255 characters long
- Password
- Must be 1-32 characters long
- SMB version
- Recommended to keep on Auto
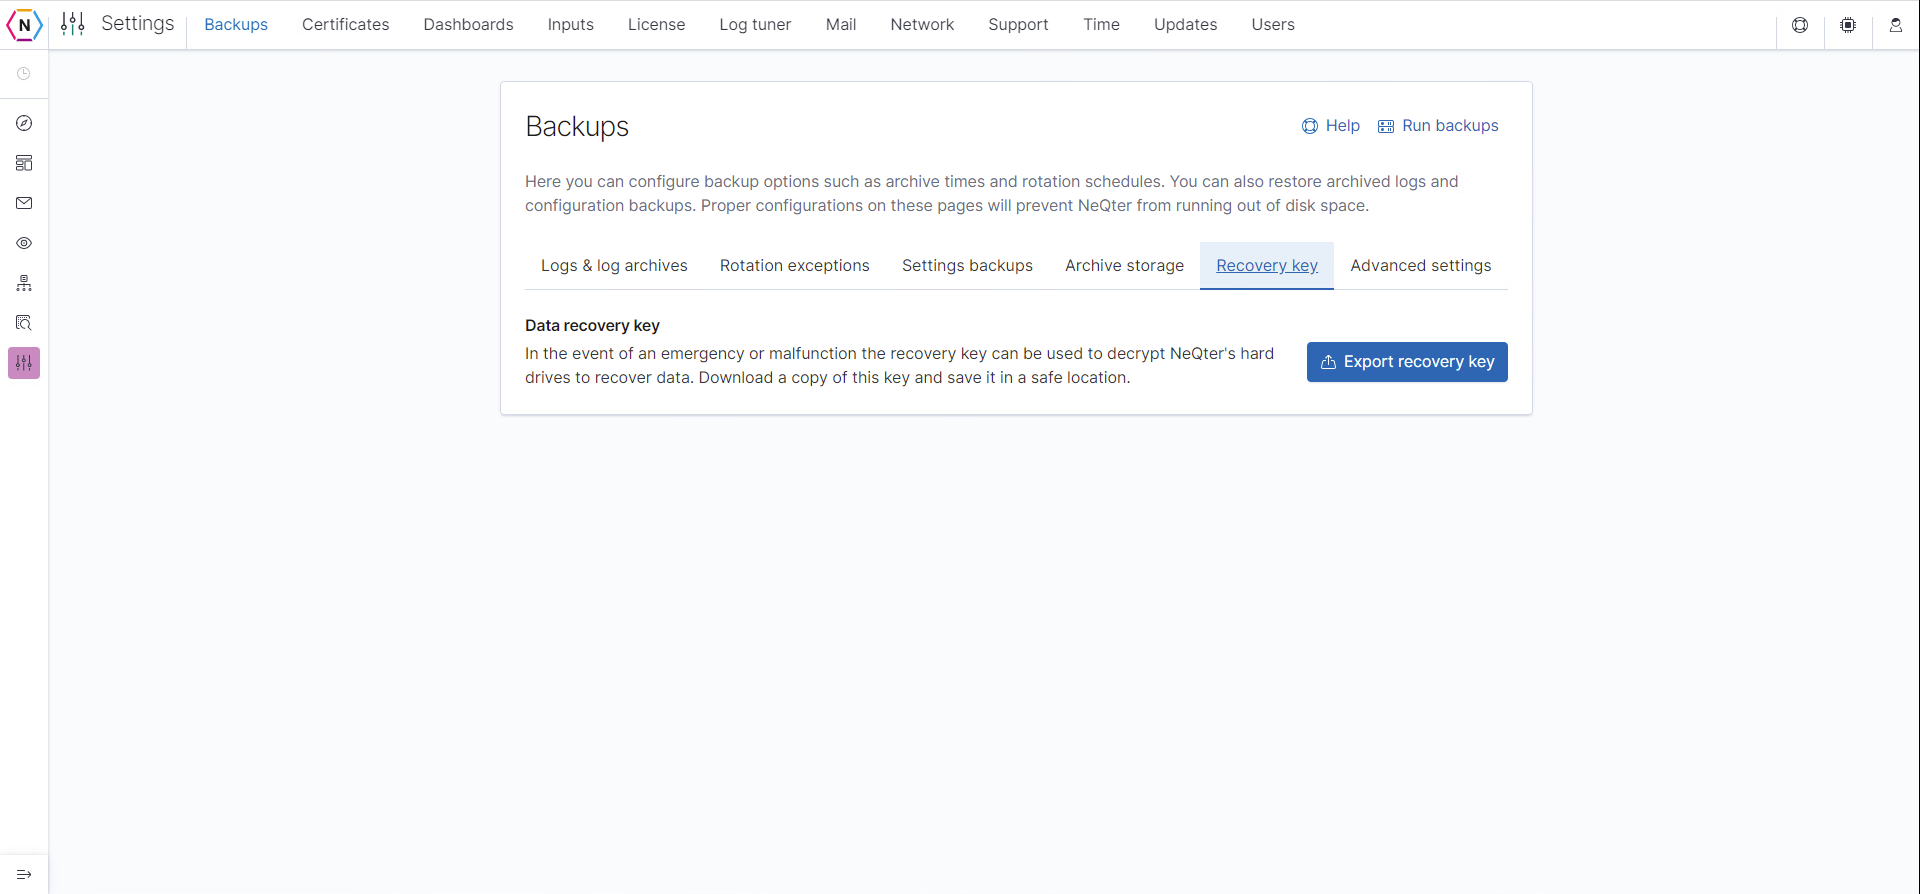
Recovery Key
The data recovery key is a backup key that can be used to de-encrypt NeQter’s hard drives (which are already encrypted) in case of an emergency. To retrieve the recovery key go to Settings > Backups > Recovery Key and then click Export recovery key. This is the de-encryption key for your data and is random for all devices, with the key consisting of a string of plain text. If there are any hardware changes to your device you will be prompted to enter in this key at boot up. Ensure that you download this key, and store it in a safe location.
Certificates
The Certificate page is where you are able to apply a Certificate to the NeQter Device. The Certificate most commonly used is SSL which helps keep the NeQter Device even more secure! It is suggested if possible to apply a SSL Certificate to the device.
To create a custom certificate or if you are unable to use Chrome as a browser, and are using Mozilla Firefox or Internet Explorer, you will need to accept more certificates to ensure that all features of the NeQter appliance are available for use. Navigate to Settings > Certificate Management.

To create your own custom certificate, fill out all of the fields, and then click on Generate Certificate. You may also import your own self-signed certificate by clicking on Import certificate on the upper right corner.
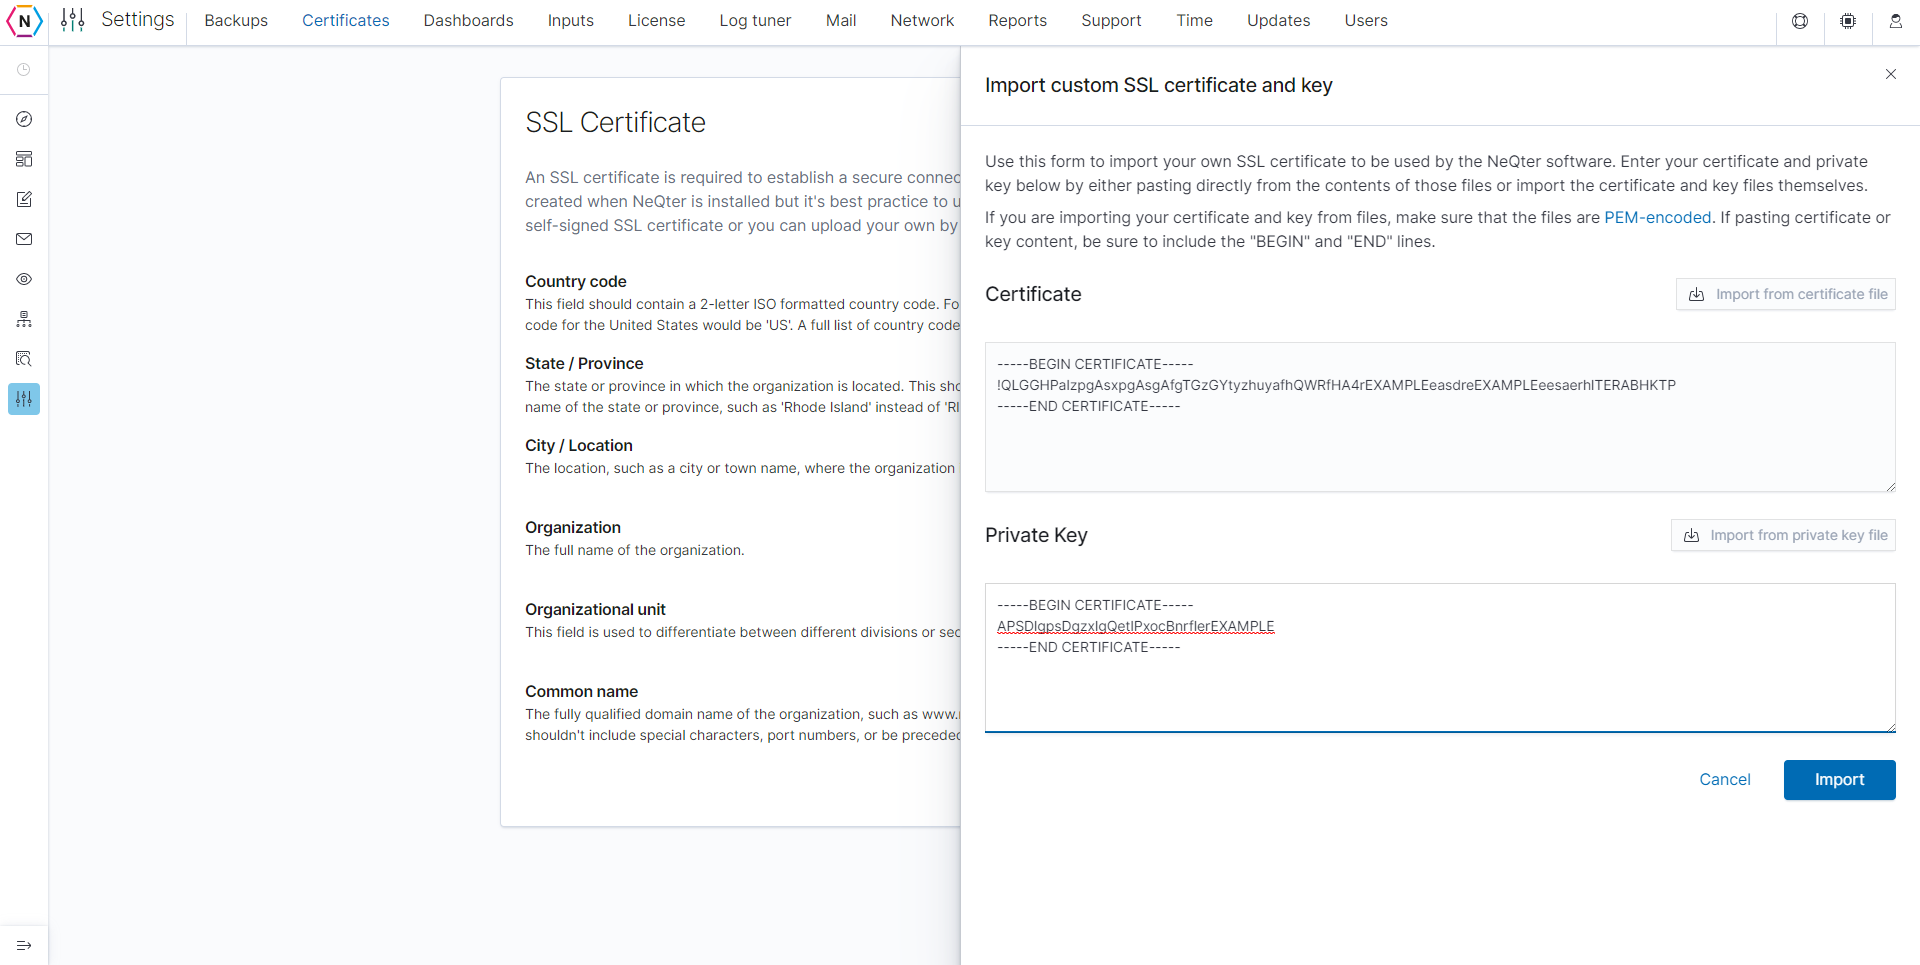
NOTE: When importing a certificate you will need to make sure to import in a particular way in order for it to work. It should be formatted like the examples below:
-----BEGIN CERTIFICATE-----
WILDCARD CERT
-----END CERTIFICATE-----
-----BEGIN CERTIFICATE-----
INTERM
-----END CERTIFICATE-----
-----BEGIN CERTIFICATE-----
ROOT
-----END CERTIFICATE-----
Companies
The Companies Page is where the default organization of the box can have its settings change to better match with the network environment. To edit the default company group, click on the edit button (pencil icon) to the right of the organization name.
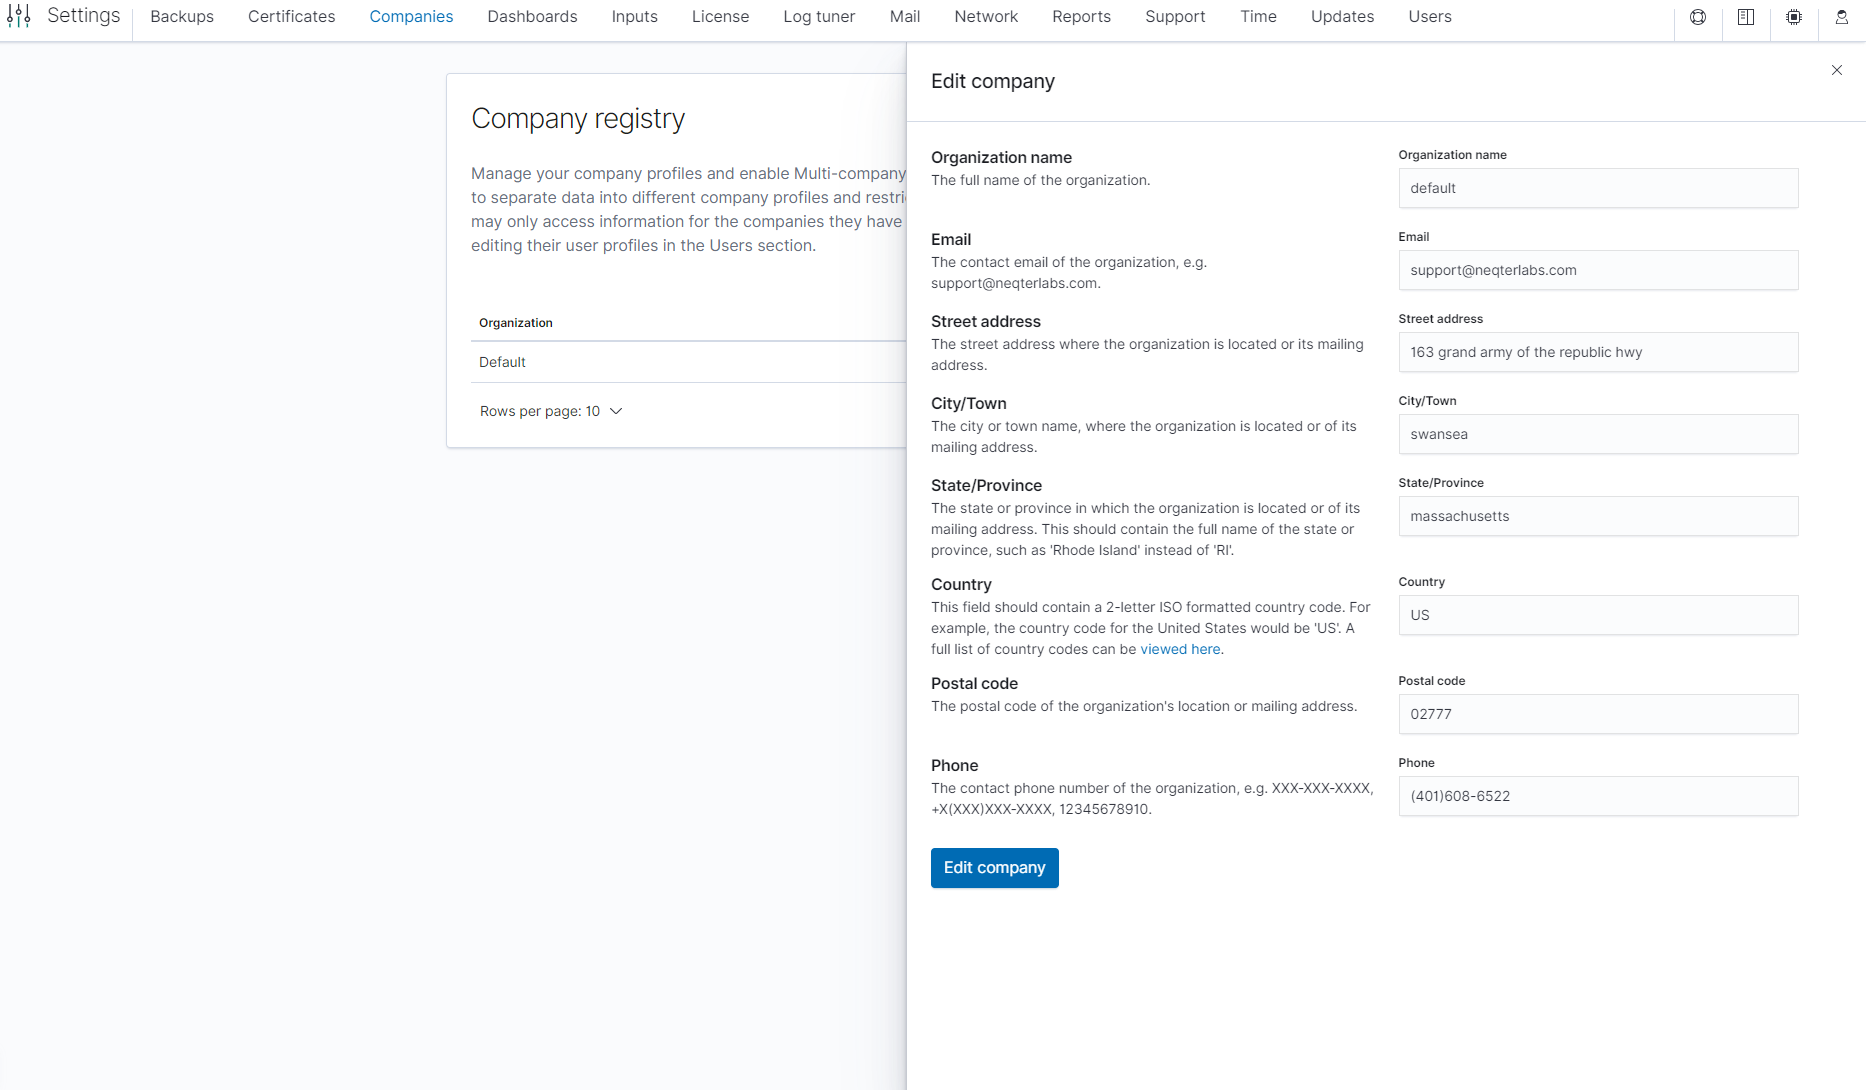
NOTE: The Companies page is also where MSPs can have multiple different companies added in order to better segment the box. This feature is turned off by default and can only be enabled by support for select clients. For more information or if you’re interested in utilizing this feature, please contact support@neqterlabs.com for further information.
Dashboards
Dashboards can be enabled or off in the Settings section so that they can be seen or hidden in the Dashboards visualization tool of the NeQter device. Navigate to Settings > Dashboards. For example, if your network does not utilize the WatchGuard firewall, you can toggle it off.
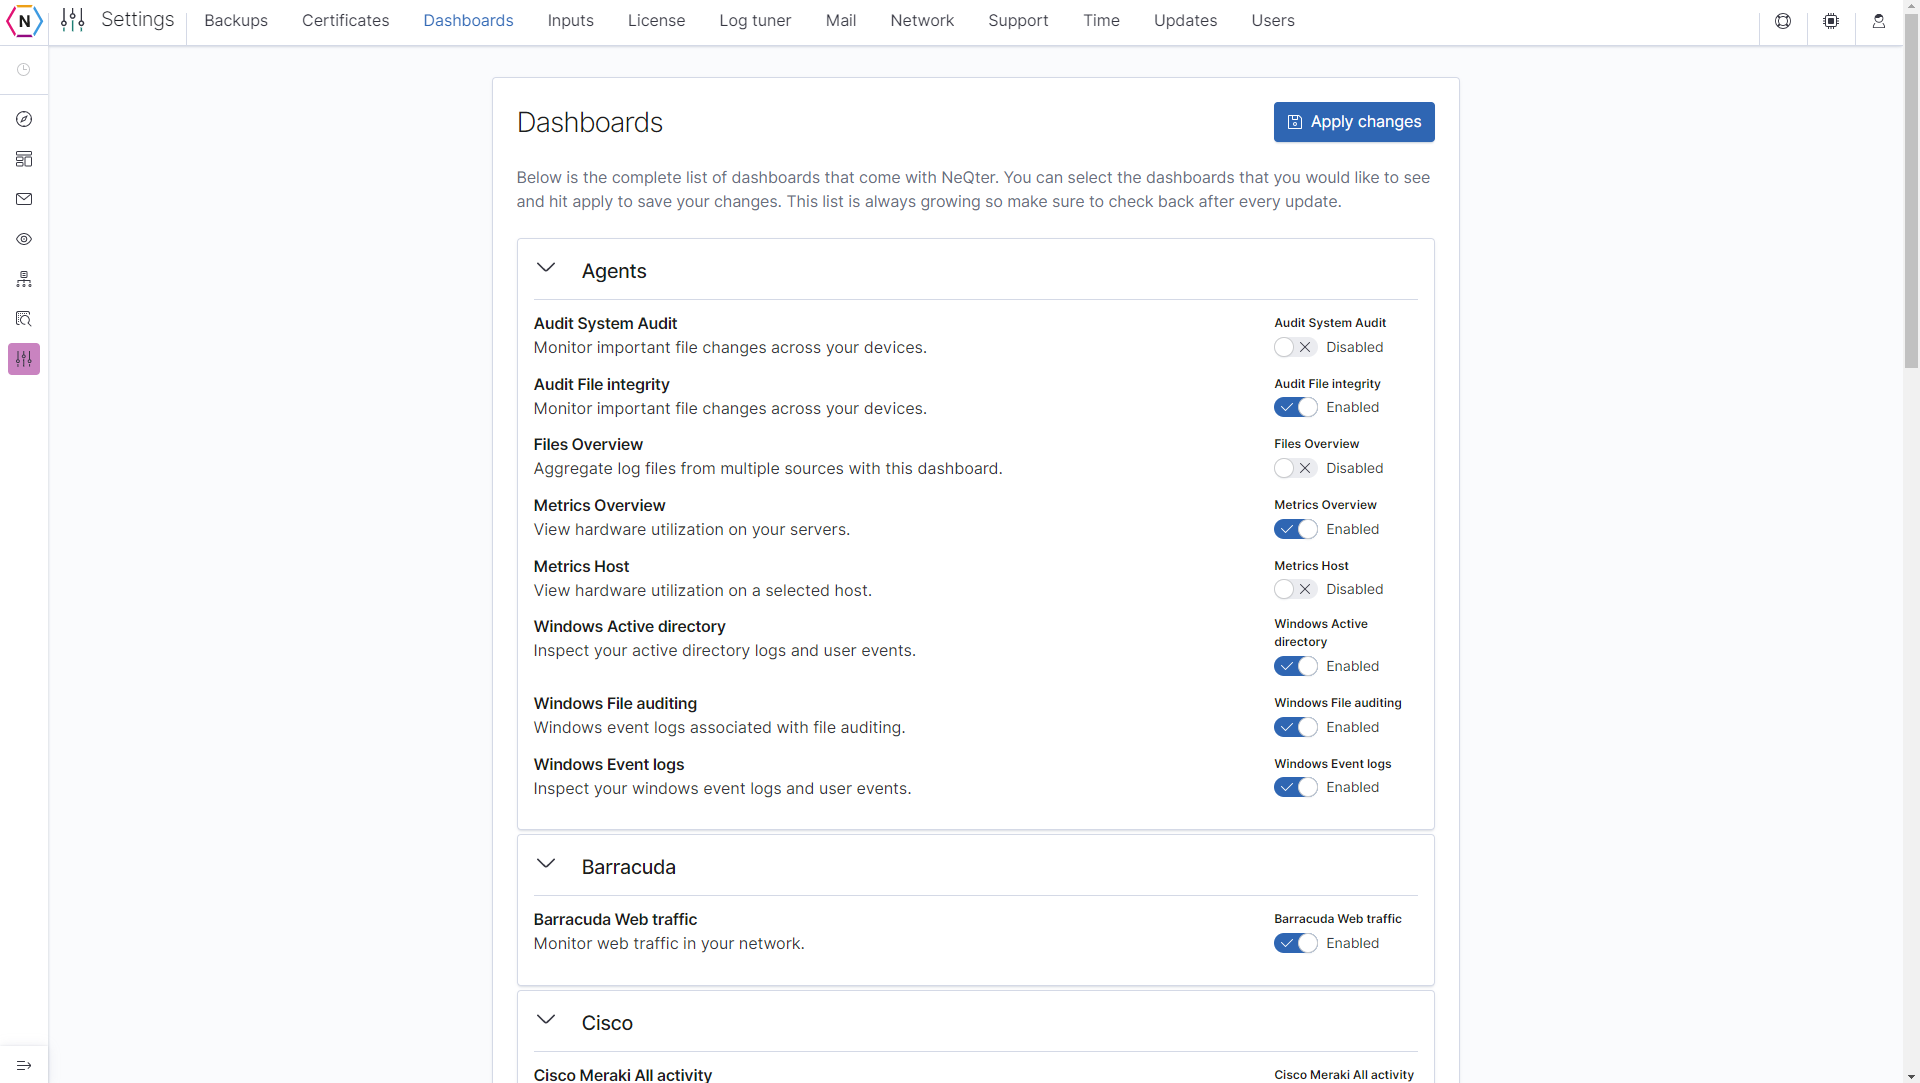
Below is a complete list of dashboards you can use, and what they are used for:
- Agent Dashboards: These dashboards are populated by your agent manager(s) which you can find out more about in the Agent Manager Section of the User Manual.
- Audit System Audit: This allows your Agent Manager(s) to populate your Audit - System Audit dashboard. This Dashboard should be enabled if you plan to collect information such as changes to your System files.
Audit - System Audit Dashboard:
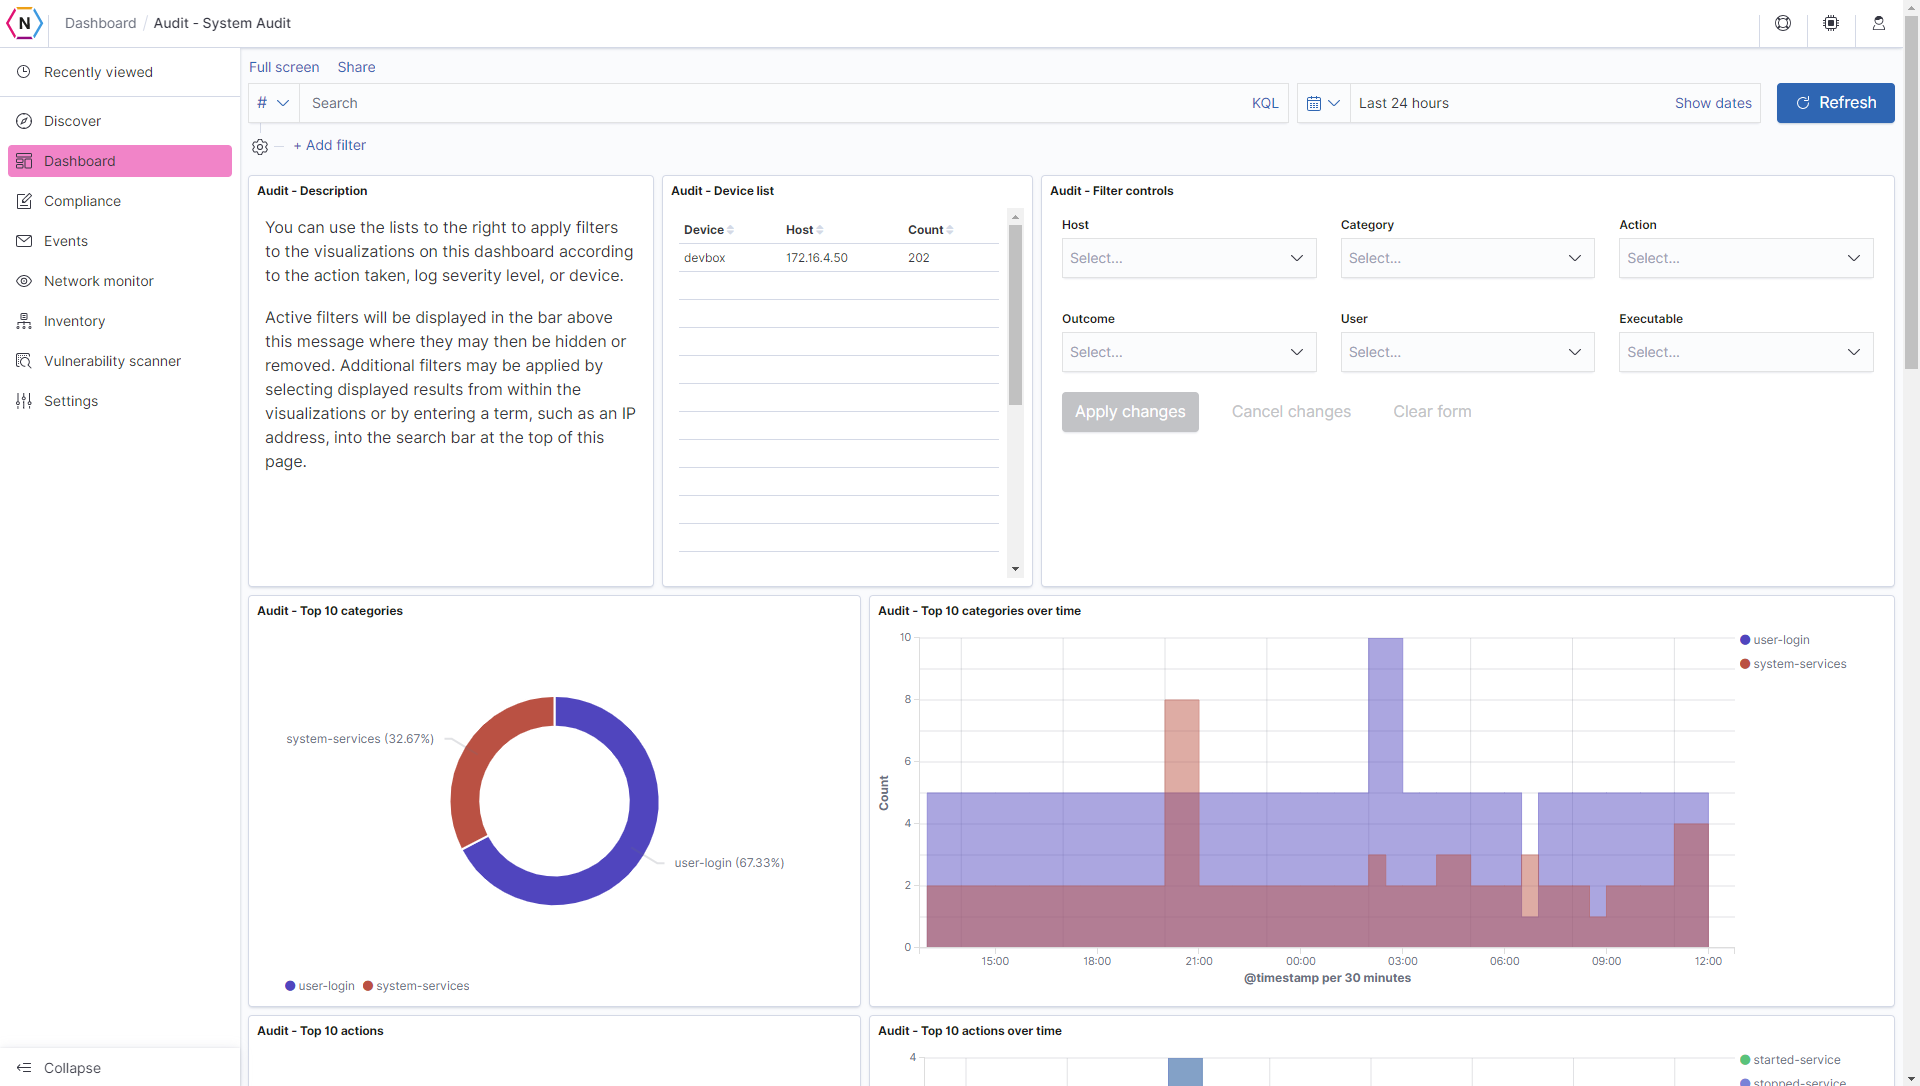
- Audit File Integrity: This allows your Agent Manager(s) to populate your Audit - File Integrity dashboard. This Dashboard should be enabled if you plan to collect information regarding the integrity of your System files.
- Files Overview: This allows your Agent Manager(s) to populate your Files - Overview dashboard. This Dashboard should be enabled if you plan to have the File Log Agent used in your NeQter Agent.
- Metrics Overview: This allows your Agent Manager(s) to populate your Metrics - Overview dashboard. This Dashboard should be enabled if you plan to collect data such as Server Hardware Utilization which is sent via the Metrics Service on your agent.
- Metrics Host: This allows your Agent Manager(s) to populate your Metrics - Host dashboard. This Dashboard should be enabled if you plan to collect host Hardware Utilization (such as workstations) which is sent via your Metrics Service on your agent.
- Windows Active directory: This allows your Agent Manager(s) to populate your Windows - Active Directory - All Activity dashboard. This Dashboard should be enabled if you plan to collect data such as AD Logs and User Events which are collected via the Windows Log Agent.
- Windows File Auditing: This allows your Agent Manager(s) to populate your Windows - File Auditing - All Activity dashboard. This Dashboard should be enabled if you plan to collect data such as Windows File Audit Logs which is sent via the Windows Log Agent.
- Windows Event Logs: This allows your Agent Manager(s) to populate your Windows Event Logs - All Activity dashboard. This Dashboard should be enabled if you plan to collect data collected such as Windows Event Logs and User Logs that are sent via the Windows Log Agent.
- Packets Overview: When enabled this dashboard allows you to see packet information collected via the built in Packetbeat tool which you can setup on the network settings page.
- Packets HTTP and TLS: When enabled this dashboard will show information pertaining to HTTP and TLS traffic that was detected by the Packetbeat tool.
- Packets DNS and DHCP: When enabled this dashboard will show information pertaining to DNS and DHCP Data that was detected by the Packetbeat tool.
- Barracuda Web Traffic: This dashboard encompasses all the information NeQter collects from your Barracuda firewall. If you have a Barracuda Firewall then you will need to have this dashboard enabled and information collected by your NeQter unit can be found under Barracuda - Web traffic in Dashboards.
- Cisco Dashboards: When one of these dashboards is enabled, syslog data collected by your Cisco Devices will be collected to be visualized and stored. If you have a cisco device that is listed under the dashboard that you’d like to collect data from then enable the dash. Cisco ASA - All activity, Cisco Firepower - All activity & Cisco Meraki - All activity under Dashboards on the left nav bar is where you can visualizations of each.
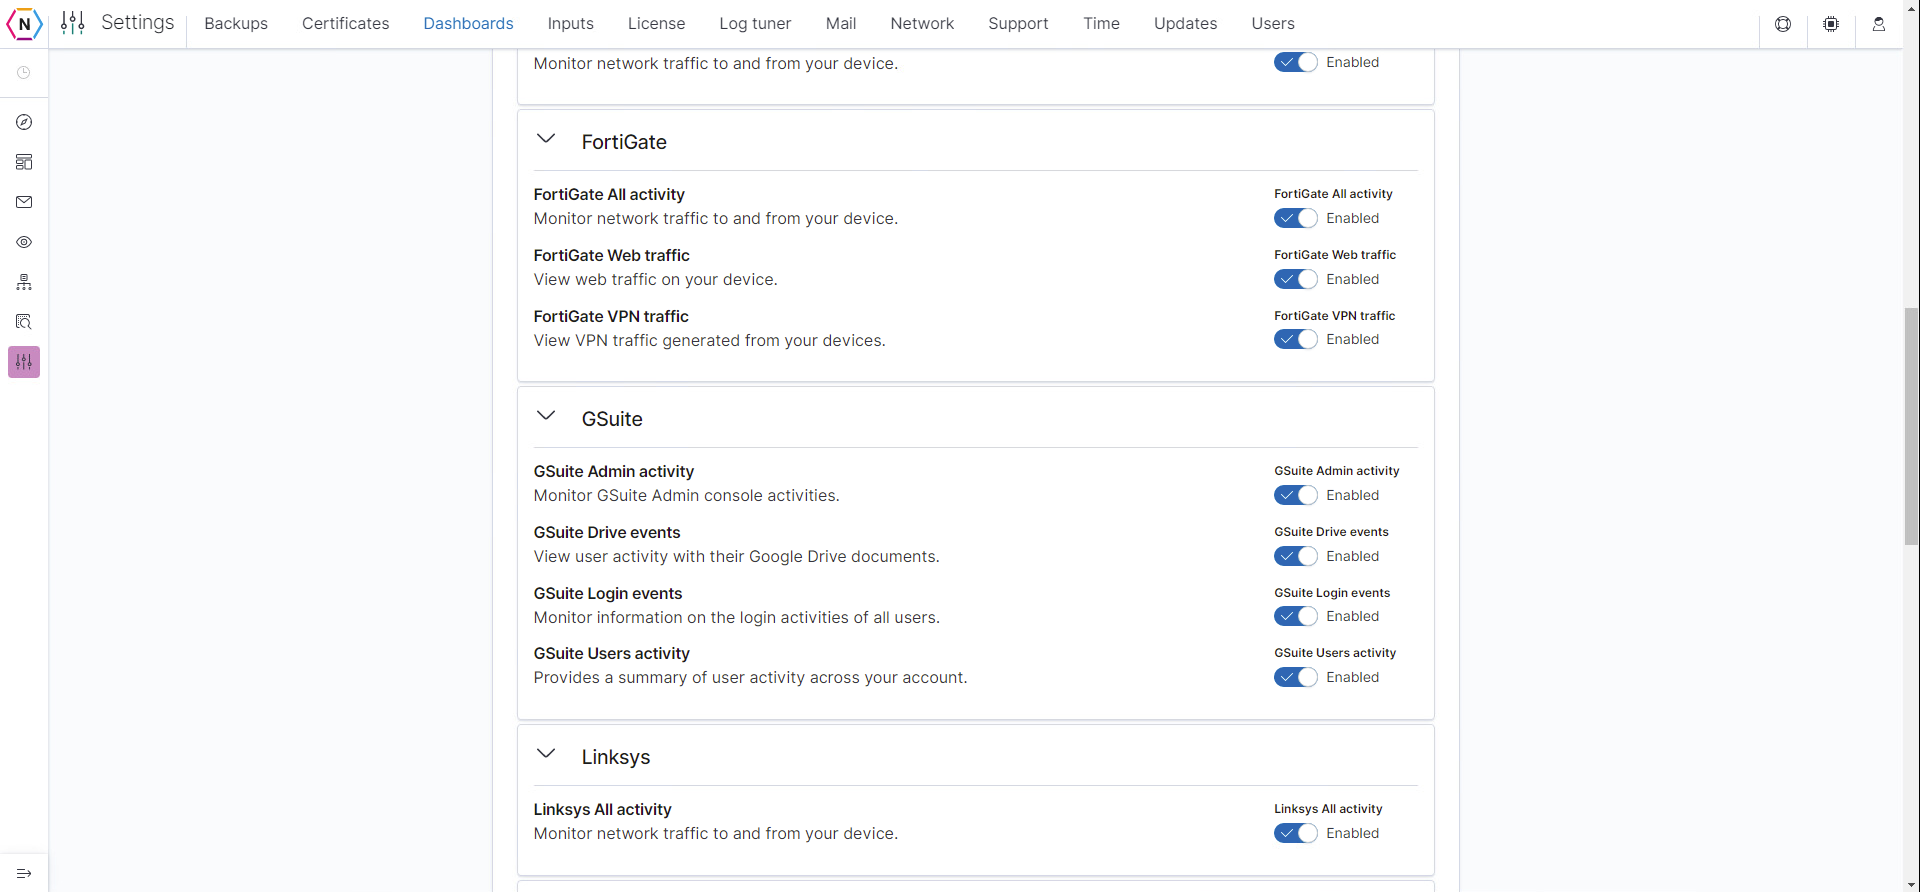
- Fortigate Dashboards: The fortigate dashboards are used to collect data from your Fortigate Device(s). It is recommended to enable Fortigate All activity to collect network traffic going to and from this device. FortiGate Web Traffic can be enabled to view web traffic monitored by your Fortigate Device(s) and Fortigate VPN Traffic will enable any VPN traffic generated by your Fortigate Device(s).
- GSuite Dashboards: The GSuite dashboards when enabled allows your NeQter Device parse logs generated by your GSuite account(s). GSuite Admin Activity monitors admin console activity, GSuite Drive events monitors google drive activity, GSuite Login Events monitor user login activity such as logon failures, successes and logoffs & finally GSuite Users Activity monitors user activity across accessible accounts. It is recommended that if you have a GSuite to have all of these enabled.
NOTE: To learn more about setting up GSuite to send information to your NeQter Unit, go to Inputs
- Linksys Dashboard: If you have a Linksys Device on your network then enable this dashboard to collect data from your Linksys device such as network traffic.
- Office 365 Dashboards: Enable this dashboard to have data such as user, admin and system activity collected from your O365 and Entra ID Active Directory audit logs and visualized.
- pFSense: If one of your devices is using pFSense software you can have it send logs to your NeQter Unit. Enable this dashboard if you’d like to see pFSense logs visualized on the dashboards page.
- SonicWall Dashboard: If you’d like to collect logs from your SonicWall then we’d recommend having this Dashboard enabled, which will allows the NeQter unit to visualize network traffic to and from the sonicwall.
- Sophos Dashboards: We support both Sophos UTM and XG Devices. To have logs visualized from either one of them you will need to enable the corresponding dashboards. First, if you have XG then you can ignore the UTM dashboards and vice versa. All - Activity when enabled visualizes network traffic to and from your Sophos device while Web Traffic views web traffic logs from your device.
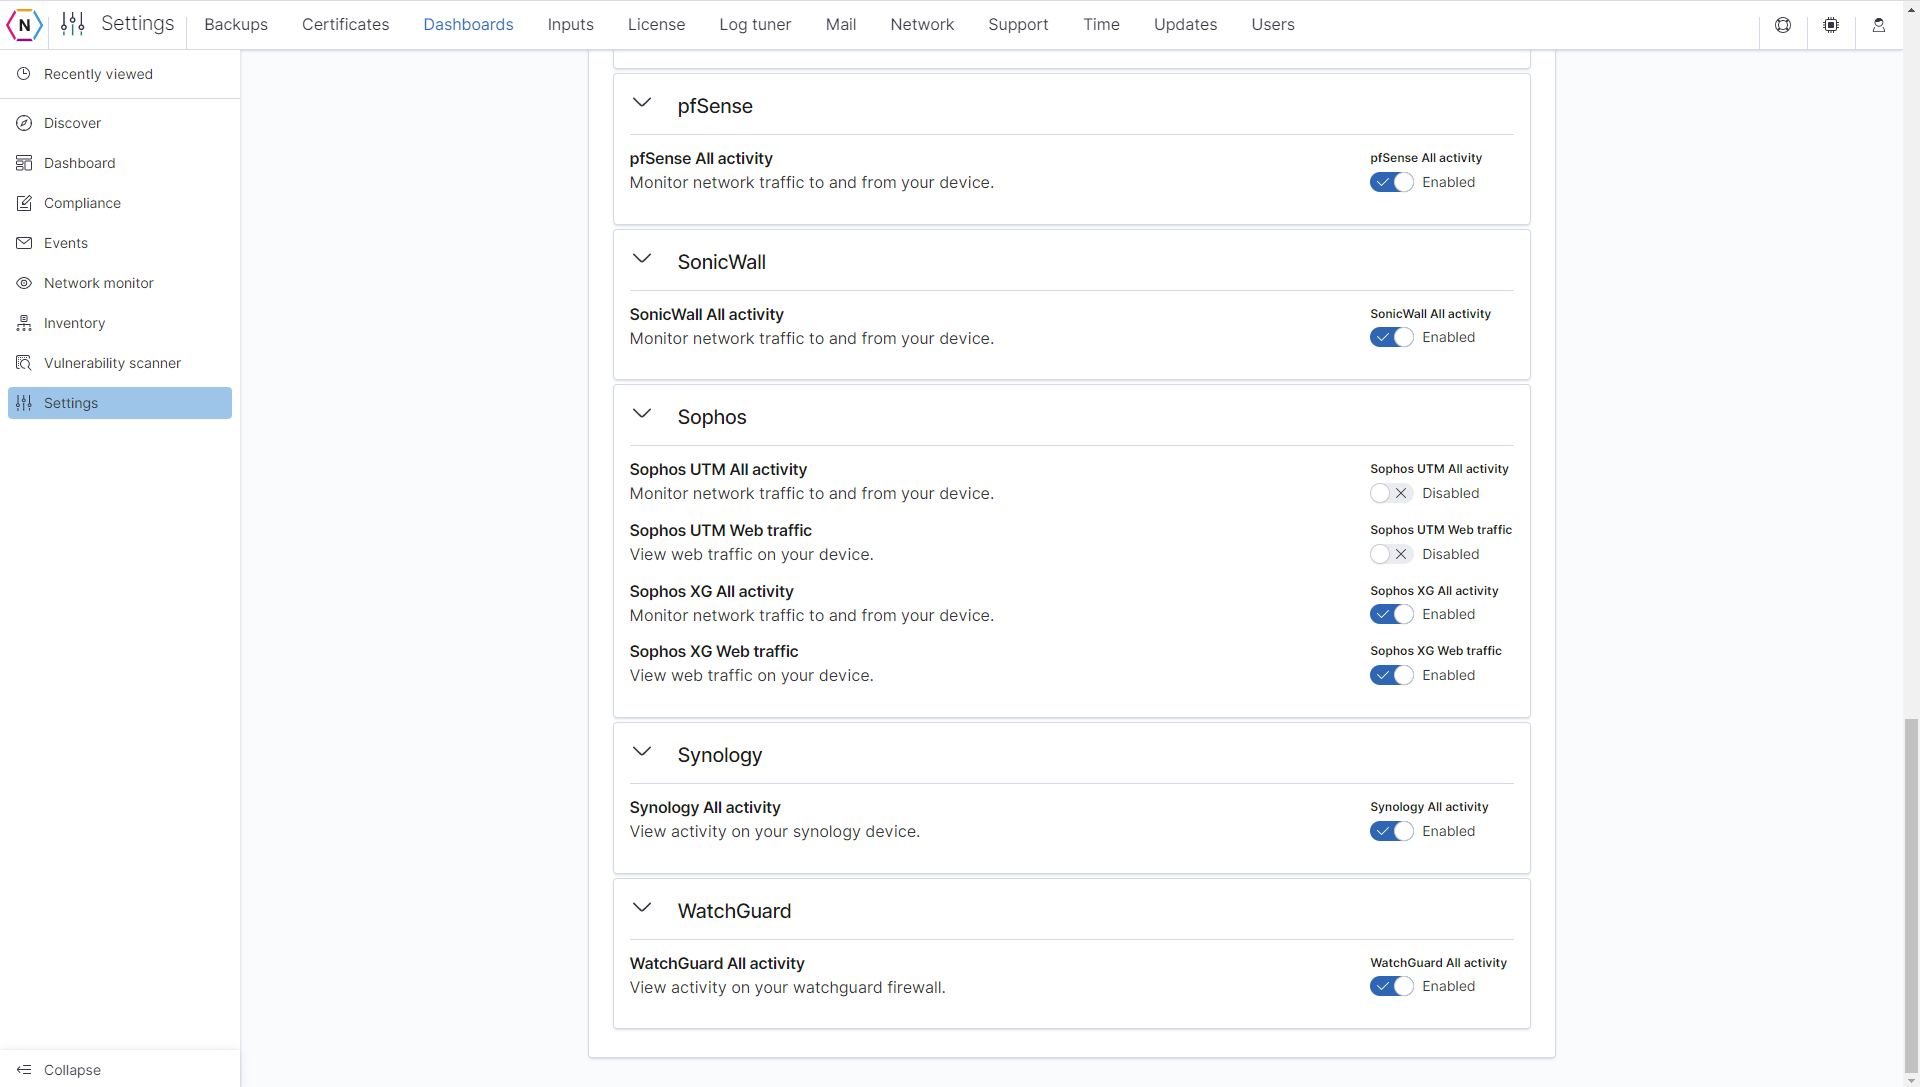
- Synology Dashboard: If you have a Synology Device connected to the same network as your NeQter Unit then you are able to have your NeQter unit collect logs from it! Simply enable the Synology dashboard to be having the Synology Dashboard populated.
- WatchGuard Dashboard: If you’d like to collect logs from your WatchGuard Firewall then we’d recommend having this Dashboard enabled, which will allows the NeQter unit to visualize network traffic to and from the Firewall.
- Other Dashboard: This dashboard is where information collected by systems not specifically supported can be found. If you are sending logs to our NeQter Client from an device not listed above then you will need to have this dashboard activated.
Inputs
On the inputs page you can define which devices are sending logs to your NeQter appliance via syslog. To do so simply put in the Label and IP Address of the device you’d like to collect logs from, then select under Manufacturer drop down menu the corresponding manufacturer. Devices we inherently support are as follows:
- Barracuda
- Cisco Meraki, ASA & Firepower
- Crowdstrike
- Fortigate
- Juniper
- Linksys
- Palo Alto
- PfSense
- Preveil
- SentinelOne
- Sonicwall
- Sophos UTM & XG / XGS
- Synology
- TeraStation
- Watchguard
If your device is not currently listed, select ‘Other’ as the manufacturer and you will be able to search your logs in a custom index in the Log tab.
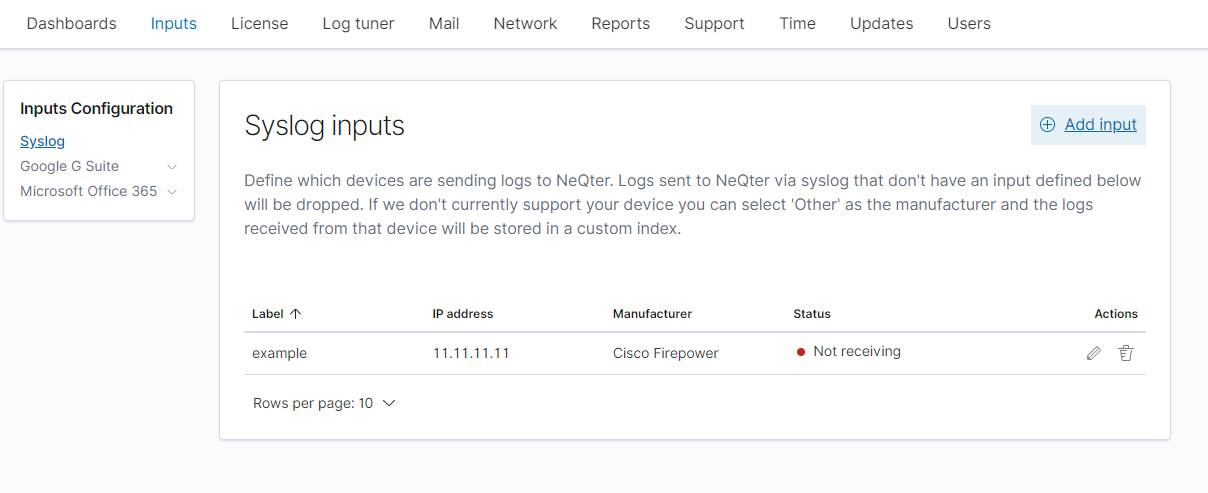
NOTE: In order to complete the handshake after adding a syslog you will also have to log into added server and create a remote syslog entry pointing to the NeQter as well.
Before GSuite can be setup on your NeQter product, it must be enabled on your dashboard. To do this, navigate to Settings > Dashboards and then scroll down the list until you find GSuite, enable the information you plan on receiving from GSuite and then click Apply Changes on the top right. Once this is set you should see the options you selected now in the Dashboards tab.
Next you will need to go to Settings > Input and then click Google G Suites under Inputs Configuration in the left hand corner of the page. From here follow these steps:
1. Previously you were asked to select which events you would like to have displayed in dashboard, now enable the events you selected in the Choose which events to retrieve section.
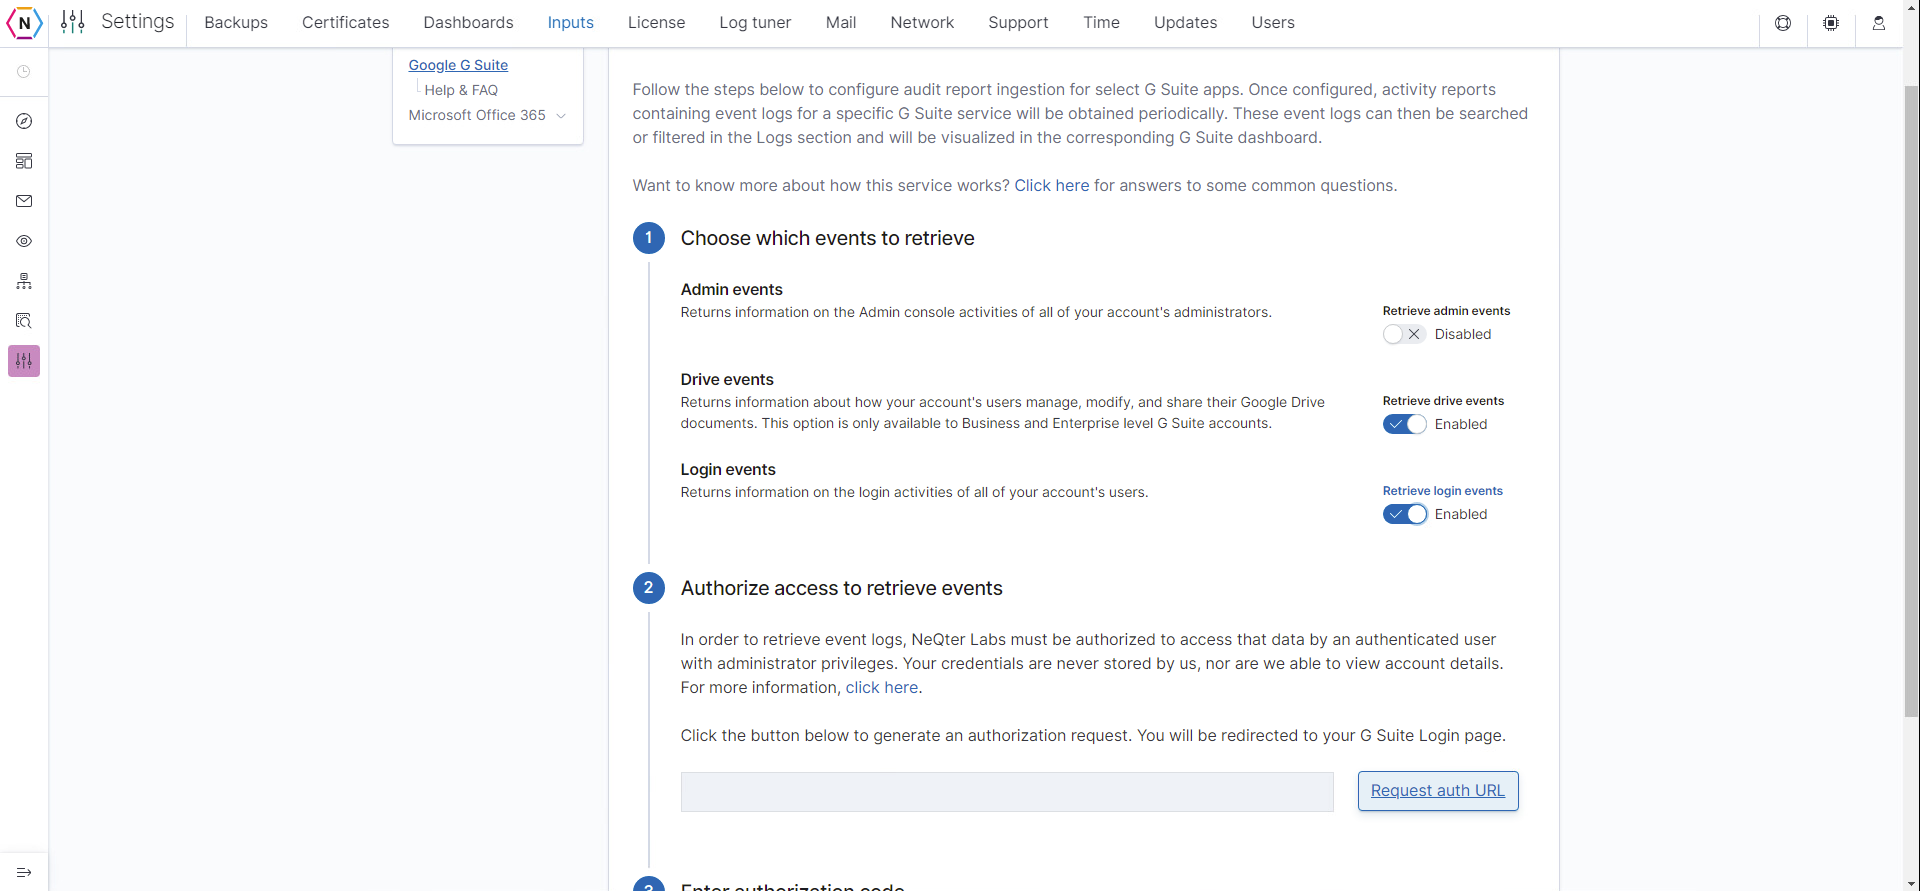
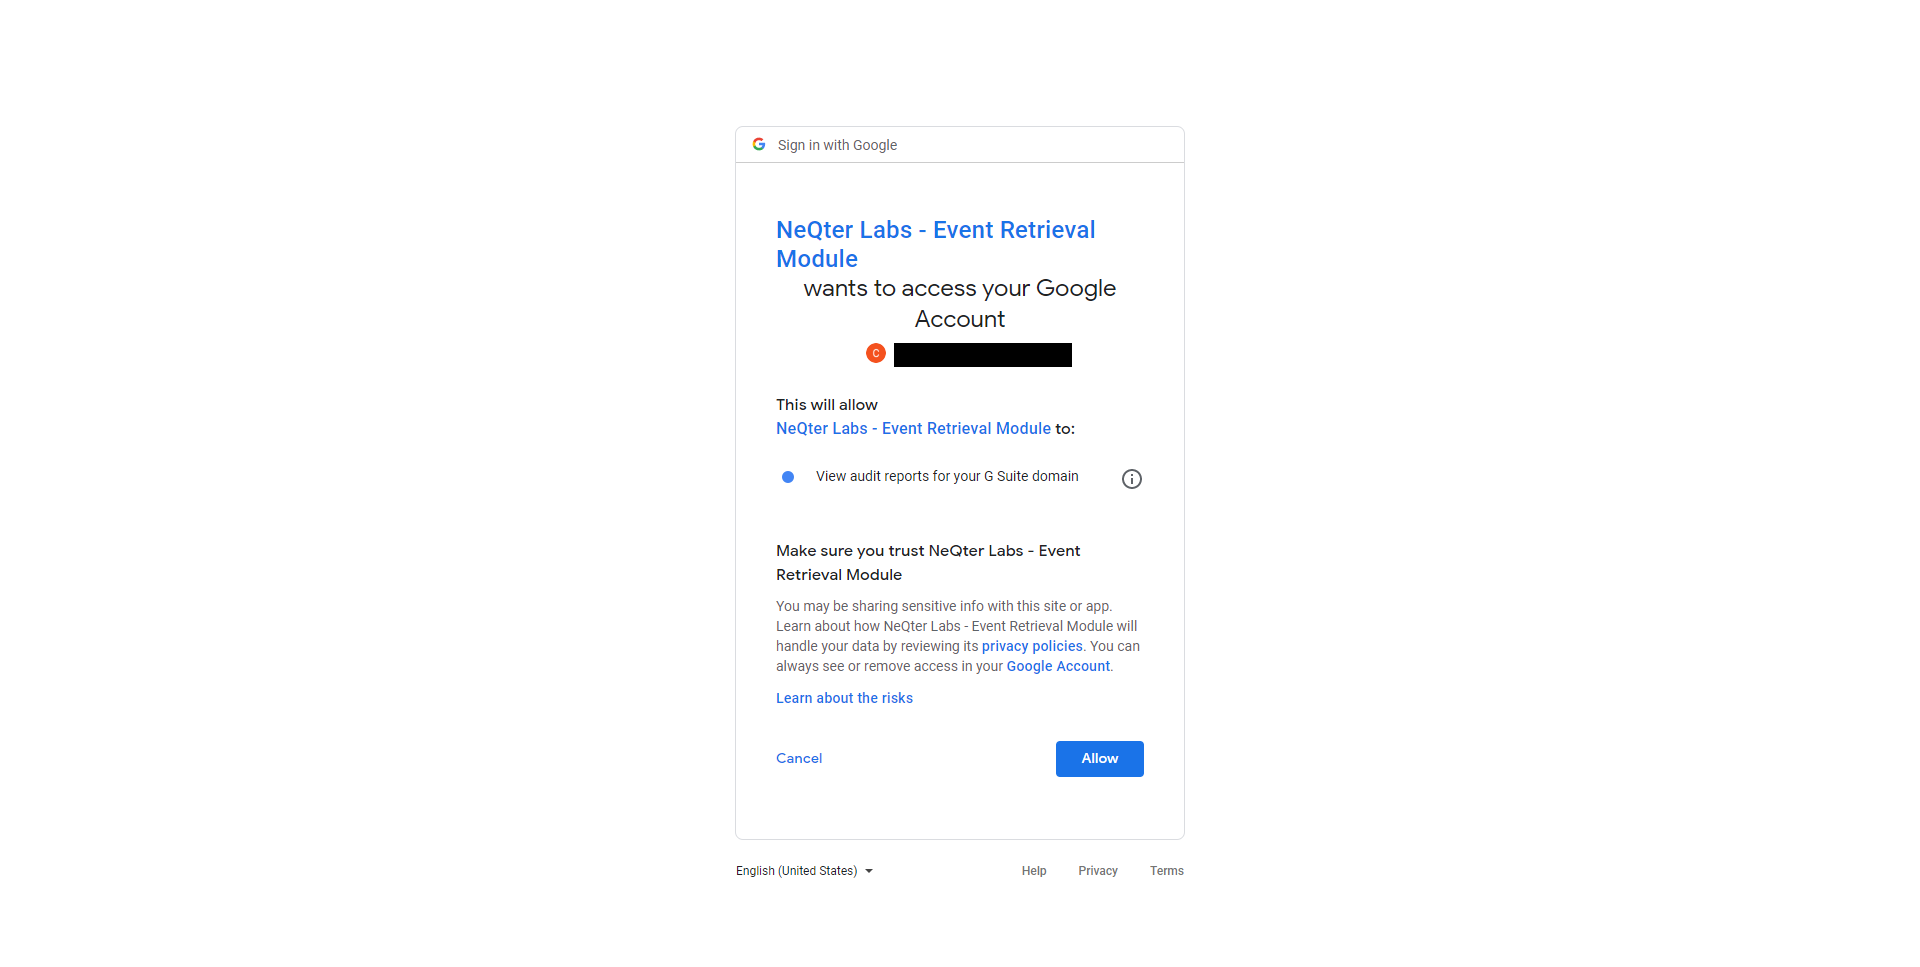
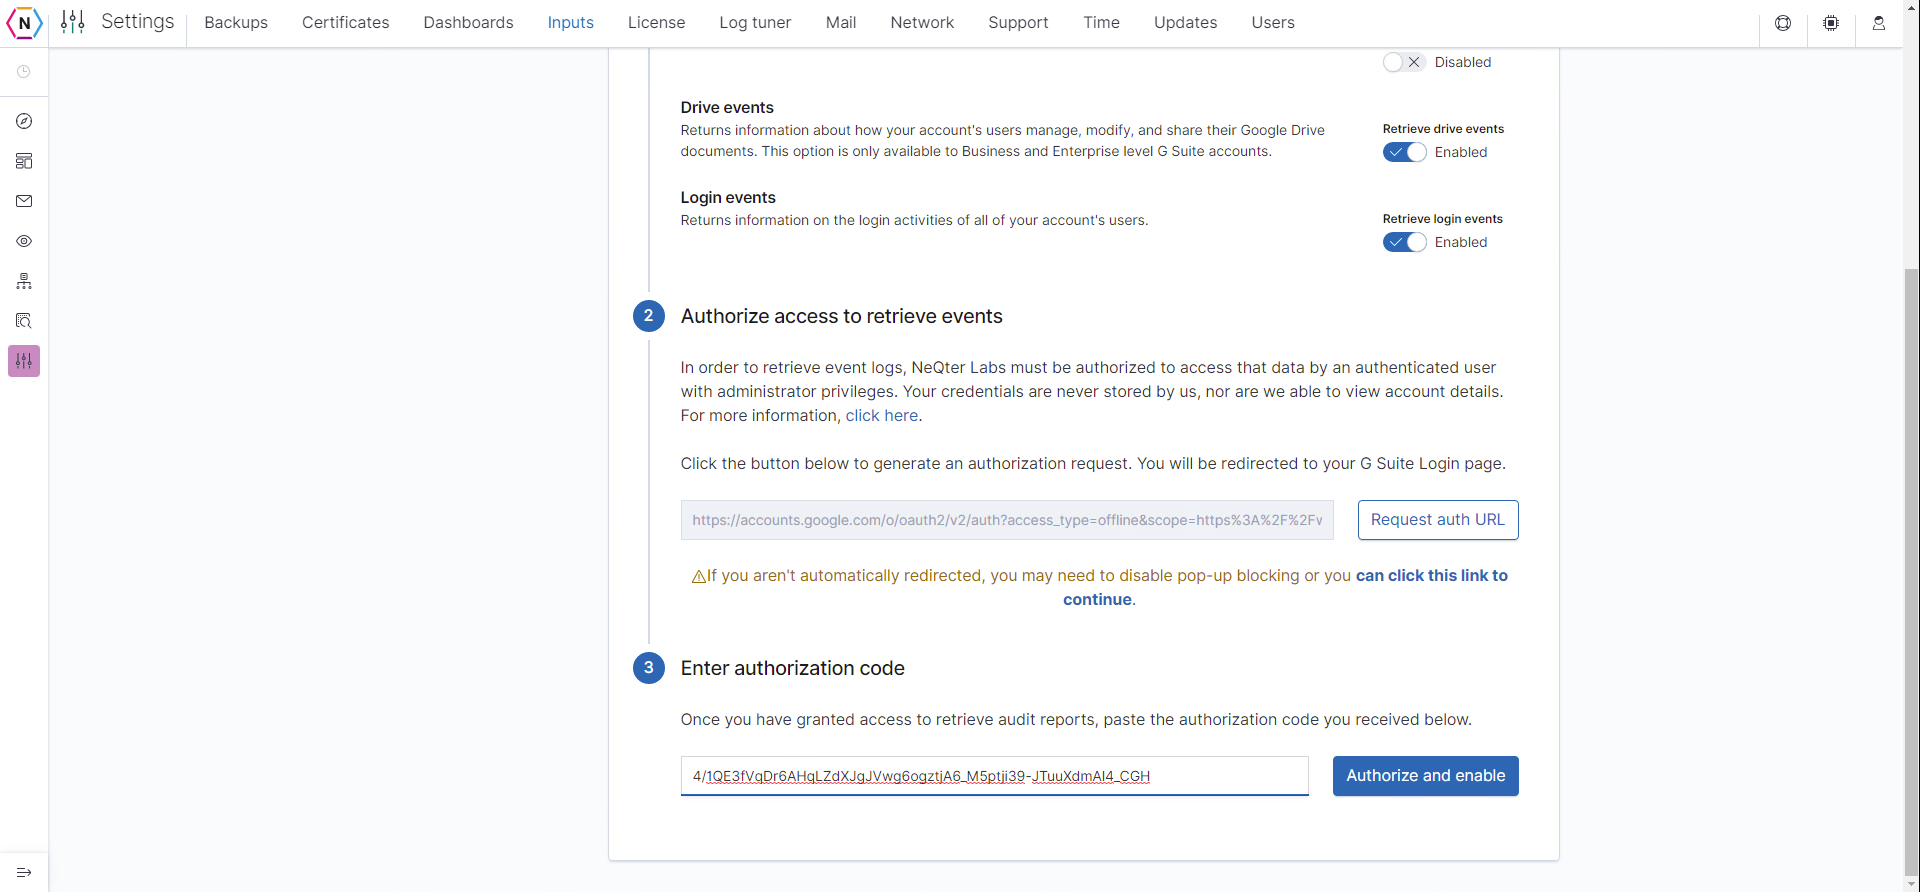
2. Next you will be asked to create an authorization code, to do this click Request auth URL button which will redirect you to the sign in page for your GSuites account. From here login and Allow NeQter’s Event Retrieval Module to have access to your audit reports.
NOTE: You must be using an account with the Administrator Role in order to allow NeQter’s module to have access.
3. Last you should see a page with a random string of characters, copy this code and enter into the box underneath Enter Authorization Code located in the NeQter GSuite Setup Page you were previously in. Select the Authorize and enable button and GSuite should begin collecting data.
When first entering the O365 Input Tool users will first need to click the Add Office 365 Tenant button on the top right which will bring up a configuration slide out to fill in with your Tenant Information. It is here that users will input their Office 365 Information and register a App Registration in their Microsoft Entra admin center. This will establish credentials that NeQter can use to access the Office 365 Management API.
NOTE: Registering an application requires access to the Microsoft Entra admin portal with proper administrator rights / roles. User accounts with either Privileged Role Administrator, Cloud Application Administrator, Application Administrator, or a custom directory role with the necessary permissions should work.
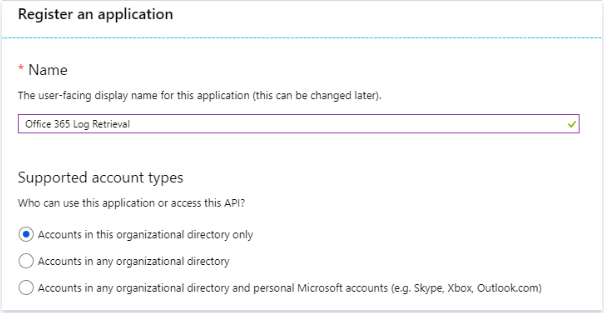
1. In your Microsoft Entra ID Admin Portal, on the top search box search for App Registrations.
2. To register an application, click New registration.
3. Give the application a name.
4. Select Accounts in this organizational directory only for the supported account type.
5. Click Register at the bottom of the form.
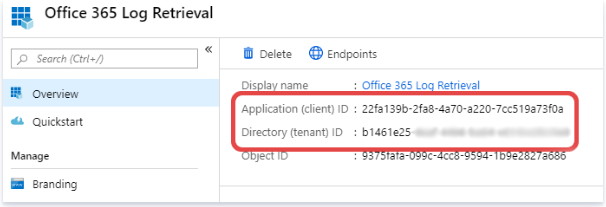
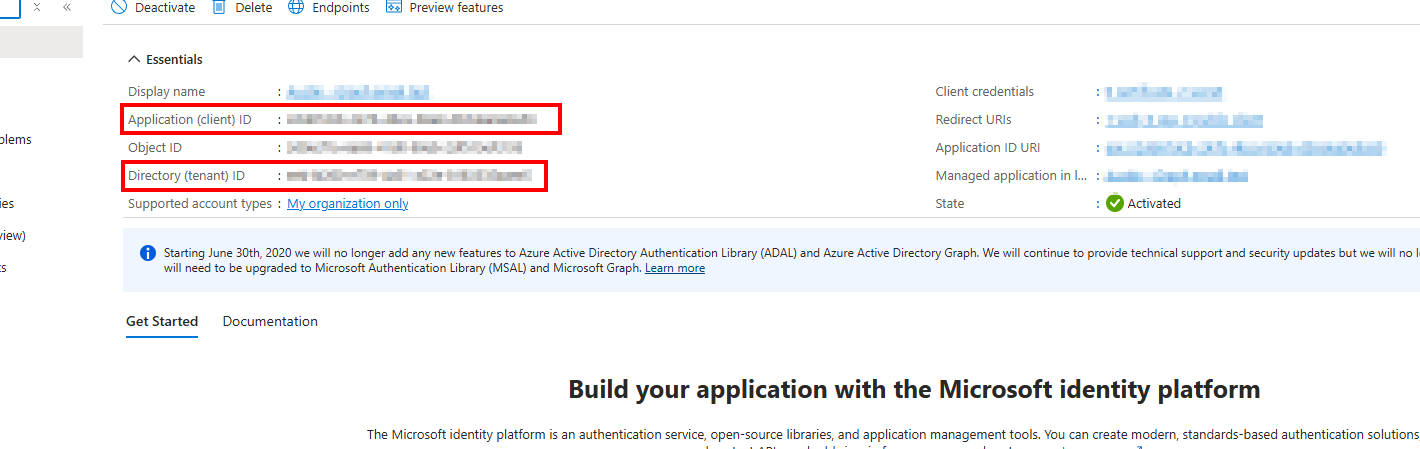
6. From the newly registered application’s Overview section, record the Application (client) ID and the Directory (tenant) ID values. You’ll need these values to complete the configuration.
Next you want to set up a secret client, to do this follow these steps:
1. Navigate to Certificates & secrets from the application’s menu.
2. Click New client secret.
3. Give the client secret a description.
4. Select 24 Months for the expiration.
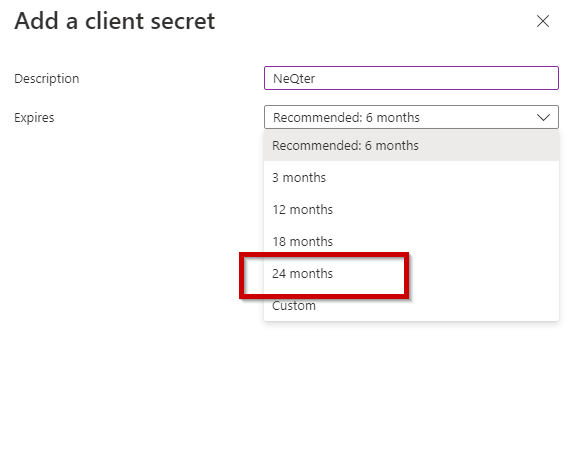
NOTE: 24 Months is the highest amount of time Microsoft will allow, we recommend setting a reminder near the expiration date to setup a new client secret and reconfigure your O365 to utilize the new one.
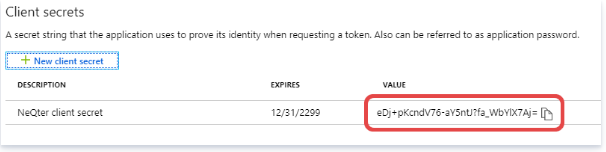
5. Record the value of the newly created client secret.
NOTE: You’ll need this value to complete the configuration and won’t be able to retrieve it later. It will only appear after the secret is first created.
Once you’ve completed the above steps, enter the tenant, client, and client secret values you’ve gathered in the NeQter configuration form.
Next you will need to give the application you just created permissions needed for your NeQter product to utilize Office 365’s Audit Logs.
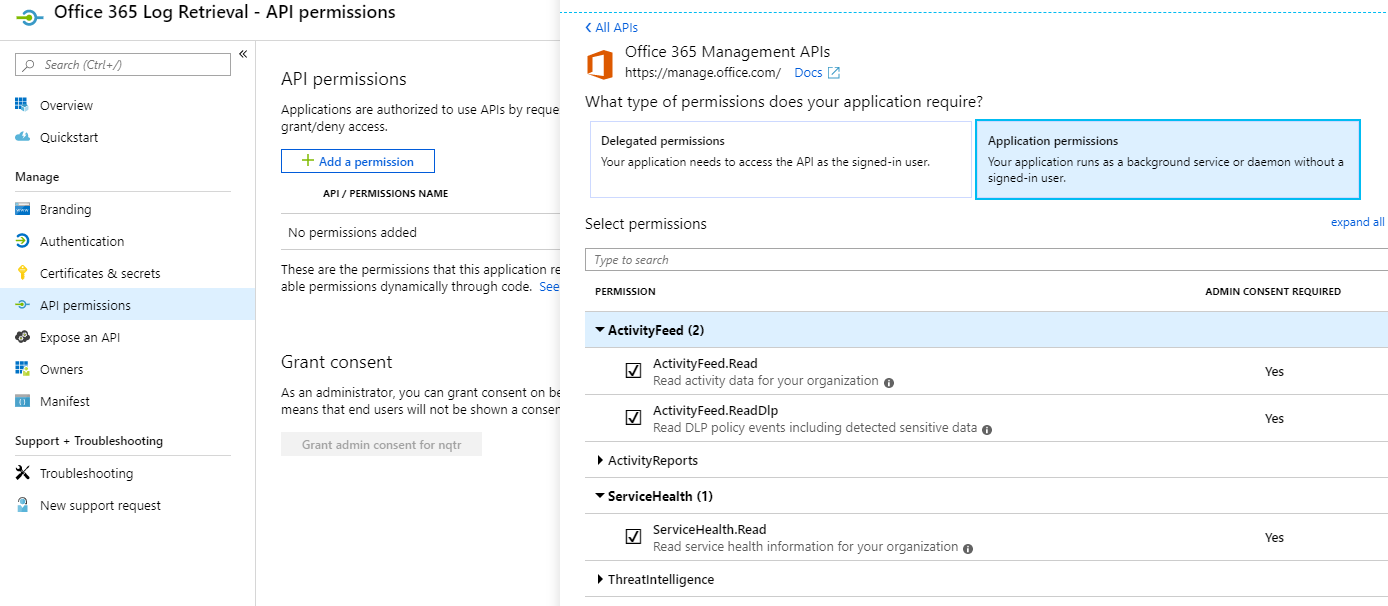
1. Navigate to the API Permissions menu and then select “Add a Permission” on the top left.
2. Next Scroll down the options available to you until you find Office 365 Management API on the right menu.
3. Once selected, you will see two options on the top of the listing, “Delegated Permissions” and “Application Permissions”; select Application Permissions and look for ActivityFeed.
4. Select ActivityFeed and allow ActivityFeed.Read.
NOTE: If you want to have ULP Logs allow ActivityFeed.ReadDlp.
5. Select ServiceHealth and then allow ServiceHealth.Read.
6. Click Add Permissions
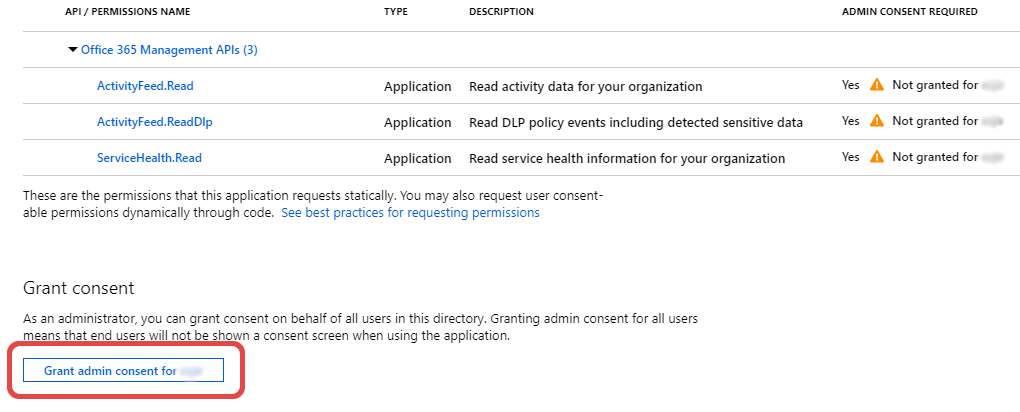
Once you’ve added the permissions you need, on the bottom left of the page there will be a Grant admin consent Button, click it and select Yes on the dialogue box the appears.
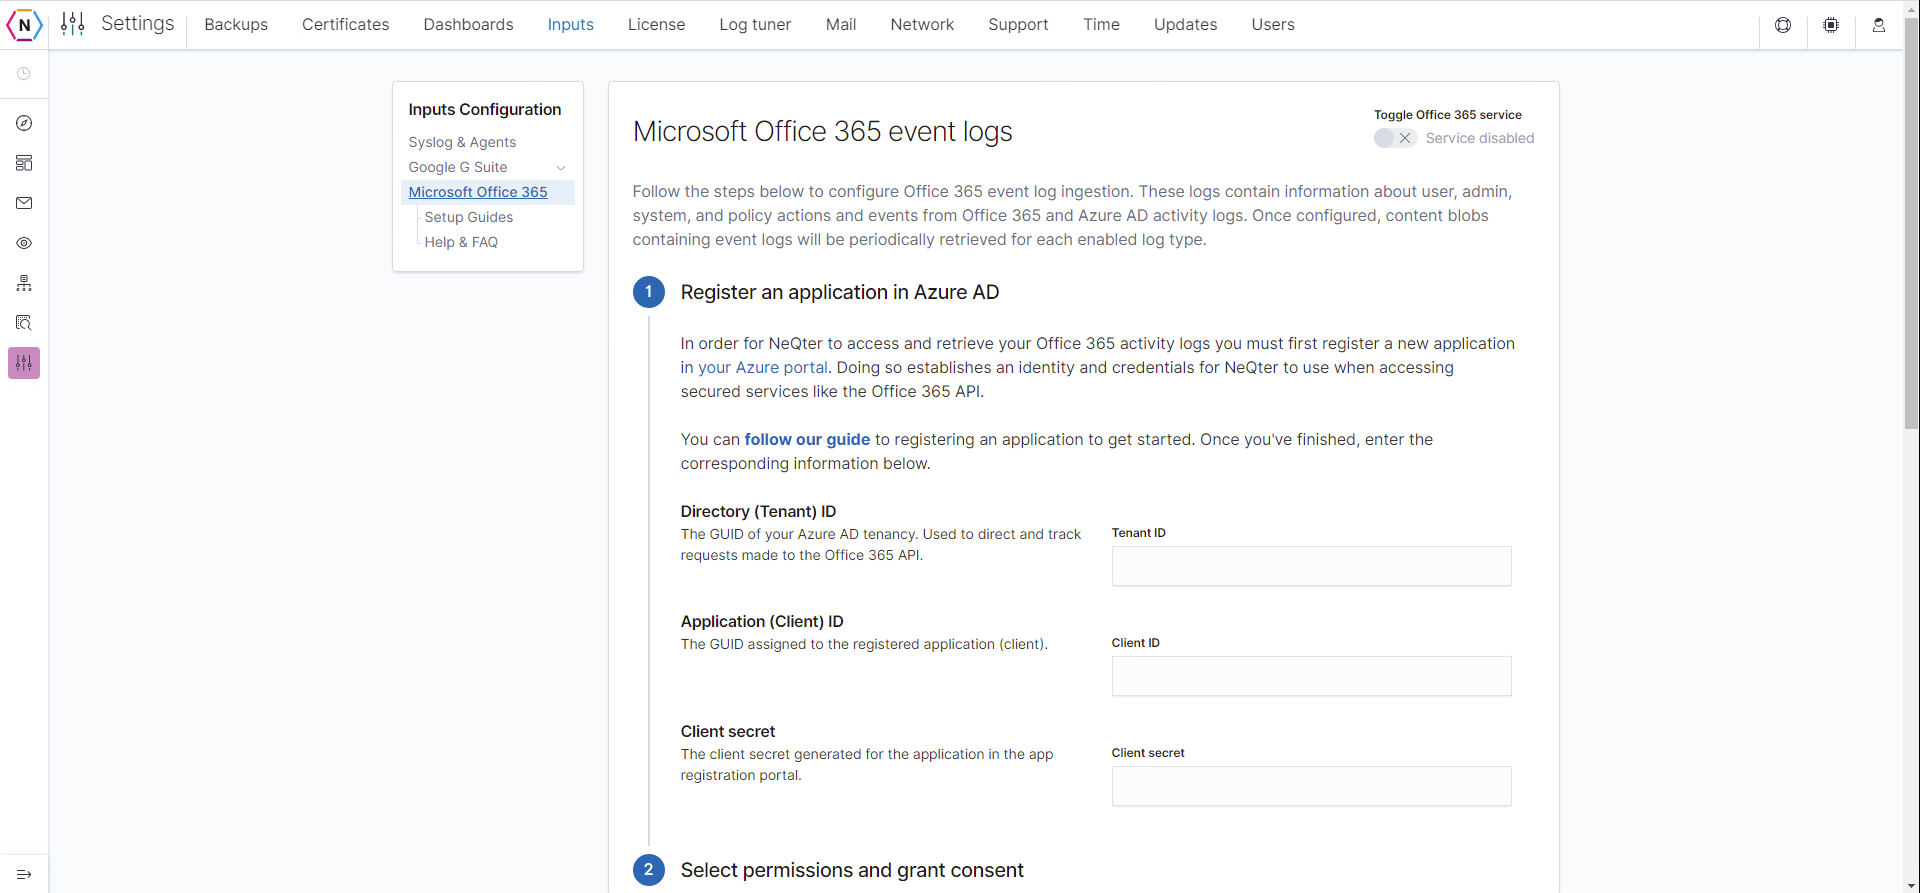
Now go onto your NeQter Application and go to Settings > Inputs, once you are in the inputs tab look for Microsoft Office 365 in the menu on the top left of the page. Select it and then where you see Tenant ID, Client ID and Client Secret copy and paste the ID values you recorded from earlier. Next Choose which Logs you wish to receive and then click Save Settings and Enable.
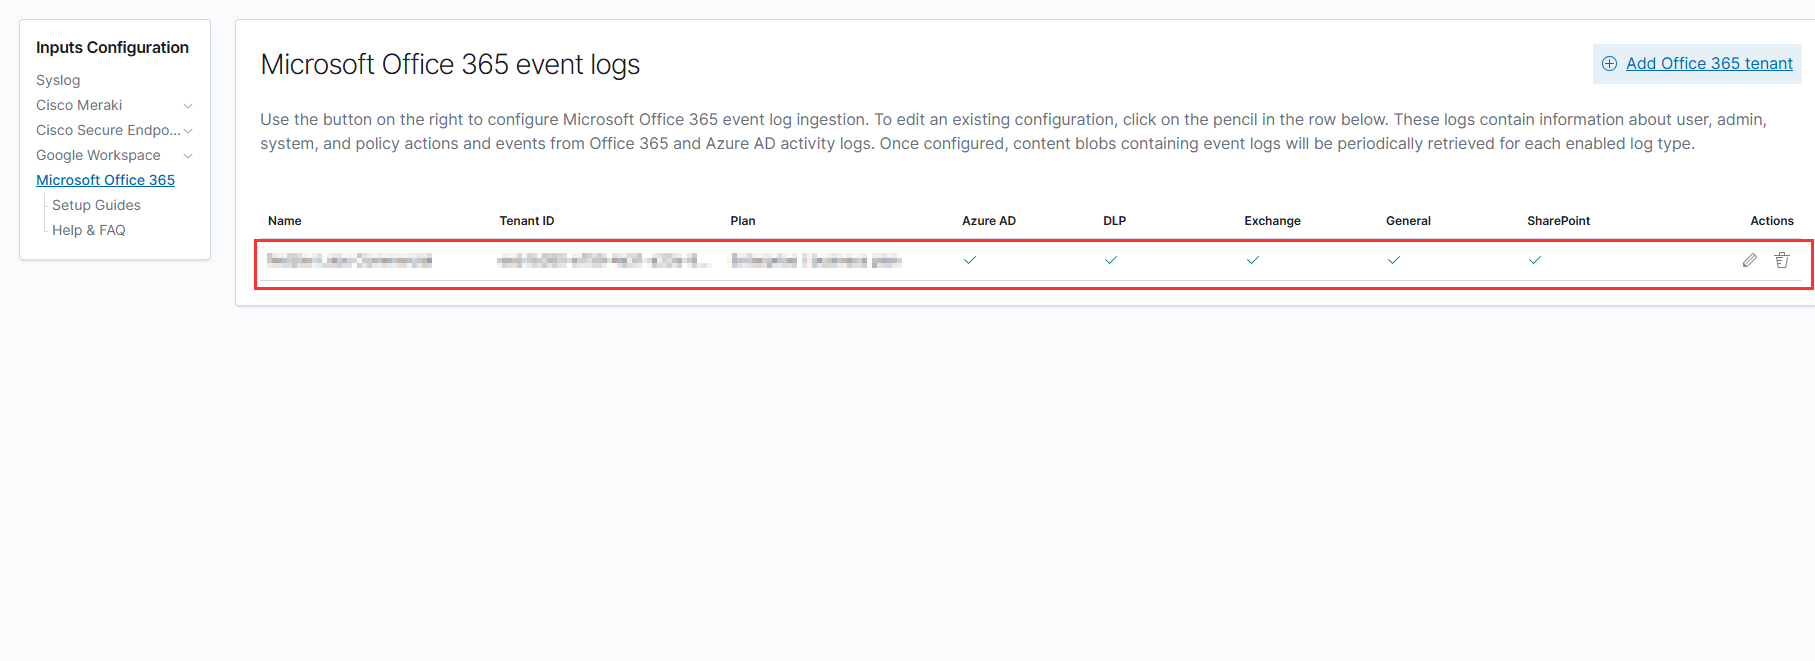
Now the created O365 Tenant will appear in your O365 Input list which can be edited or deleted later as needed.
License
The license page is used to activate and verify your License key. Having an active license ensures that your NeQter Core Module will be able to receive the latest product updates.
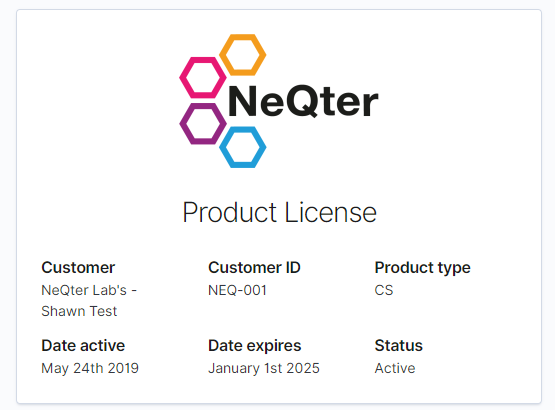
The information shown on the page goes as follows:
Customer / Customer ID: Identifies the owner of the NeQter Device.
Product Type: Identifies the type of NeQter Device deployed (VAB, CS, Etc)
Date Active: Identifies the date in which the device license was first activated
Date Expires: Identifies when the license expires.
Status: Tells the current Status of the device, Active meaning the license is working properly, inactive or expired for when the license has not been renewed and “Cannot Validate License” for when an error occurs with the license.
NOTE: If you have an “Cannot Validate License” Error, make sure to first reboot your NeQter Device and if there is still an issue to contact support at support@neqterlabs.com.
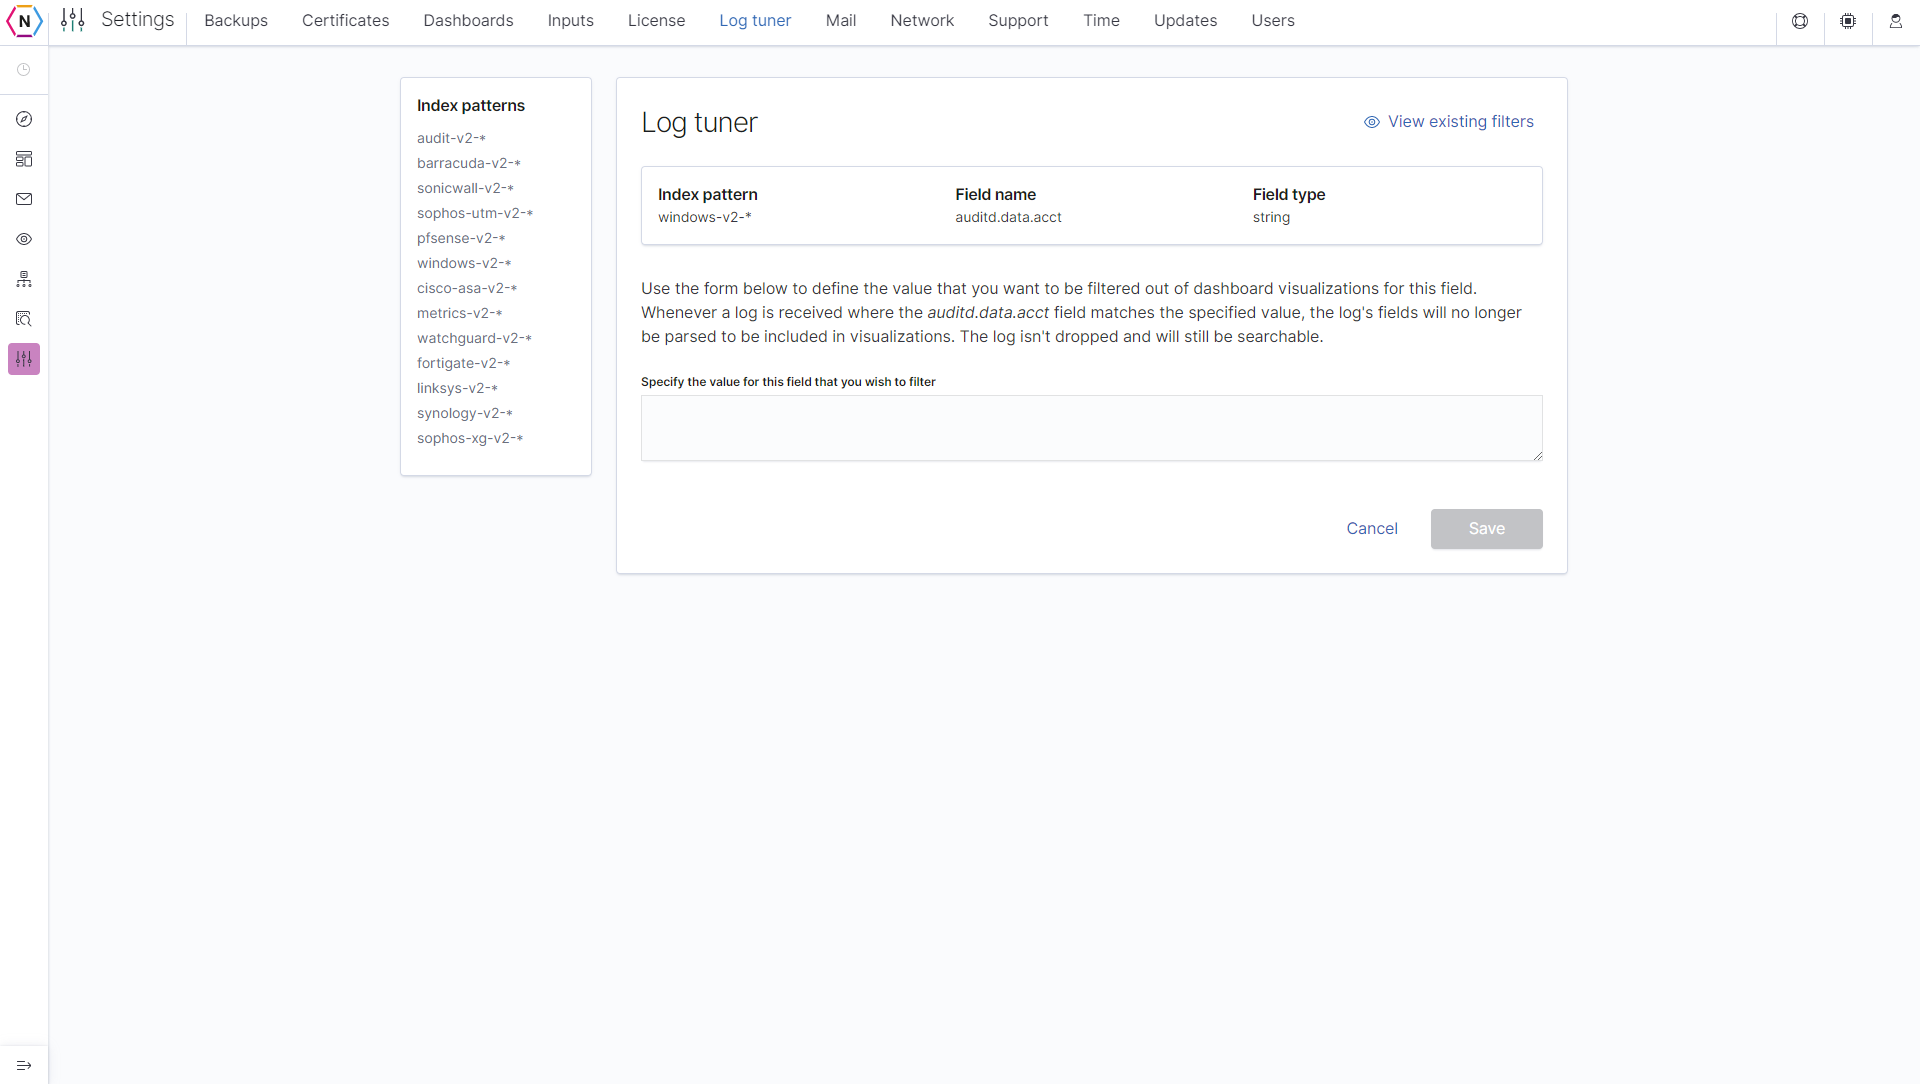
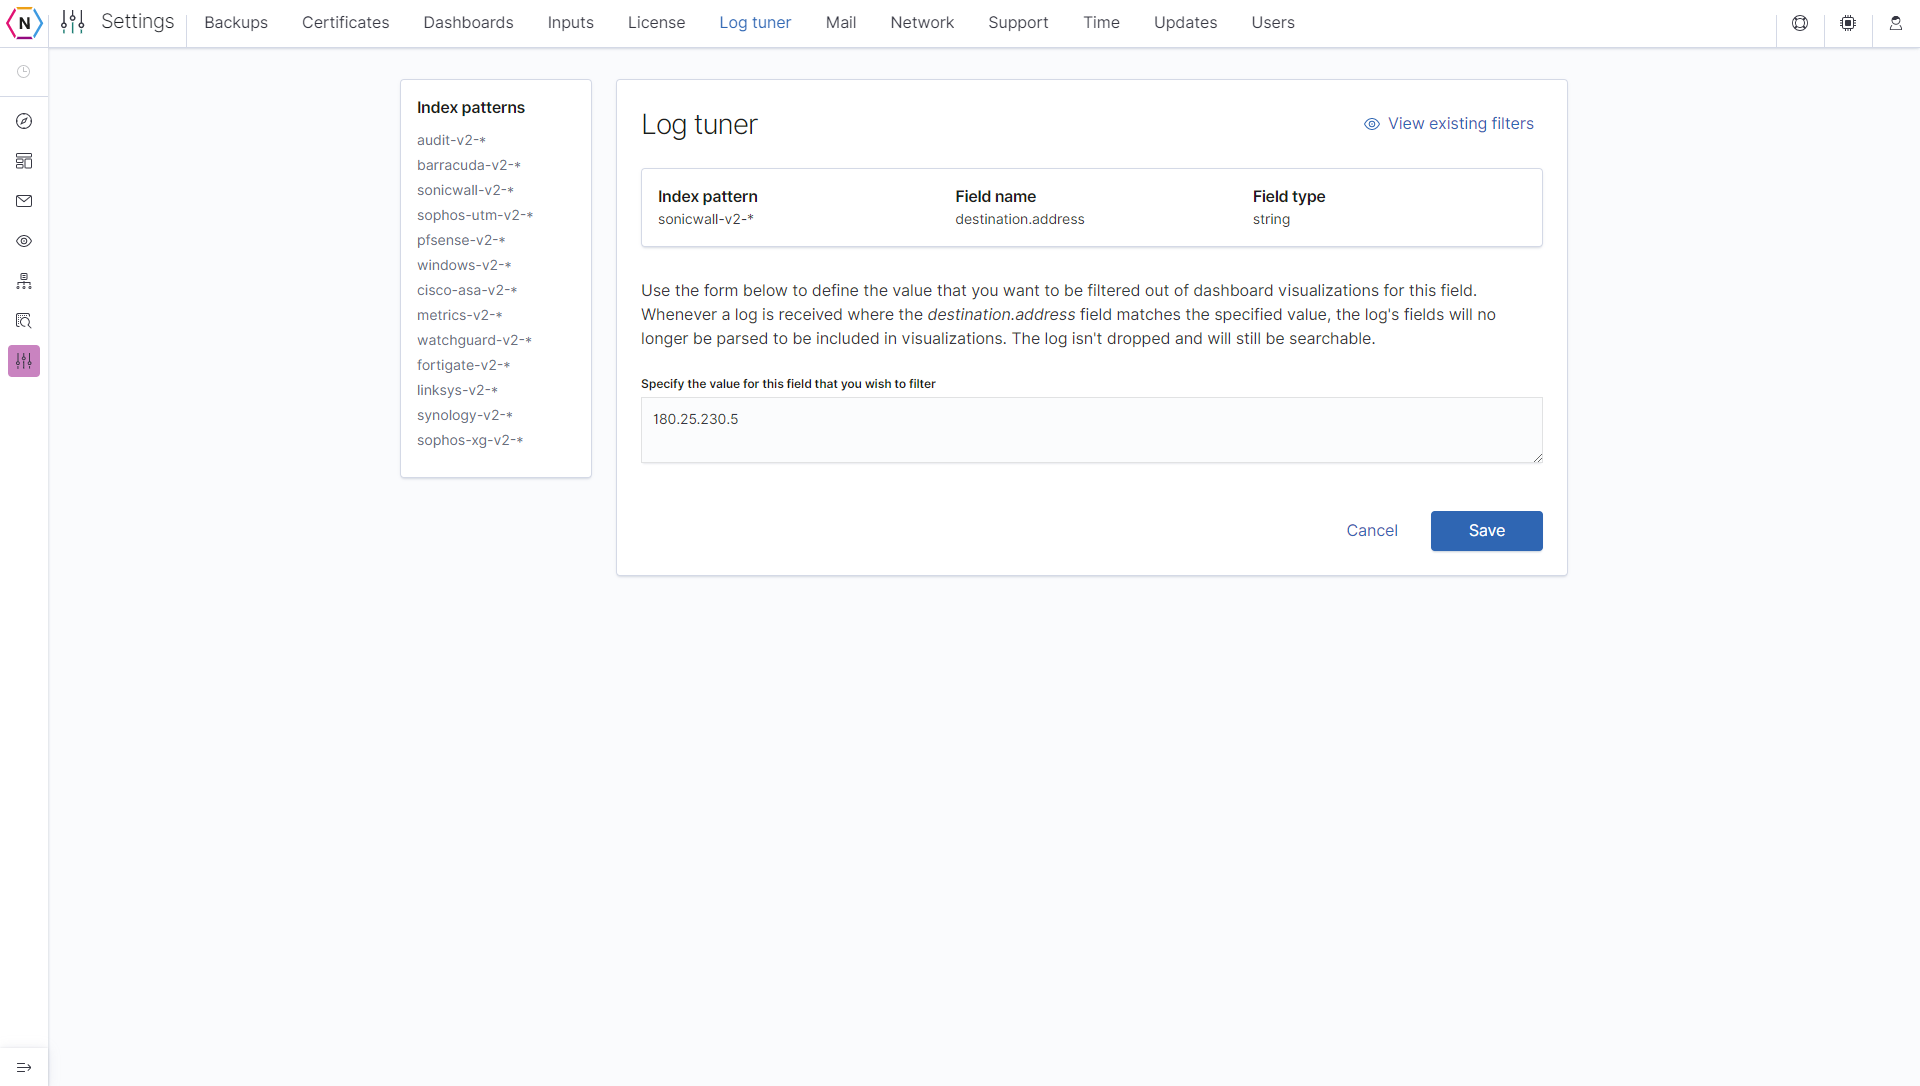
Log Tuner
The NeQter Labs Log Tuner allows unwanted log values to be filtered out of dashboards visualizations. What this means is if any logs are detected with a field containing a specific value you filtered for then the log will have that data and any other related information dropped from the logs.
NOTE: Filtered log values will still be archived and downloadable in their original format in the Raw Logs downloader.
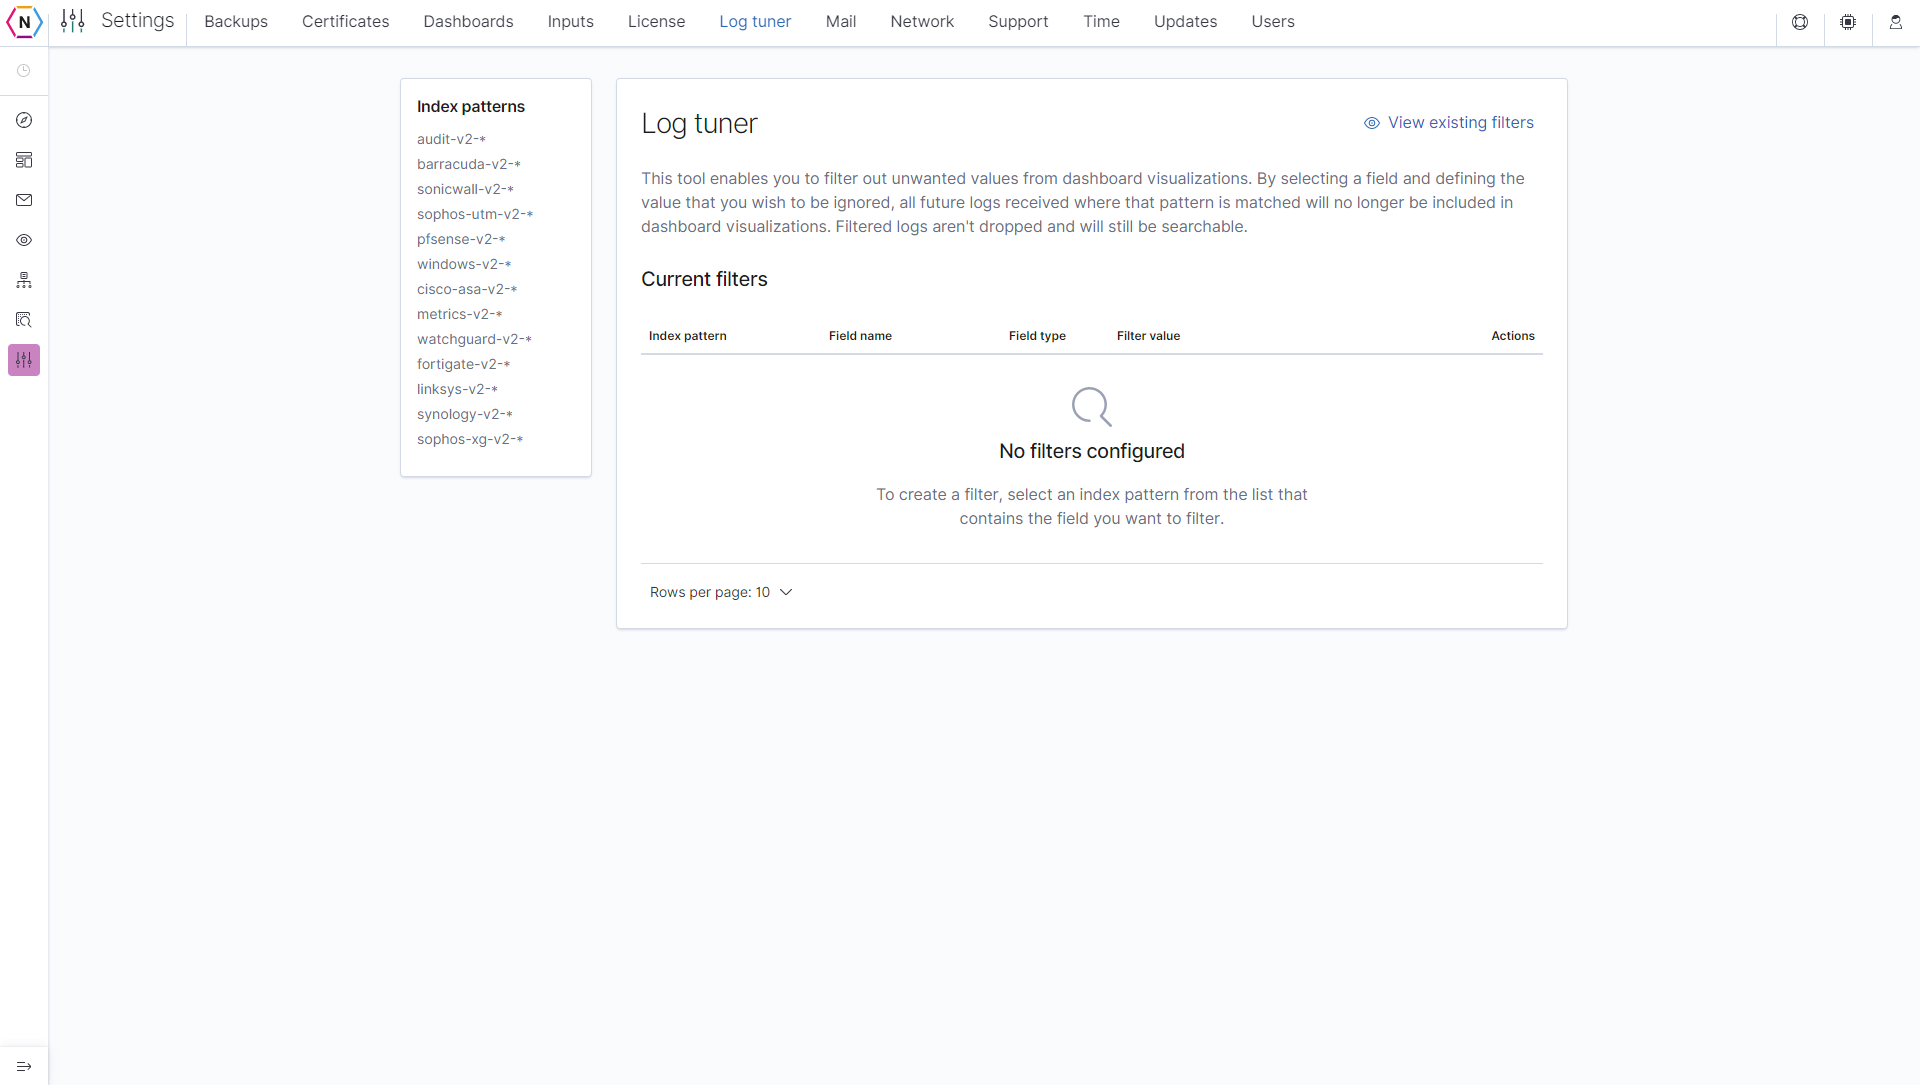
To begin using the Log Tuner, please read the following instructions:
- Select an index pattern from the left menu.
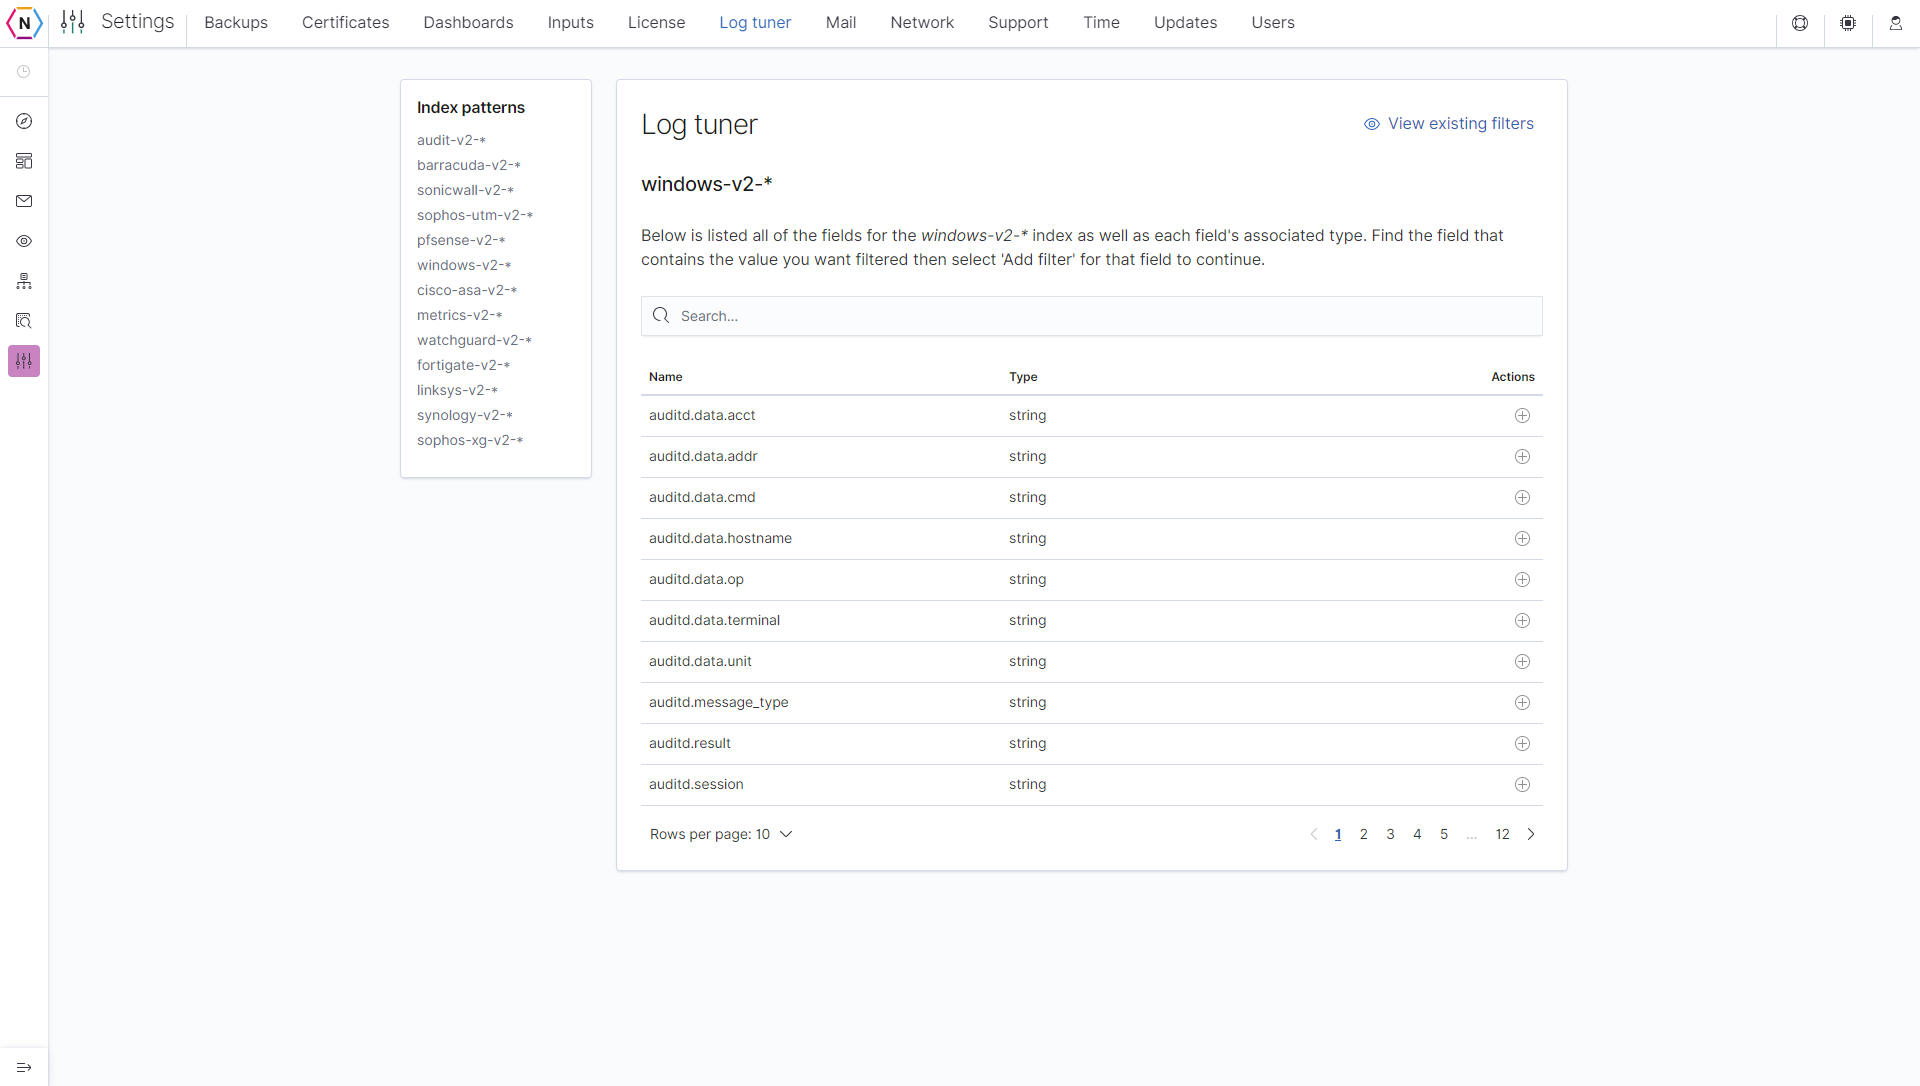
- Select the field that you would like to tune by clicking on the pencil button on the right side under Controls. Then, click Add Exclusion on the next page.
NOTE: You may only select string values, as all others are not supported.
- Enter in the log value that you would like filtered from your dashboard visualizations and click Save Changes.
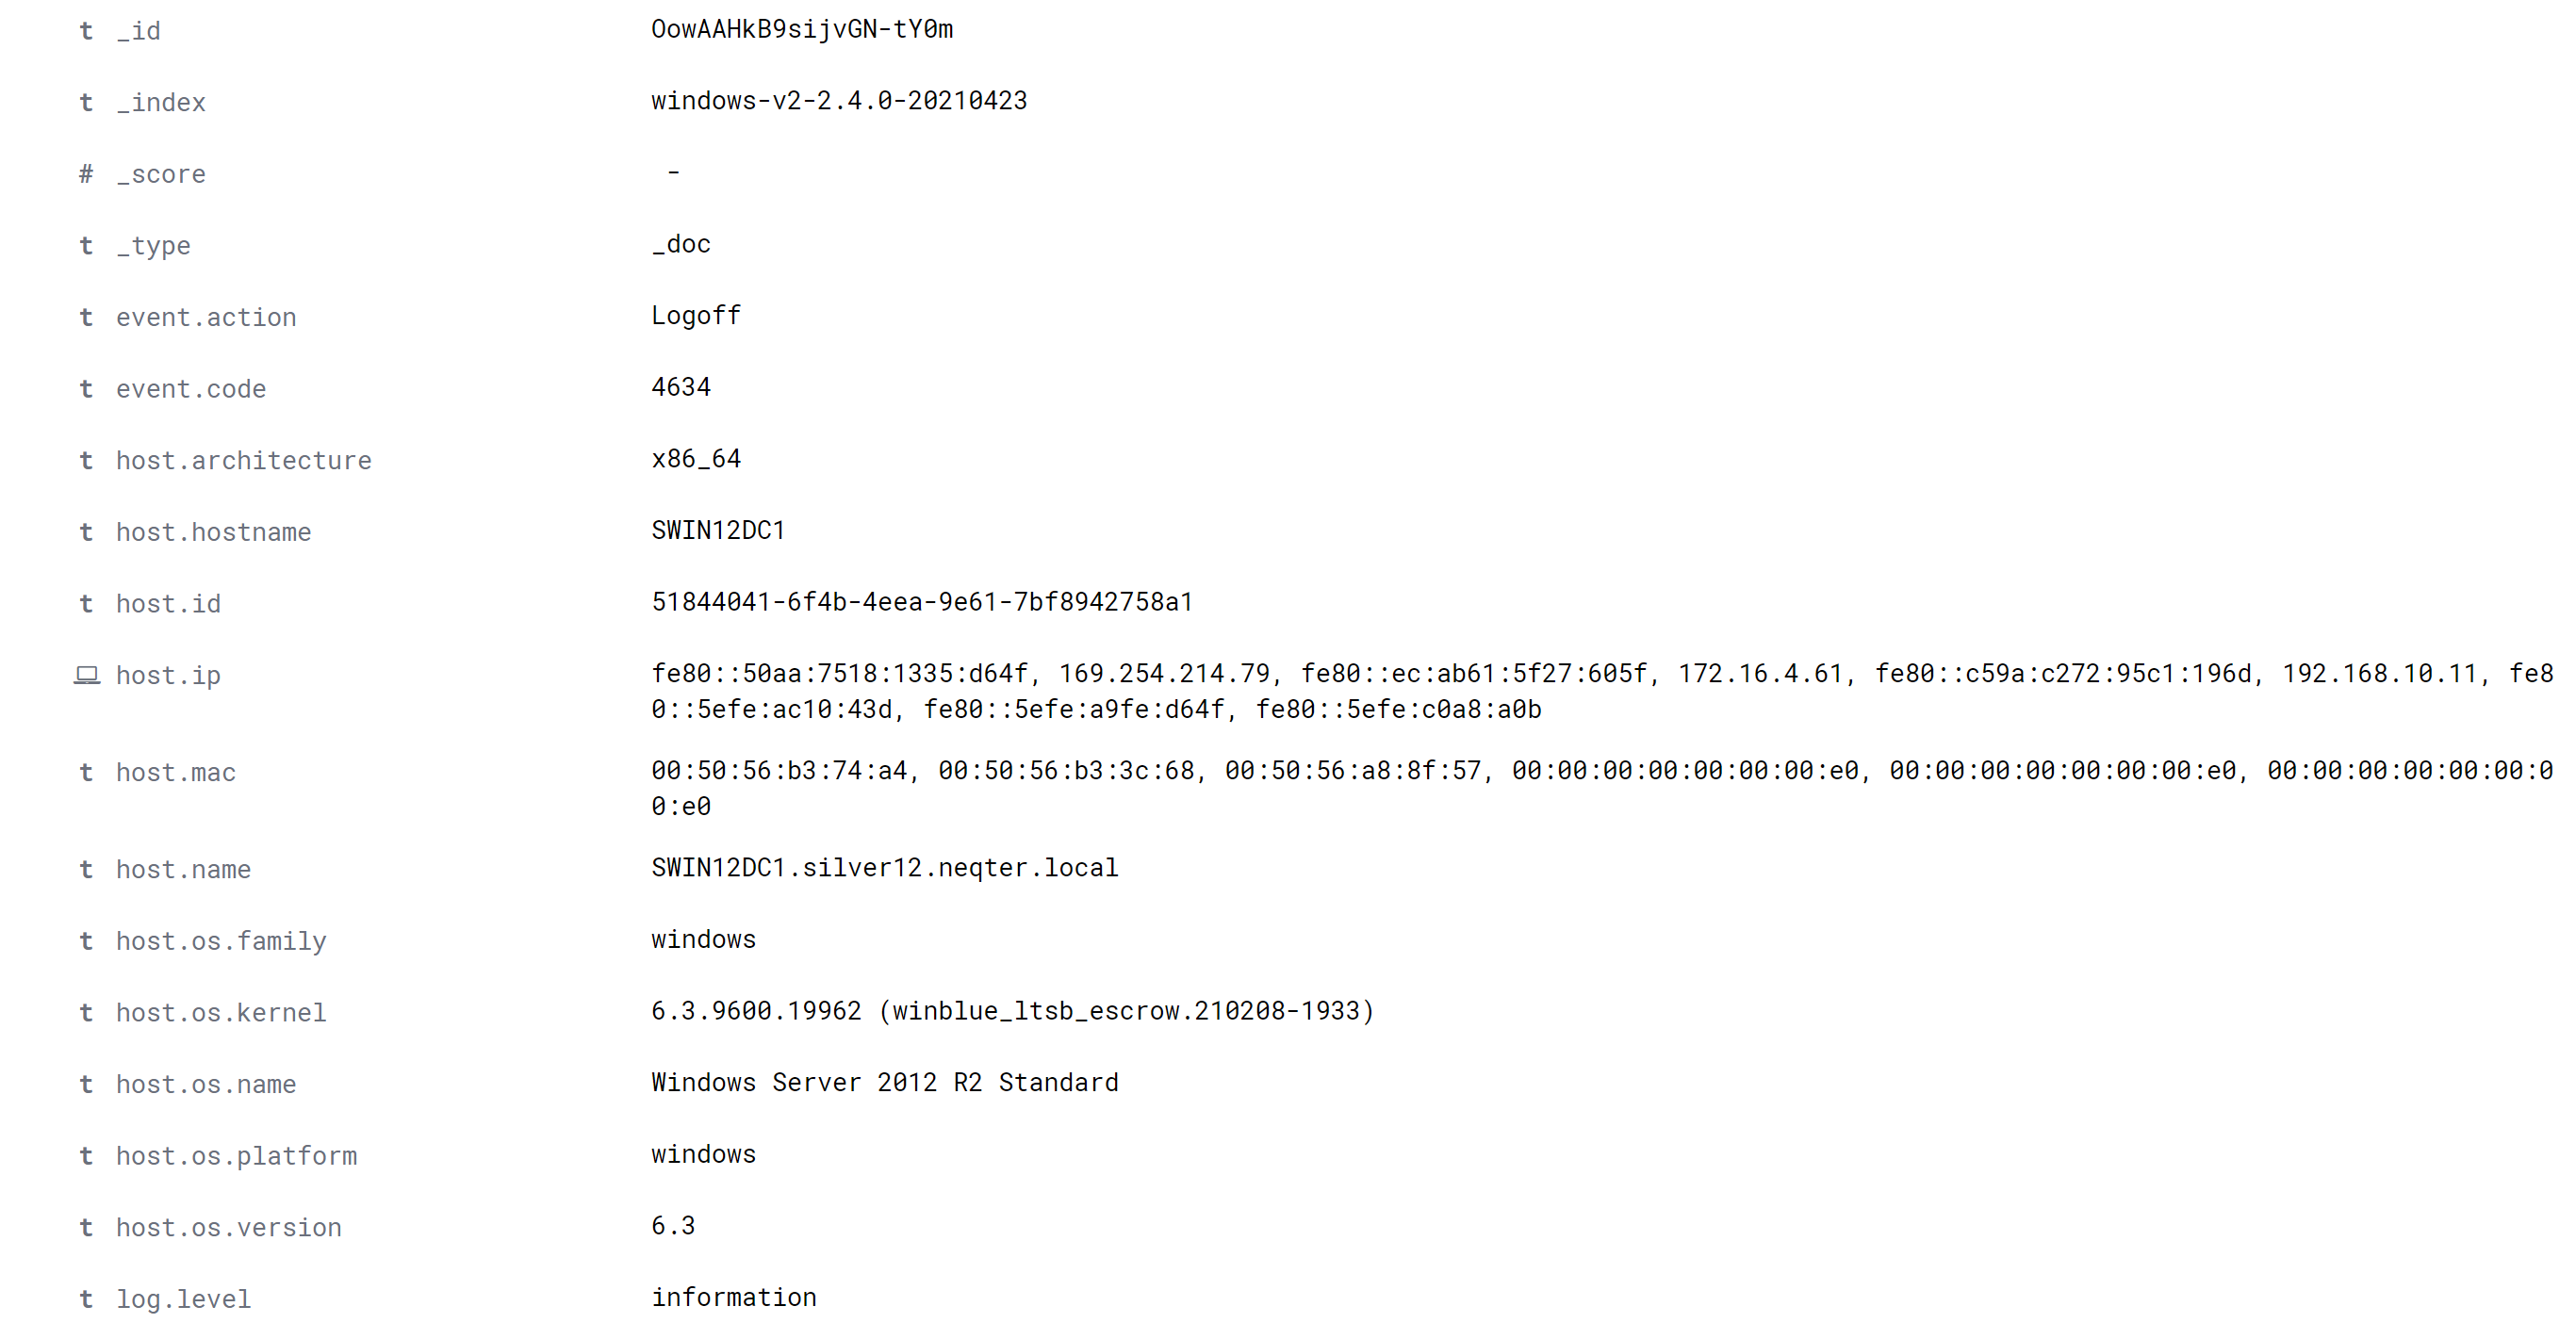
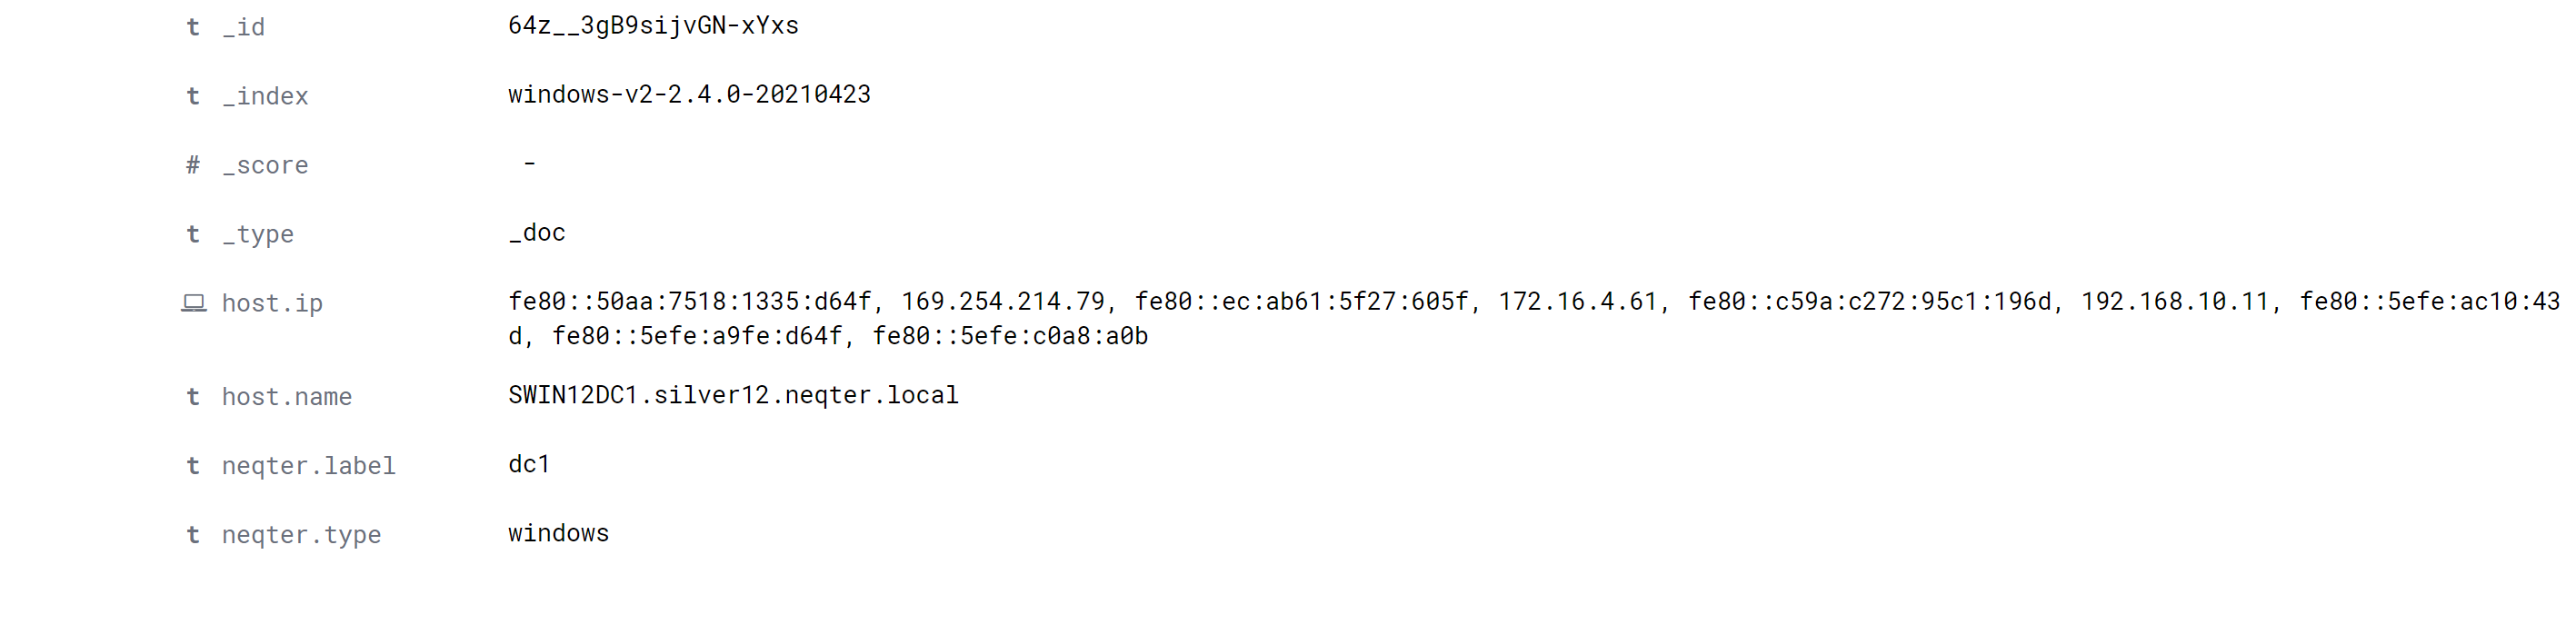
For example, below are a set of two logs. The first log shown is with the log Tuner not tuning out SWIN12DC1 From its parent field host.hostname and the second log with it tuning out the value and related fields.
Log without Tuning
Log with Tuning
The Mail page is where you can configure how email responses are sent from the NeQter SIEM. By default, the NeQter SIEM uses no-reply@neqterlabs.com to send outgoing email messages. You can change this by clicking on the “From address” field and updating the email address.. You can also modify the default prefix, which may be required for some SMTP relay systems.
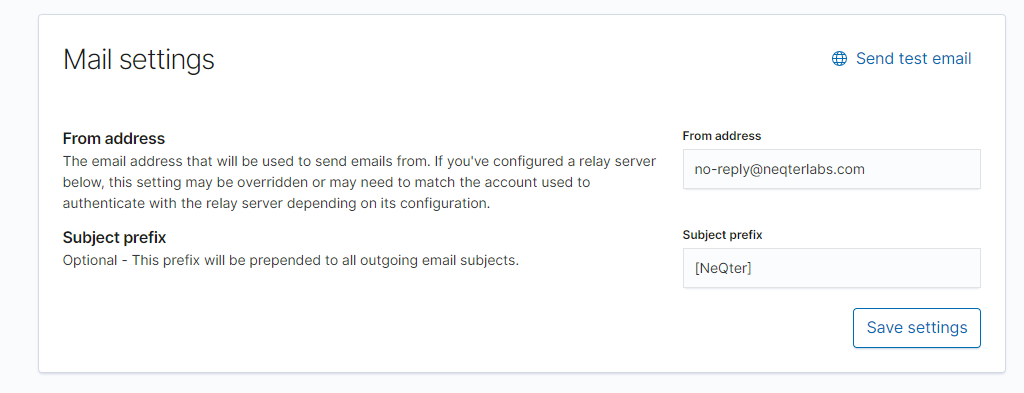
The system will function without an SMTP configuration. However, if an SMTP service is available, it is strongly recommended to configure an SMTP relay for sending email from the NeQter Appliance.
There are two types of mail relay configurations available: SMTP Relay Server, which is used for most configurations outside of Microsoft 365 Exchange, and Microsoft Graph API, which is used specifically for Microsoft 365 Exchange environments.
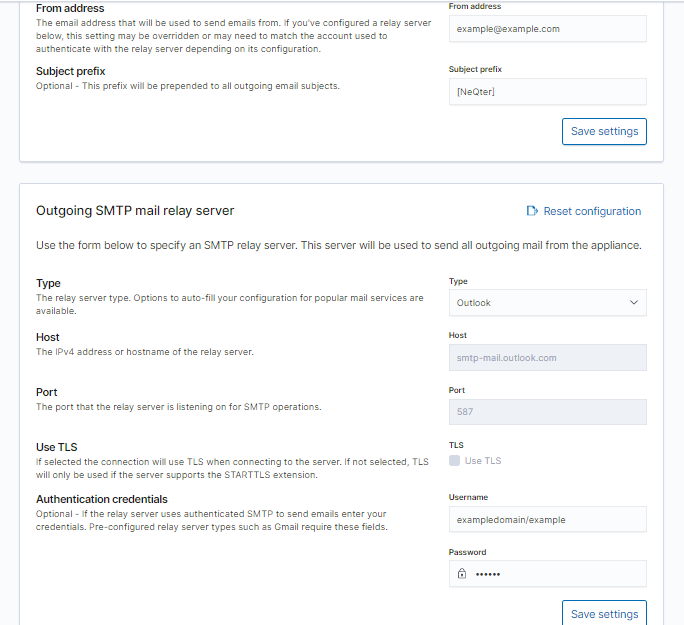
SMTP relay server
When selecting a relay type, you will see several options, such as Google Workspace and Outlook, as well as a Custom option. The Custom option can be used for relay servers that are not directly supported by the NeQter SIEM. After selecting a server type, you may edit some or all of the available configuration settings, depending on the SMTP relay you are using. The available options are described below:
- The Host field specifies the SMTP server that the NeQter SIEM will use for outgoing email. For some providers, such as Google, this field may be automatically populated. For other integrations, it must be entered manually. If manual entry is required, provide the IPv4 address (recommended) or the domain name of the SMTP server you intend to use.
- The Port field specifies the port your SMTP relay uses to receive outgoing email. Commonly used ports include 25, 465, and 587.
- Select the Use TLS checkbox if your SMTP relay requires TLS. If TLS is not required, leave this option unchecked.
- The Authentication Credentials section is where you enter the username and password associated with your SMTP relay. These credentials should have administrator permissions. Authentication may be optional, depending on your SMTP provider.
Note: If a username is entered under Authentication Credentials, ensure that the “From address” at the top of the page matches the username provided. By default, the “From address” is set to no-reply@neqterlabs.com, but it should be updated to reflect the authenticated account.
After completing your configuration, click Save Settings in both the top and bottom sections of the page. Then, select Send Test Email in the upper-right corner to send a test message. If you receive an error, verify that all settings are correct. If the test email still fails, restart the NeQter SIEM and try again. If the issue persists, please contact support@NeQterLabs.com for assistance.
Microsoft Graph API
Below is an image of the screen you will see when configuring Microsoft Graph API connectivity for mail relay:
To connect with Microsoft 365, you must create an app registration and assign the appropriate permissions. Follow the steps below to complete the setup:
1. 1. Navigate to http://portal.azure.com/ and search for App Registrations.

2. Create a new app registration. The name may be anything you choose; however, it is recommended that it be easily identifiable. Leave all other settings at their default values unless you have a specific reason to change them.
3. On the landing page of the newly created app registration, copy the Application (Client) ID and Directory (Tenant) ID, and paste them into their respective fields on the NeQter SIEM.
4. Next, navigate to the Certificates & Secrets tab in the left-hand navigation menu within Azure, and select New Client Secret. When creating the secret, you will be prompted to provide a description and choose an expiration period. Microsoft allows client secrets to be valid for a maximum of 720 days (two years). We recommend setting a reminder prior to the expiration date to generate a new client secret and update it on the NeQter SIEM before the secret expires.

5. Copy the Value of the newly created client secret and paste it into the Client Secret field on the NeQter SIEM.
6. Navigate to API Permissions within your Azure app registration and select Add a Permission. In the window that appears, choose Microsoft Graph, then add the following permissions under their respective categories (you may need to use the search bar to locate them):
Delegated Permission > SMTP.Send
Application Permission > Mail.Send
After adding the permissions, click Grant Admin Consent for (Your Company Name) at the top of the page to apply them.

NOTE: If the Grant Admin Consent button is unavailable, verify that your account has administrator privileges, as this action requires an administrative account. If your Microsoft environment is managed by a third party (such as an MSP), you may need to contact them to complete this step.
7. Return to the NeQter SIEM, select your Office 365 subscription type, and click Save Settings.
8. Navigate to the top of the Mail page and update the “From address” to an email address that is part of your Exchange environment. If the “From address” is not a valid mailbox or alias within your Exchange tenant, outgoing messages may be blocked. After making the change, click Save Settings, then select Send Test Email to confirm that your configuration is set up correctly.
Network
Only in the event that the IP address of your NeQter Appliance needs to be changed, go to Settings > Network and fill out the new IP information. You can change your NeQter Client’s IP Address, Default Gateway, DNS Server as well as DNS Search IP if needed. You can also apply IP Address changes to other interfaces on the NeQter Device by clicking on the related interface on the top nav bar of the Interface Window. Once you have the changes you need done you can click Apply changes to complete the task.
Lastly you are also able to activate the Packetbeat tool on this page by enabling Toggle Network Inspecting. This feature allows you to inspect pacts going to and from the interface it is on similar to software like Wireshark.
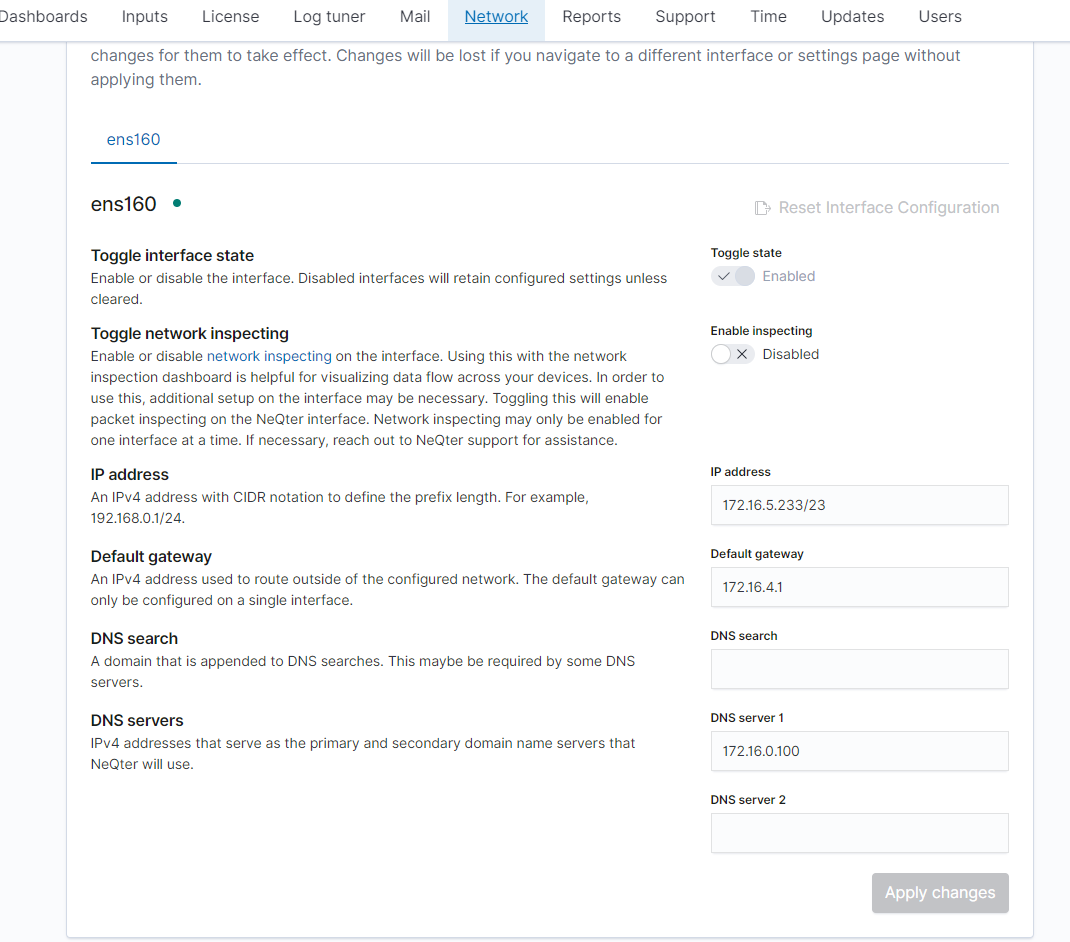
Note: You can also configure the domain name of the associated device by typing in the domain name you want under the ‘Domain name’ section and clicking ‘Change domain’
Support
The Support Tab under Settings is where you can get the current documentation for our NeQter Client (which you are at the present reading) you can also get information about how to contact our support team if there is an issue that you can’t resolve by yourself.
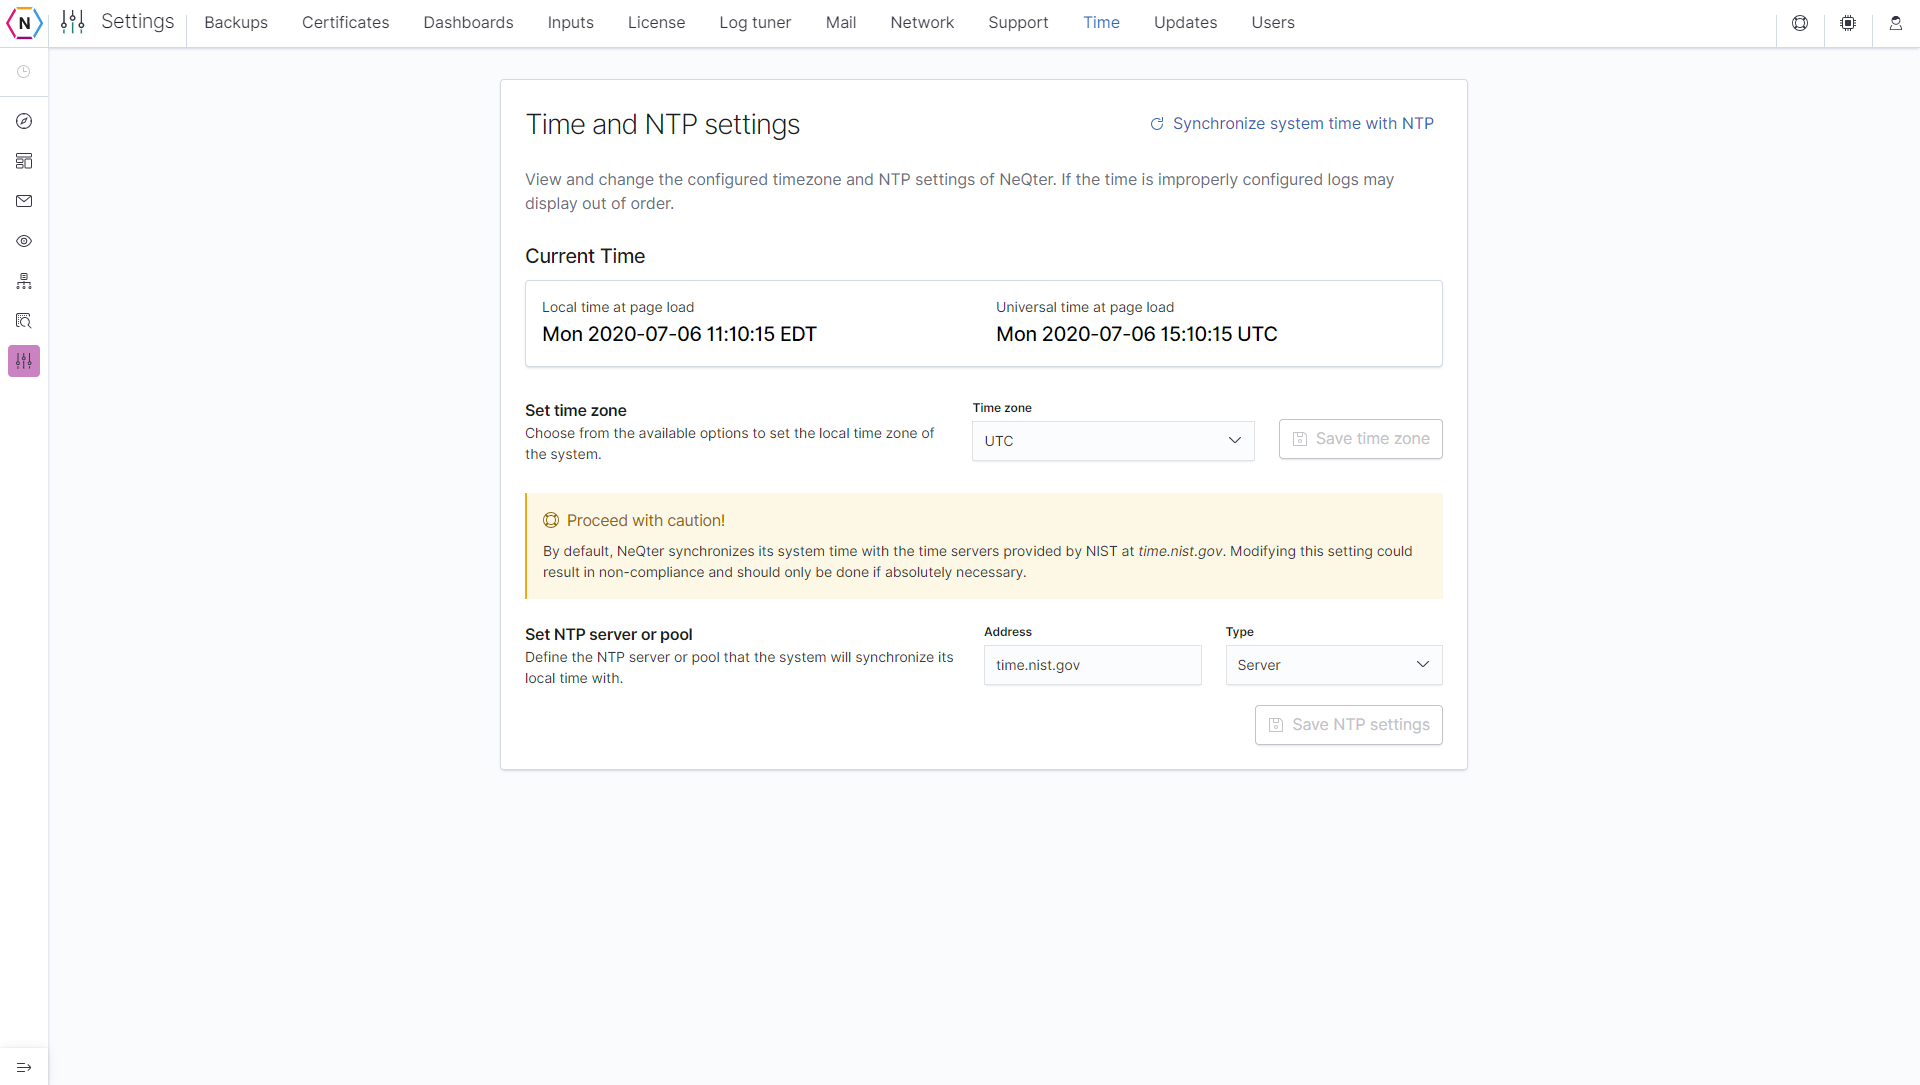
Time
The Time Page under settings is where you are able to change the NTP Server Source as well as the time zone on the box. The default Source is time.nist.gov (which we recommend you do not change) which can be changed by typing in the source address under te Address Bar. As for changing the time zone used on the box simply click on the time zone drop down and look for a city in your time zone (for example, America/Detroit is located in CST Timezone, which would make your box use CST instead of the default UTC).
WARNING: Changing your NTP Server settings could cause you to fall out of NIST Compliance. It is not recommended to use these settings unless absolutely necessary!
Updates
The NeQter Compliance Engine appliance will check for new updates every night at 1am. You will be able to see if you have an update available by viewing this page. The Check for Updates button will allow you to manually check for updates. If an update is found, click the Update button to start the update process.
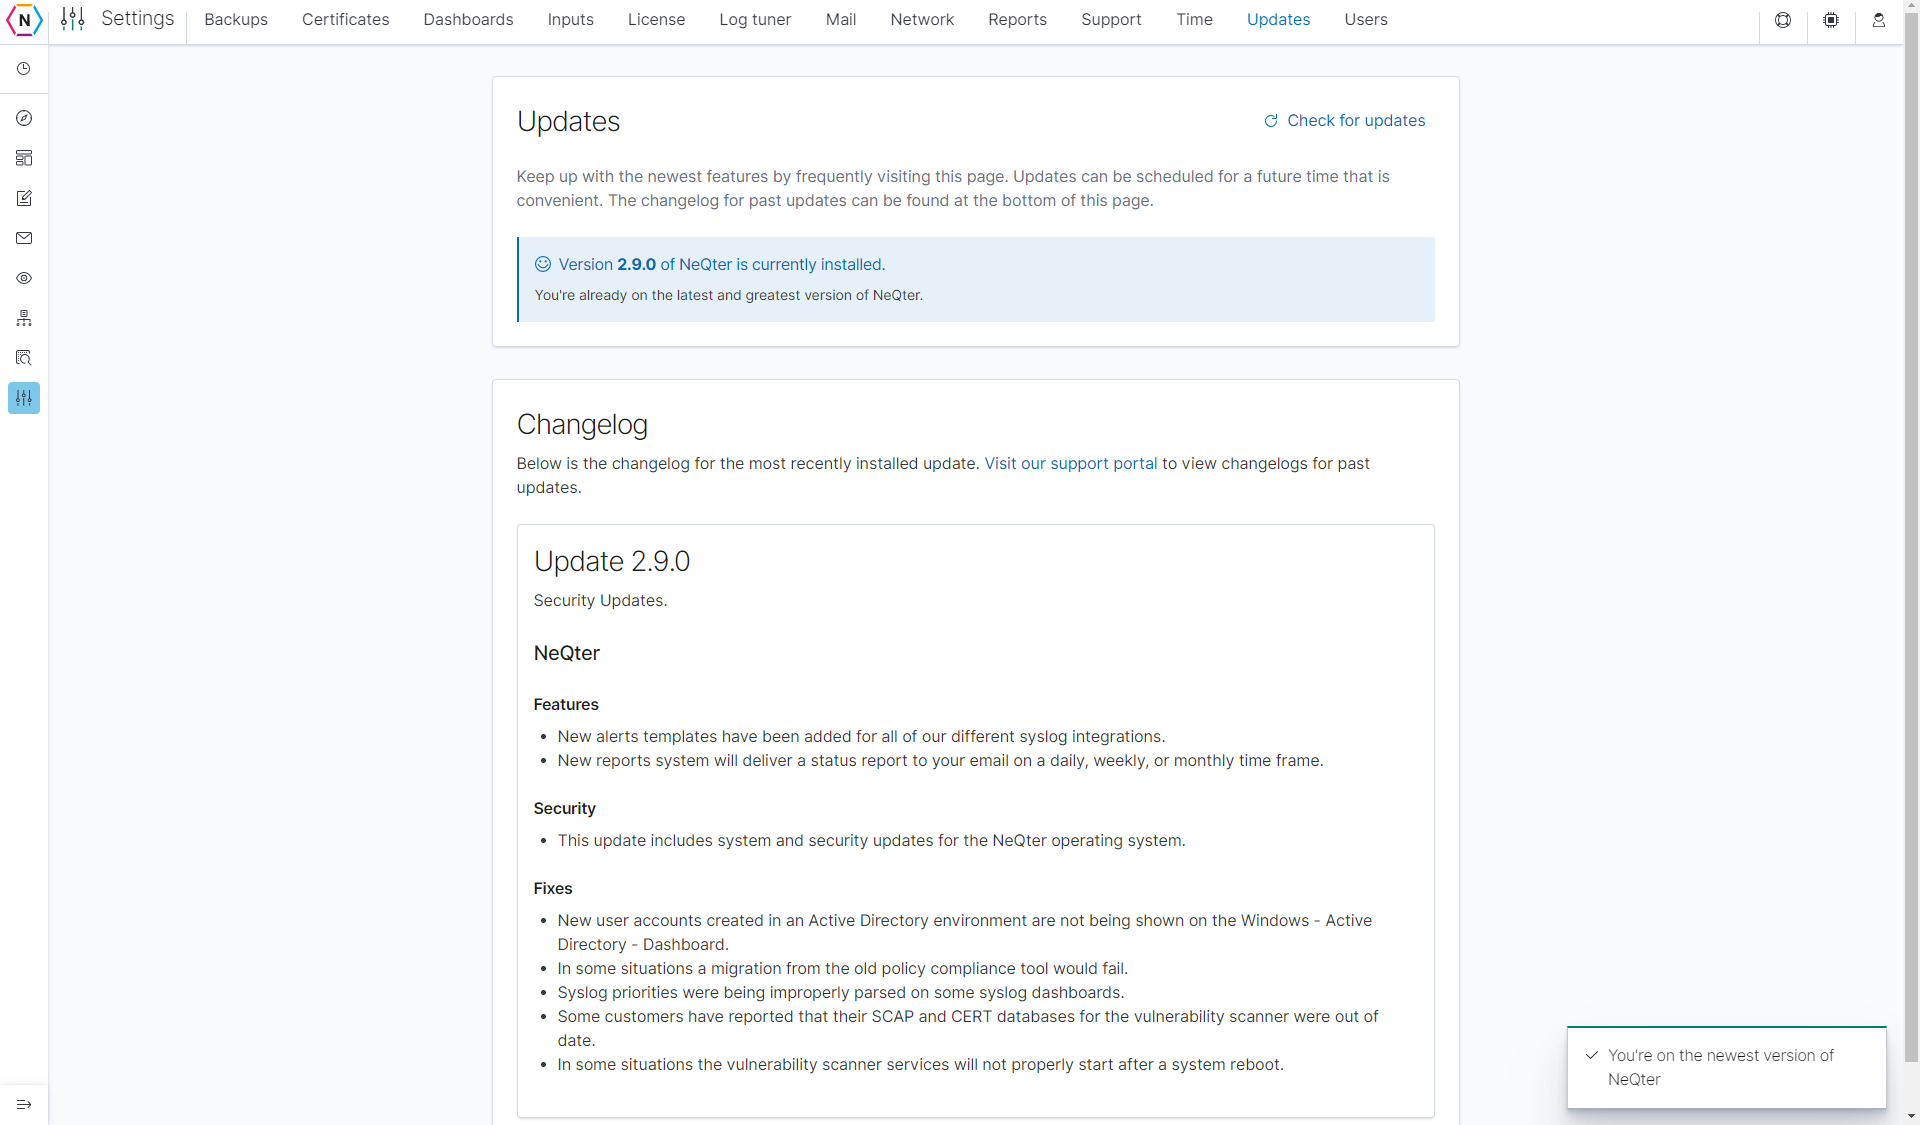
If an update is available you can also schedule an update by clicking on the schedule button found on the side and then picking a time and date to have the update start.
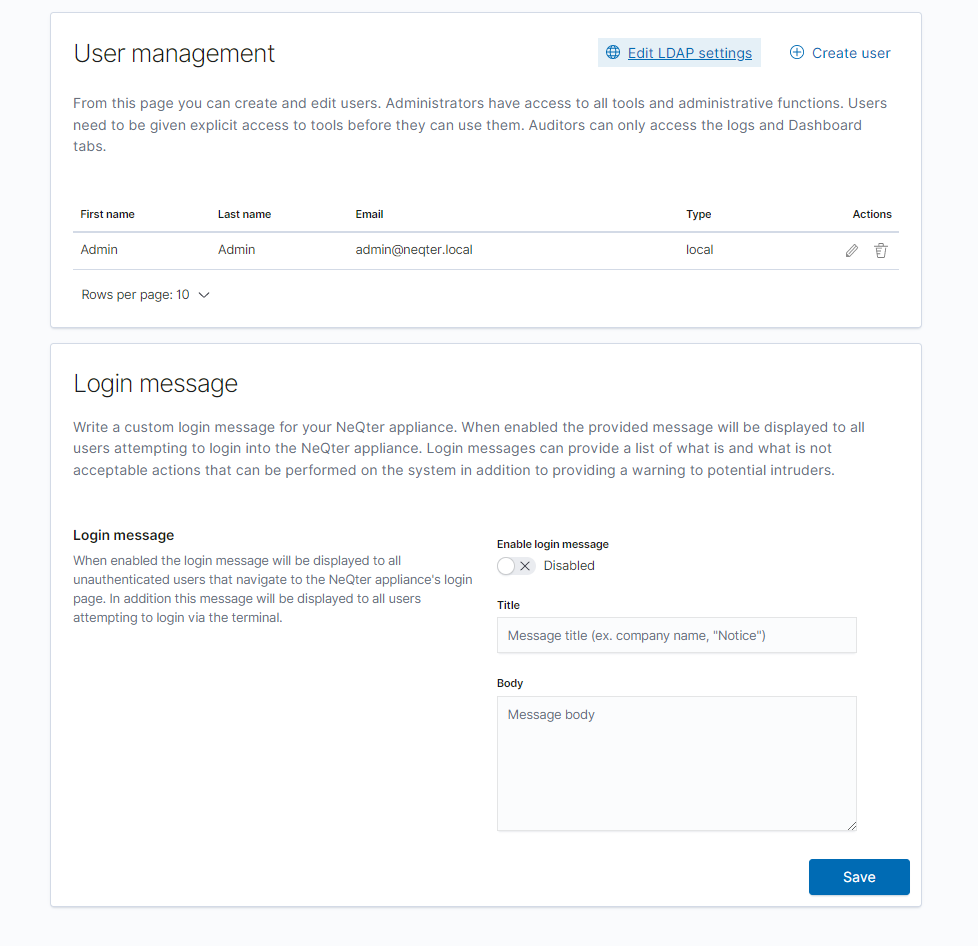
Users
To create, edit, and remove Local users for the overall NeQter appliance WebUI, use the navigation bar to go to Settings > Users. From here you will find a list of users and a Create user button on the top. To edit a user click on the pencil icon next to their name on the list, to delete a user click on the Trashcan icon instead.
To create a user from scratch follow the steps below:
1. Click on Create User.
2. Give the user a first and last name
3. Input a email (preferably the one they use) under the Email section.
NOTE: The email address that you provide will be the login name for the account.
4. Type in a password and then retype the same password below to confirm.
The User Screen should now look something like the following:
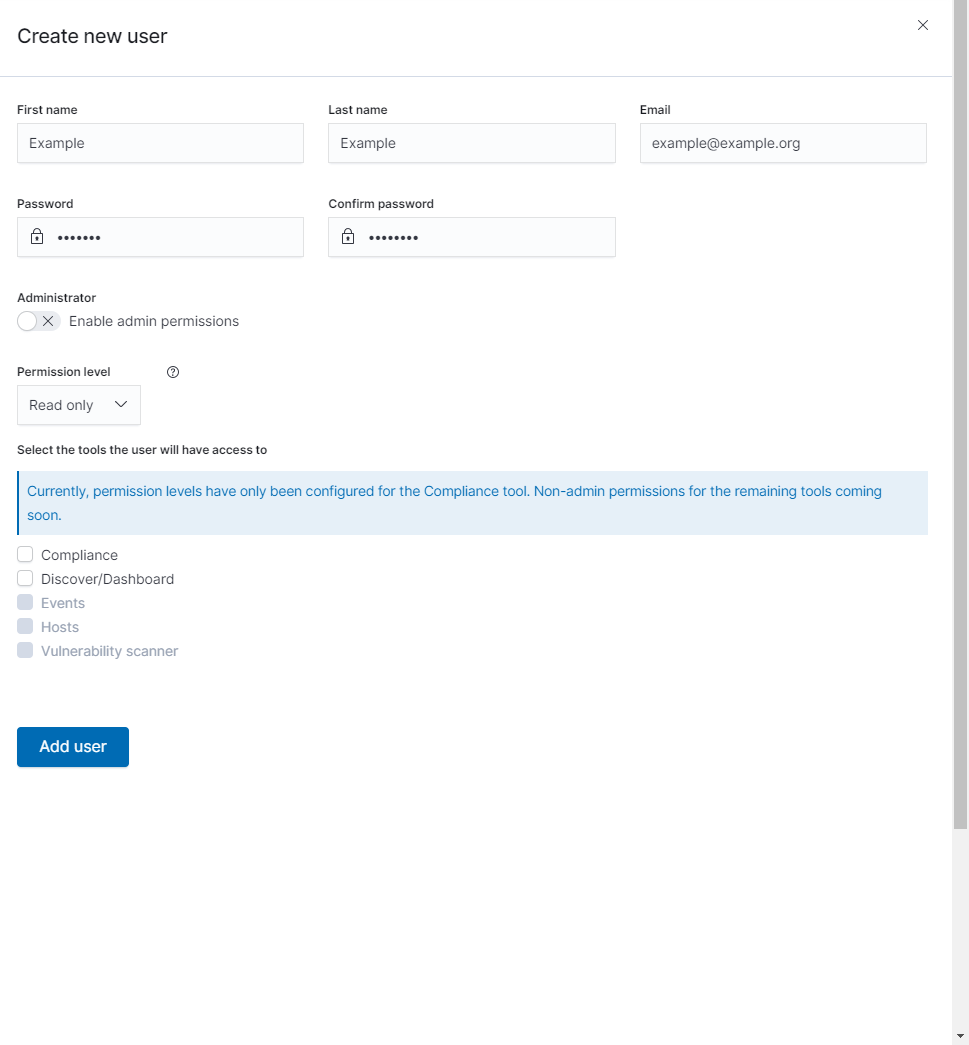
After inputting the user’s setting you can either enable admin permission which gives the user complete access to all tools on the NeQter Device or select specific tools you’d like to give a regular non-admin user access to.
To create a Admin User Account click on the Enable admin permissions button.
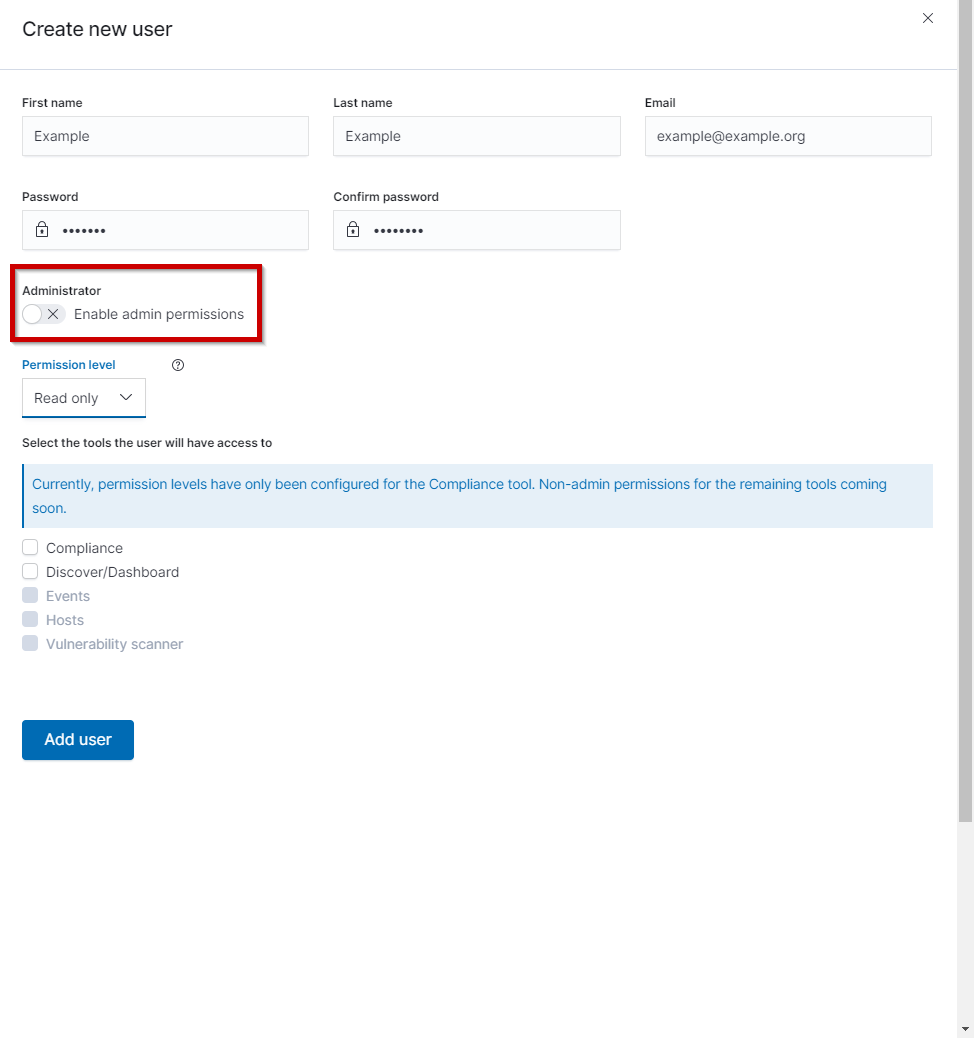
To create a auditor / user account you can click on the tools you’d like the user to have access to by clicking on the checkboxes on the bottom of the Create new user flyout. Some tools can be set to read only with others only being available for both read and write permissions. You can change between the different permission levels by clicking on the Permission Level checkbox circled in the image below.

Once the user’s permissions are all set, all that is left is to click the Add User to complete. A successful creation notification will appear if user creation was done successfully. To edit the properties of a user, click on the pencil icon under the Actions column in the existing users table.
NOTE: The page may need to be refreshed to reflect New User Creation.
Configuring LDAP Users
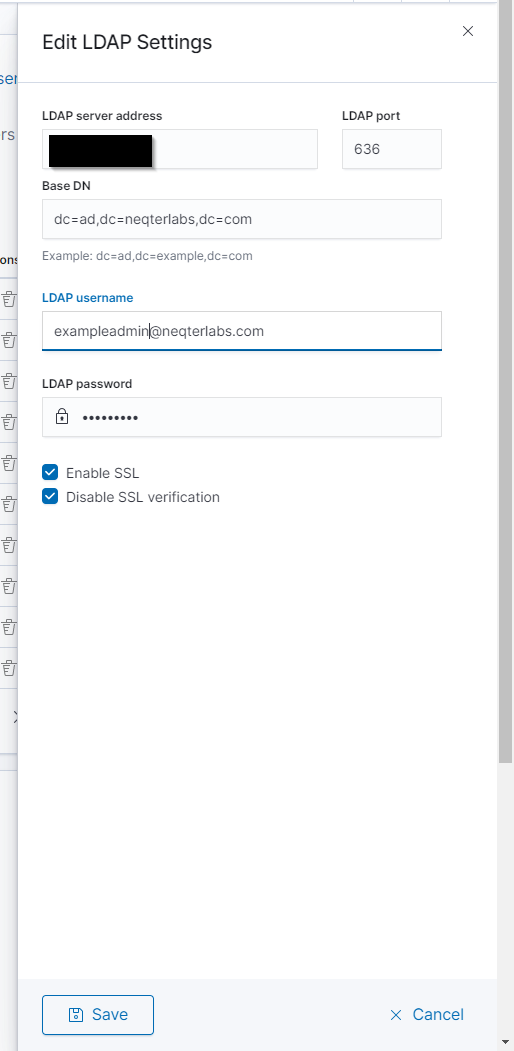
If you require two factor authentication or wish to import users from your Active Directory, you can do so by utilizing our LDAP Integration System. To configure LDAP user accounts on your NeQter Device, follow the steps below:
1. Click on the Edit LDAP Settings button the top right of the page.
2. Put in the IP Address of your Active Directory Server alongside the port you’d like to utilize (Port 389 or Port 636 are most often used for LDAP).
3. Next, type in dc=(domain name),dc=(TLD) for the Base DN section.
Example: ad.neqterlabs.com would becomedc=ad,dc=neqterlabs,dc=com
4. Put in a Domain Admin User and Password. Optionally, if you’re using SSL alongside LDAP you can also enable it or disable it being utilized by clicking the check boxes near the bottom of the window.
5. Save and navigate to Create User. From there click LDAP, you will be prompted to put in the password of the LDAP username inputted earlier.
6. If the username and password is correct you’ll be greeted with a screen containing all user accounts found on your ldap network, from here you can pick which accounts you’d like to import by clicking on the check box found next to each user. Once you have the users you’d like imported selected, click on the Add # Users button on the top left to have the NeQter grab their login information.
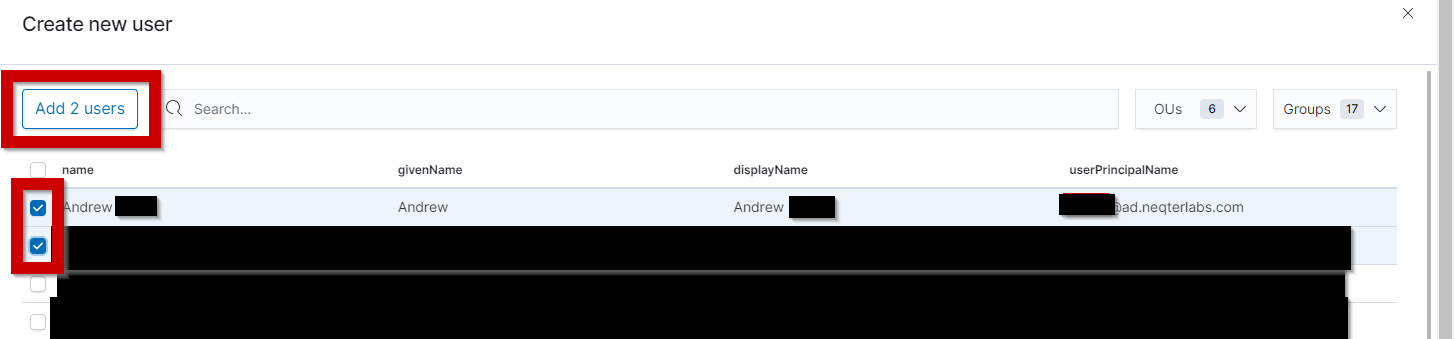
You will now see the users added to the NeQter device after a quick refresh of the page.
NOTE: If you or another user wants to login to the neqter device using ldap then at the login screen make sure to have ‘LDAP’ selected for the login type. ‘Local’ login will only allow someone to login to a local neqter account only.
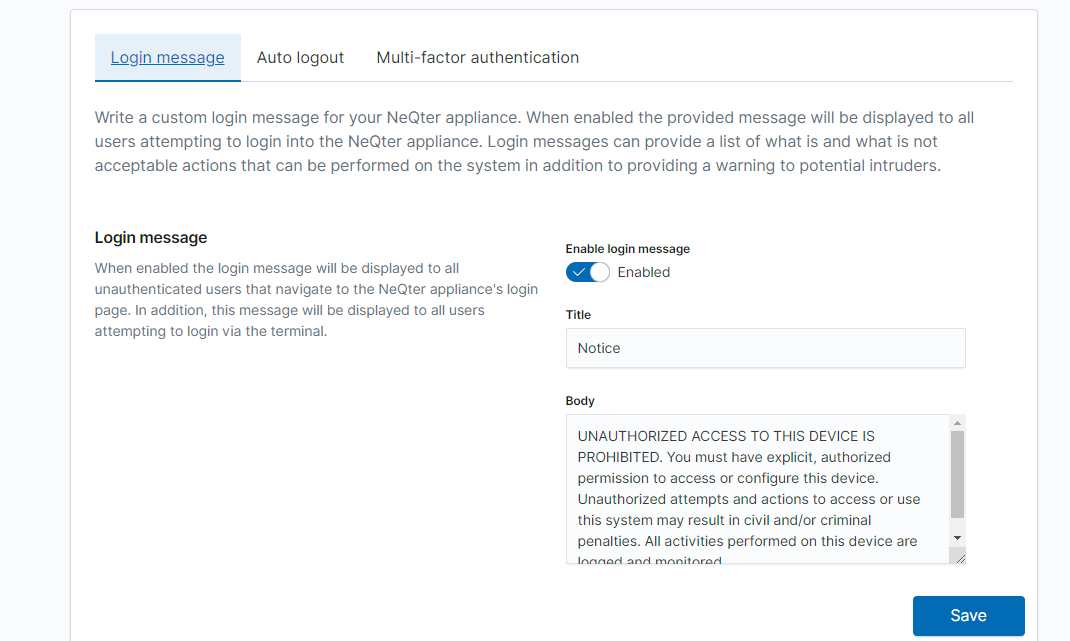
Configuring a Login Message, Auto-Logout & MFA
At the bottom of the user page there will be multiple different options Admin Users can change. The Login message section is where you can create your own login banner from scratch. You’ll first need to enable the login message banner and then from there you can edit the Title and Text body of the banner. Once completed you can click Save and now whenever anyone attempts to connect to the NeQter Appliance they will be greeted with the banner you created.
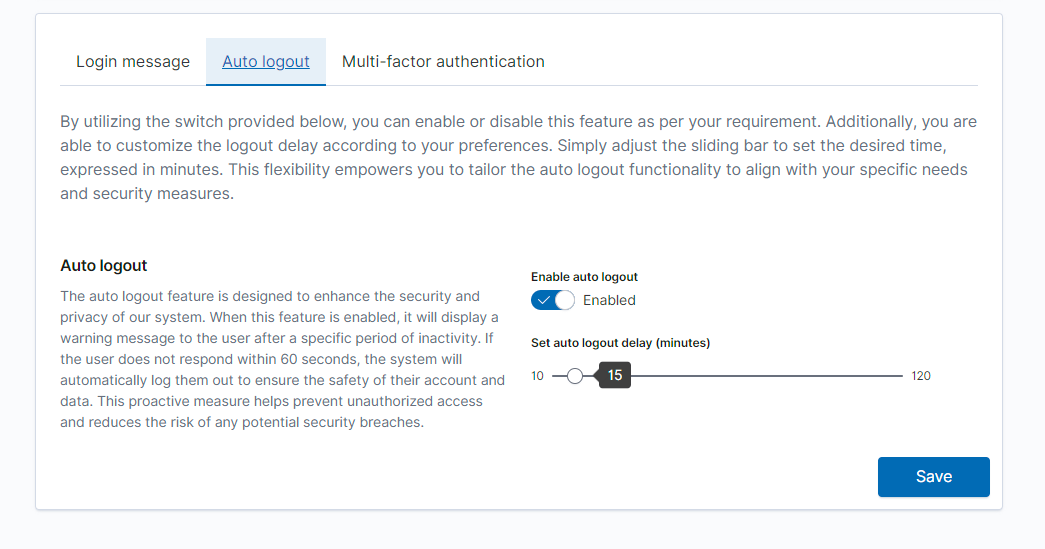
The Auto logout section is where the login period can be changed. By default it is set to automatically have users logout after 15 minutes of no activity. This can be changed to be anywhere from 10 minutes to 2 hours. This feature can also be disabled from this panel.
The Multi-factor authentication section is where users can enable MFA for the NeQter Device. Once enabled, any future logins will require an MFA Code input for any user attempting to login. The code will be sent to the associated email address of the account used.
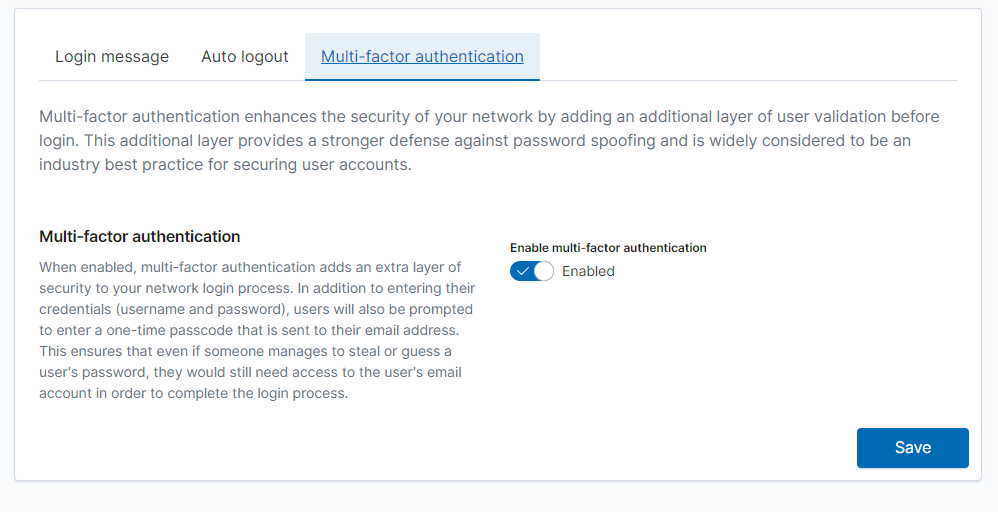
NOTICE: MFA should NOT be enabled unless at least one administrator account with a legitimate email is present on the box. If MFA is enabled and users are unable to access the device it can be disabled via the terminal console.
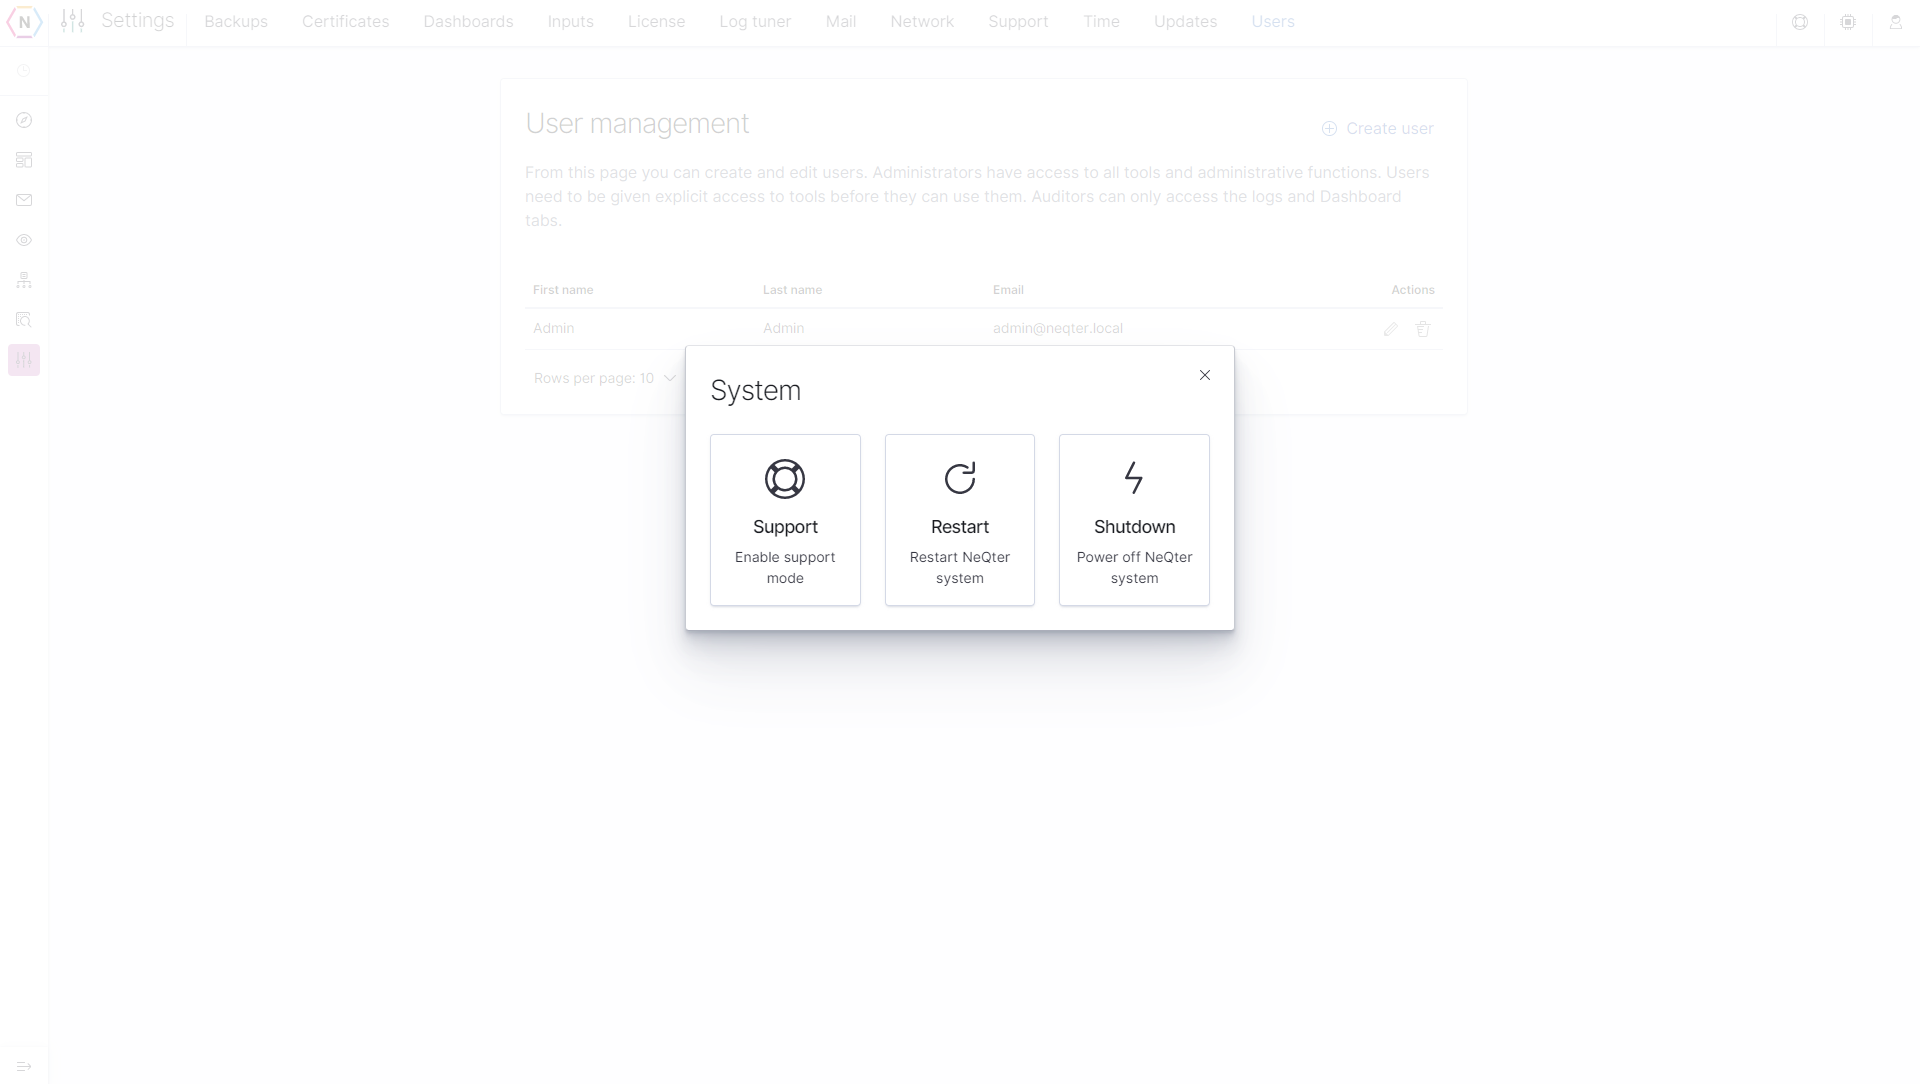
System
Located on the upper right of the top navigation bar is the system settings section, represented by a icon that looks similar to a processor. From here you may choose to either restart, shutdown or have the system enter support mode. All users should be notified of the shutdown and/or restart before it occurs.
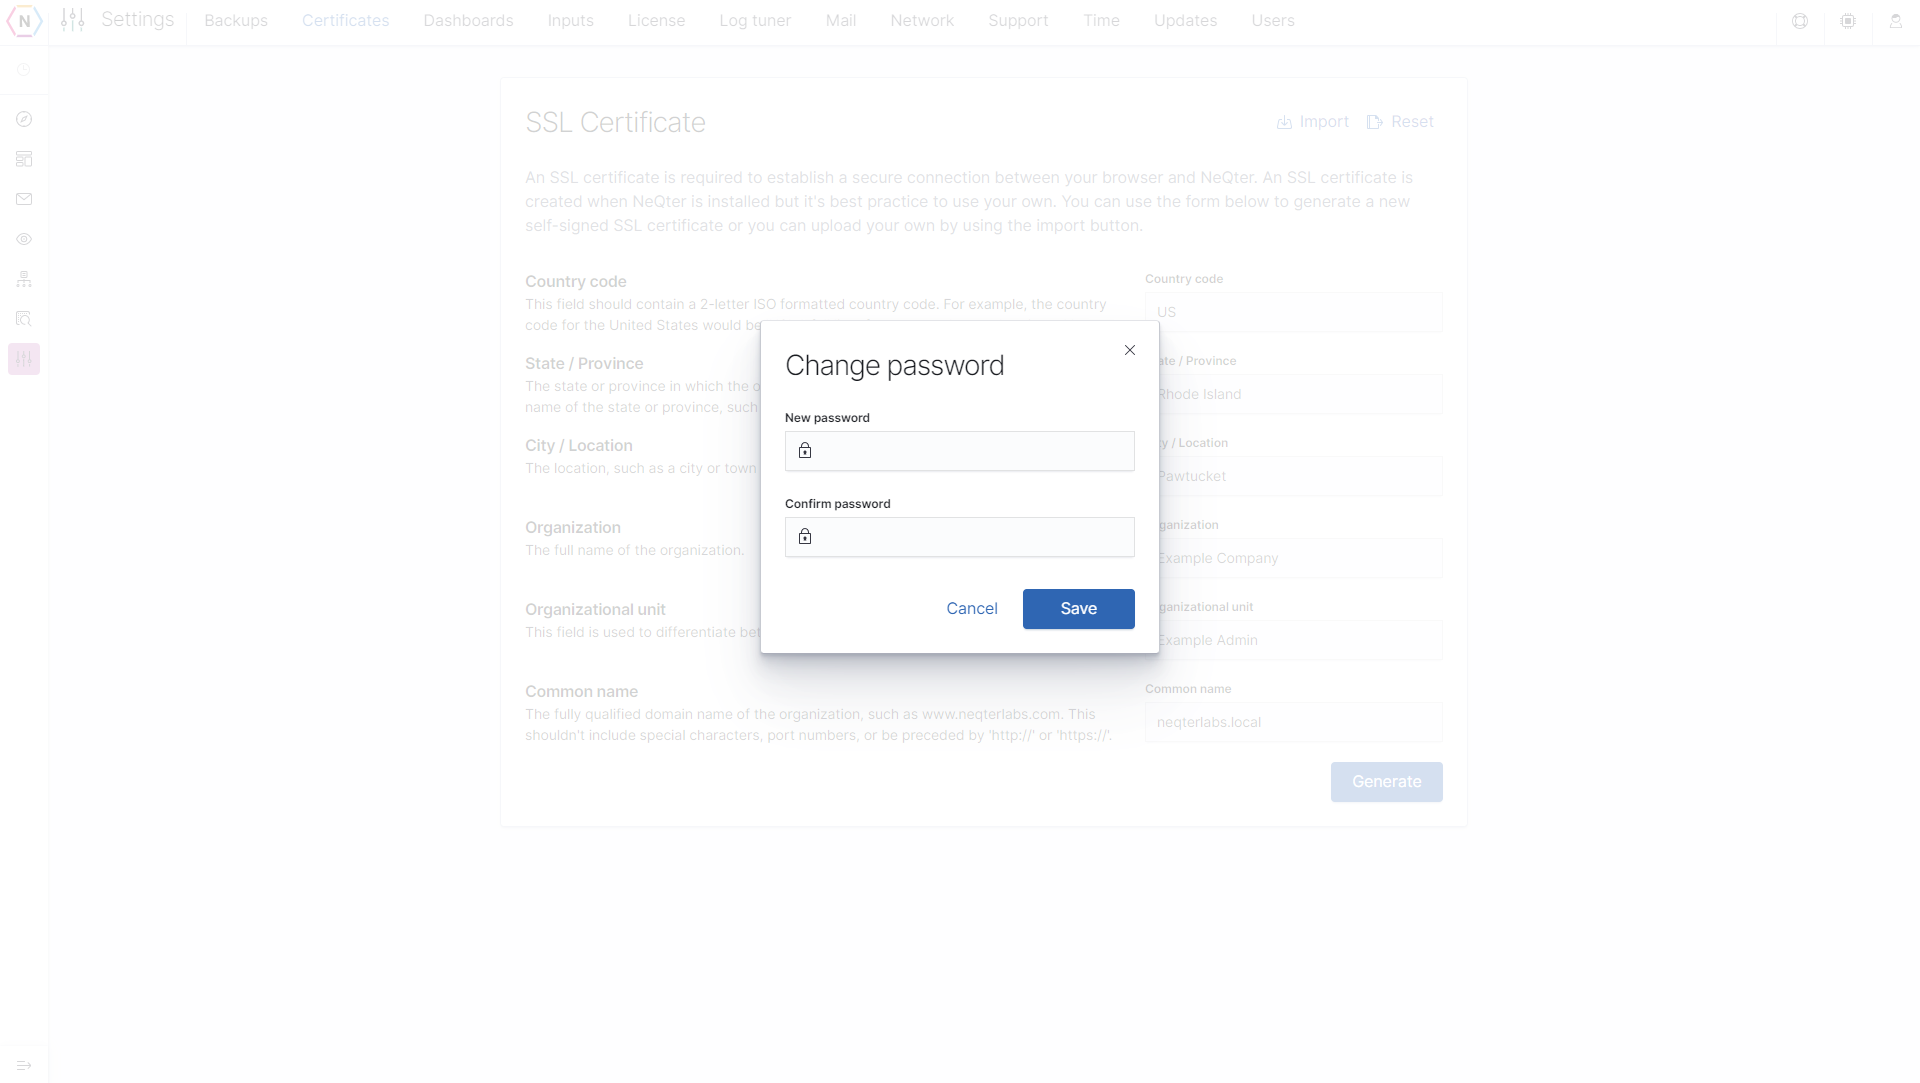
Changing Default Password
The first thing that should be done is to change the default administrators account password. Creating and removing accounts will be covered under User Configuration. From the navigation bar on the top, click on Admin, represented by the icon that looks like a person’s silhouette, and then click Change Password.